CloudBuild GKE Autopilot Private Cluster on New VPC
This method is to create a brand new VPC, dedicated for Cloud Build Private Pool usage, aiming to provide a fixed external IP for Cloud Build Private Pool without interfering with the existing VPC.
Scenario
- Ensure all network traffic is internal, but want the convenience of Autopilot GKE, so Private Cluster is needed
- If you want to connect to CloudSQL with a private IP without using CloudSQL Auth Proxy, then Autopilot GKE needs to use Private Cluster
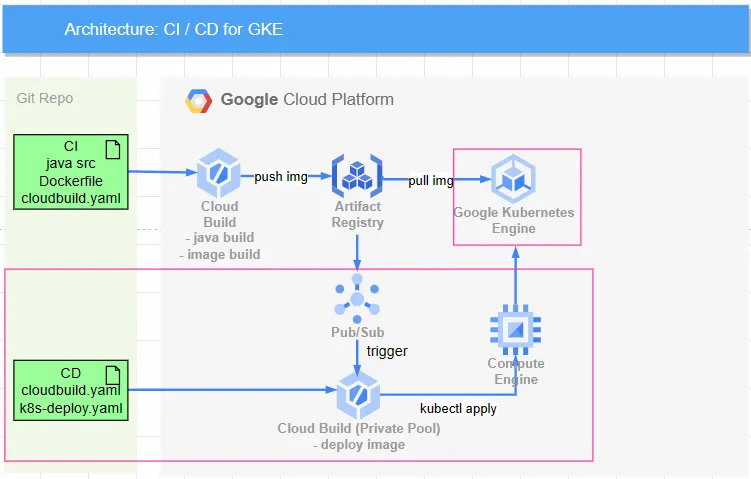
- The red box in the diagram below is the scope of this implementation. GKE uses a private cluster, CloudBuild below uses a private pool with an independent VPC, while CloudBuild above without a red box uses a public pool for CI. Details can be found in CloudBuild triggered by Pub/Sub
Process and Explanation
- Create a VPC network and enable Subnet PGA and NAT Gateway, so the pods in GKE will use the NAT Gateway for external networking
- Create a GKE autopilot Private Cluster
- (Optional) Use GCE as a bastion host, the service account must have Kubernetes Engine Developer permissions to get the GKE credentials
- Create Artifact Registry so GKE Private Cluster can directly connect through PGA
- Create a VPC network (red box in the diagram above) dedicated to CloudBuild and the necessary routes
- Create Cloud Build and use a Private Pool to ensure data flow remains within the private network with a fixed IP, thus an independent VM as a bastion from CloudBuild to GKE is needed
- The process becomes
CloudBuild to internal IP->VM (static internal IP & static public IP)->GKE(public IP) - When setting up the private pool for CloudBuild, do not check the option for external IP to ensure traffic stays within the VPC, but this means it cannot access the internet. For installing packages, it is recommended to separate private pool execution
- The process becomes
- Reserve the following two network segments to be unused by any services:
- CloudBuild reserves
192.168.10.0/24 - Docker bridge reserves
172.17.0.0/16(GCP must avoid using this segment)
Execution Steps
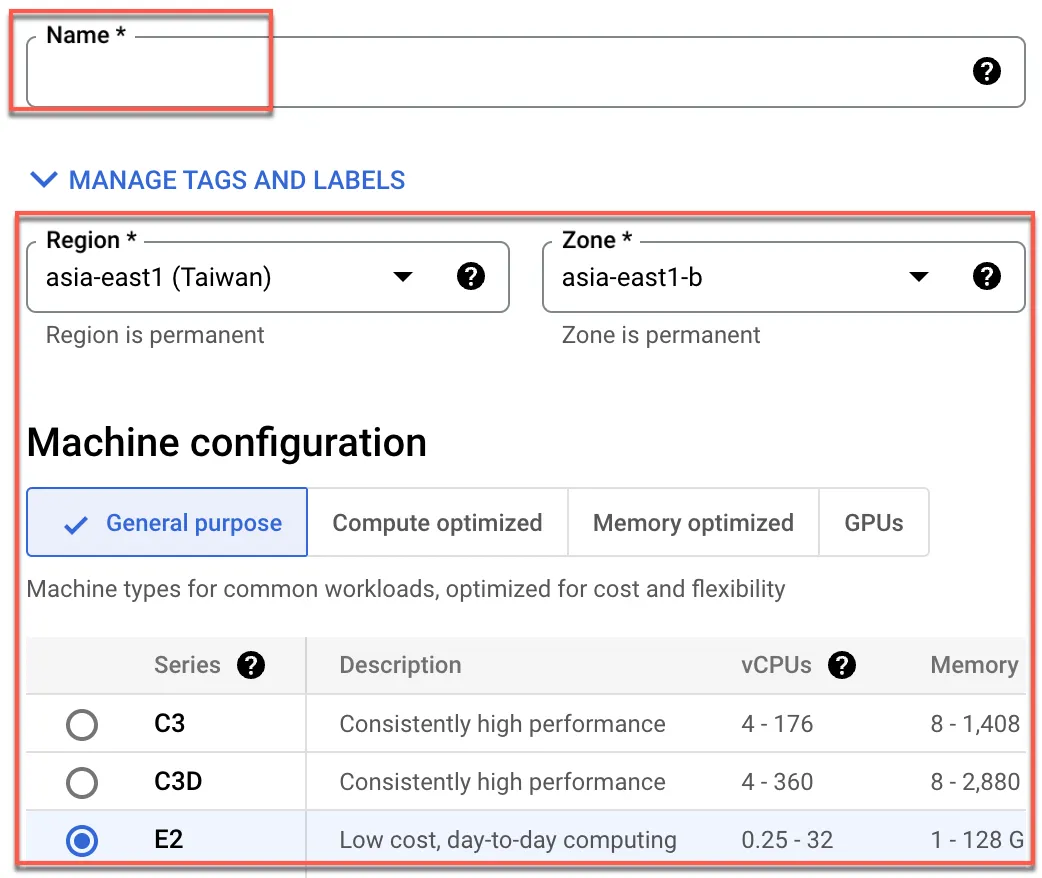
Create GKE VPC
This VPC is to provide external access for GKE Private cluster and is used for running internal services, not for Cloud Build Private Pool external access.

Enter the network name and choose Custom in Subnets
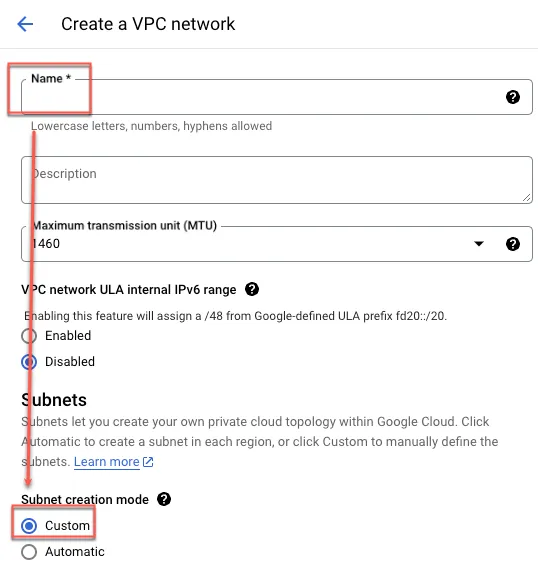
- Enter a name
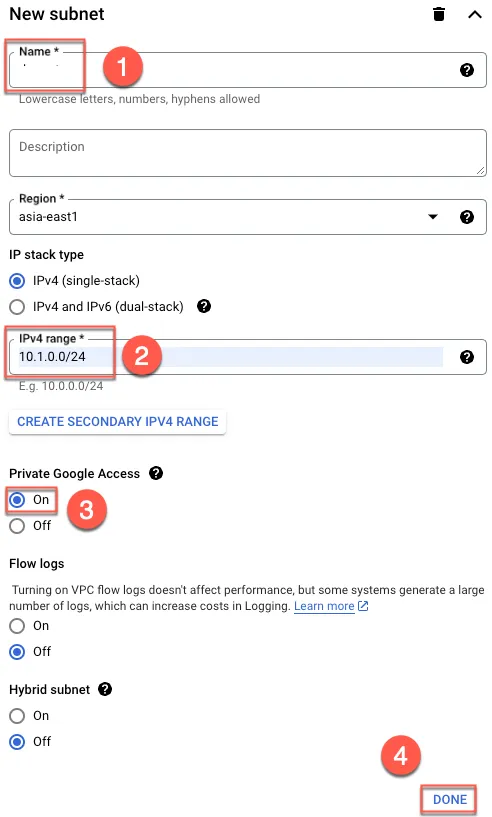
- Enter a custom subnet
- Enable PGA
- Done
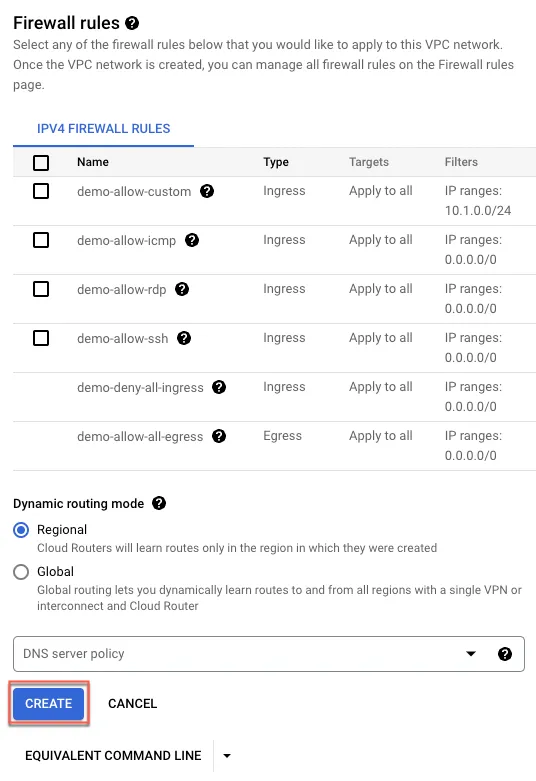
Click Create to create the VPC
Set up IAP Firewall
Ensure IAP can pass through the firewall by creating a rule to allow 35.235.240.0/20.
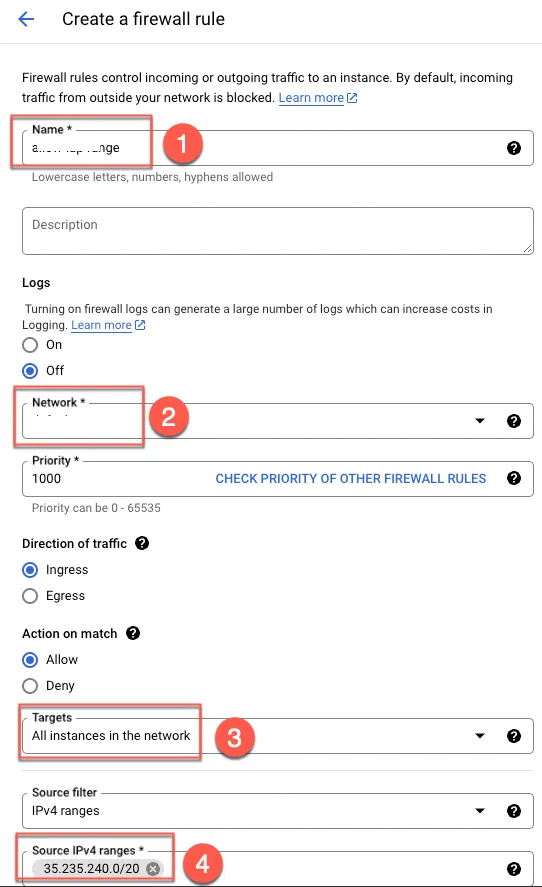
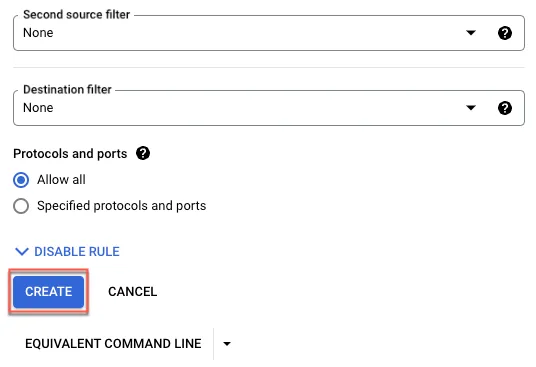
Click Create
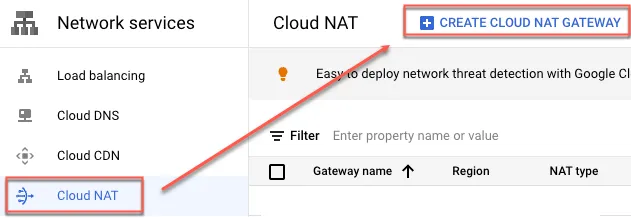
Set up NAT Gateway
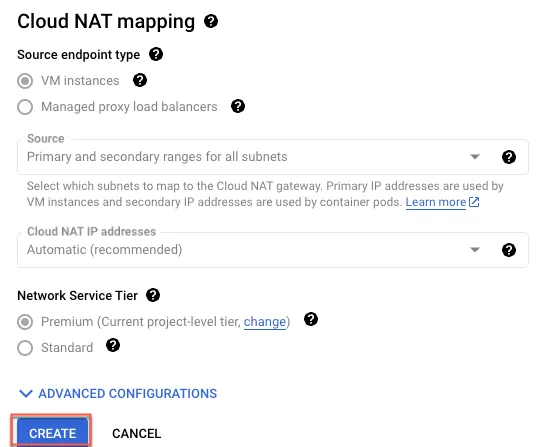
Create a NAT Gateway so all traffic can go out through a specific IP.
- Enter the gateway name
- Select VPC
- Choose the region
- Create a router
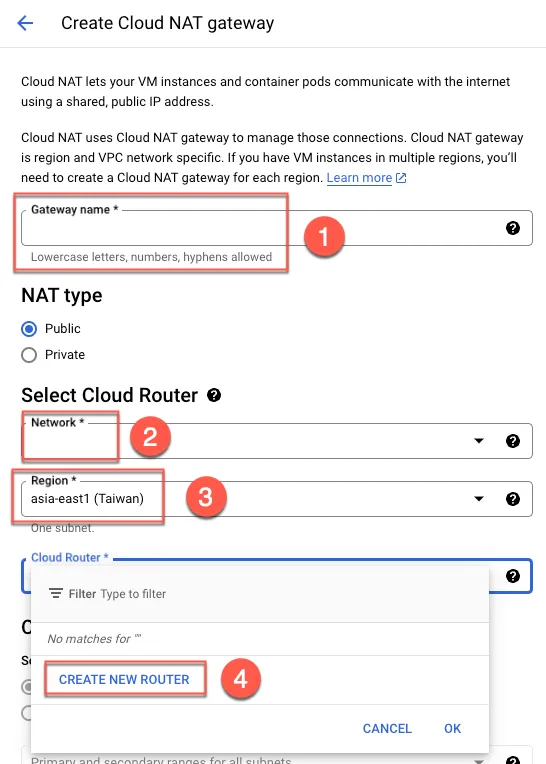
Enter the router name and click Create

Finally, create Cloud NAT
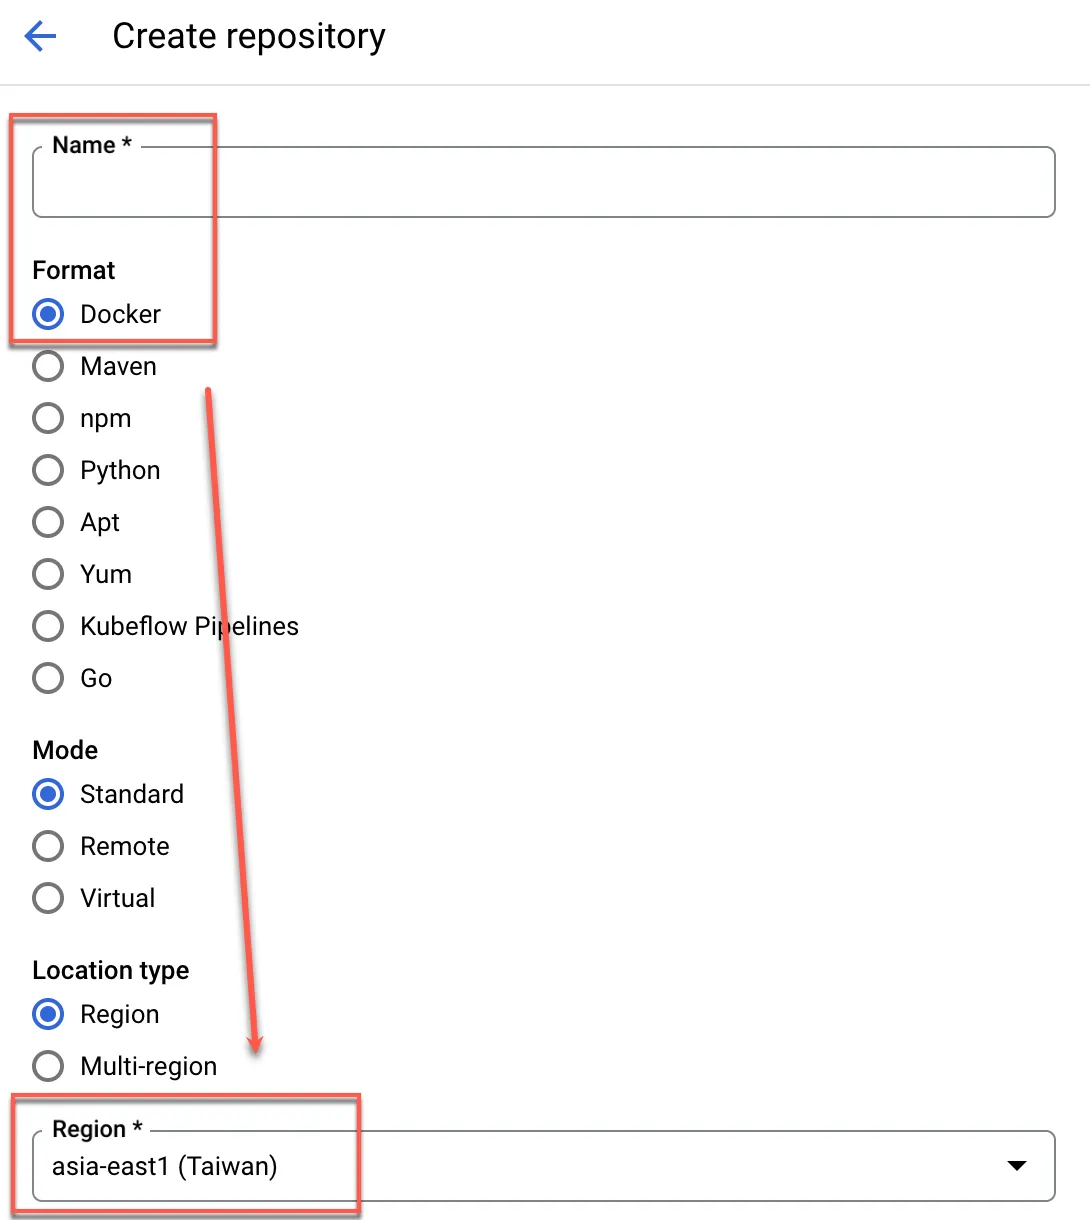
Create Artifact Registry
Click + Create

Enter the name, choose Docker format, and select the region to create.
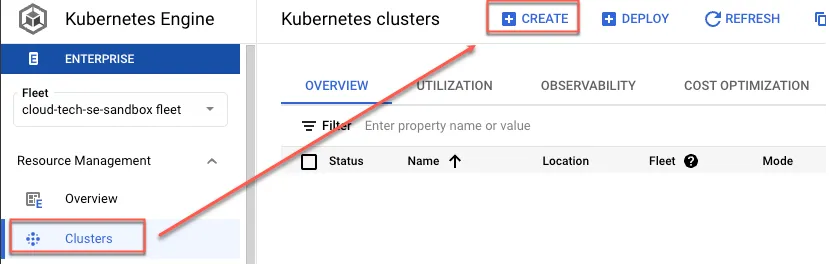
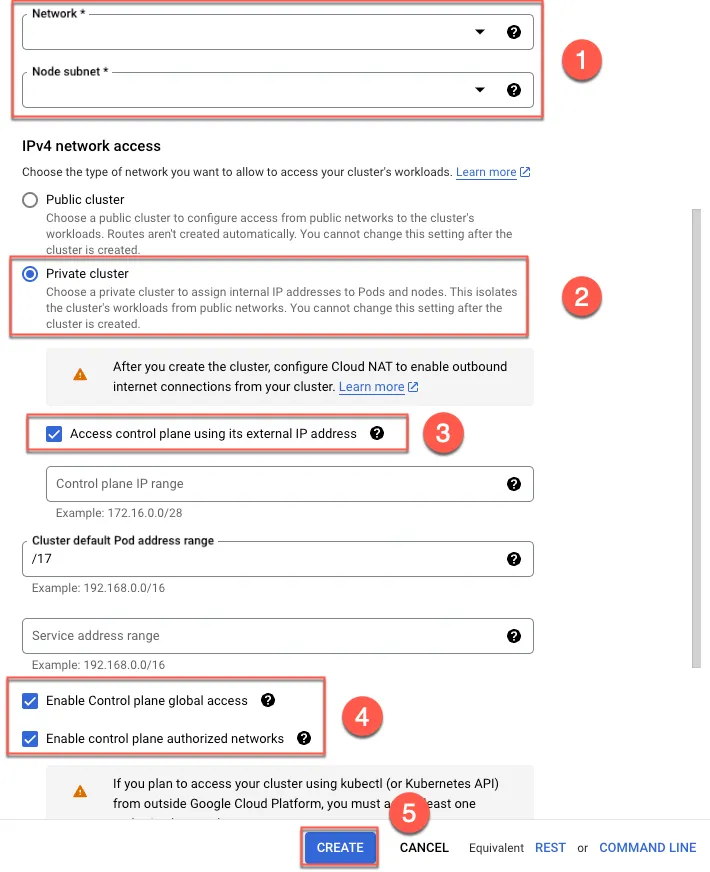
Create GKE autopilot Private Cluster
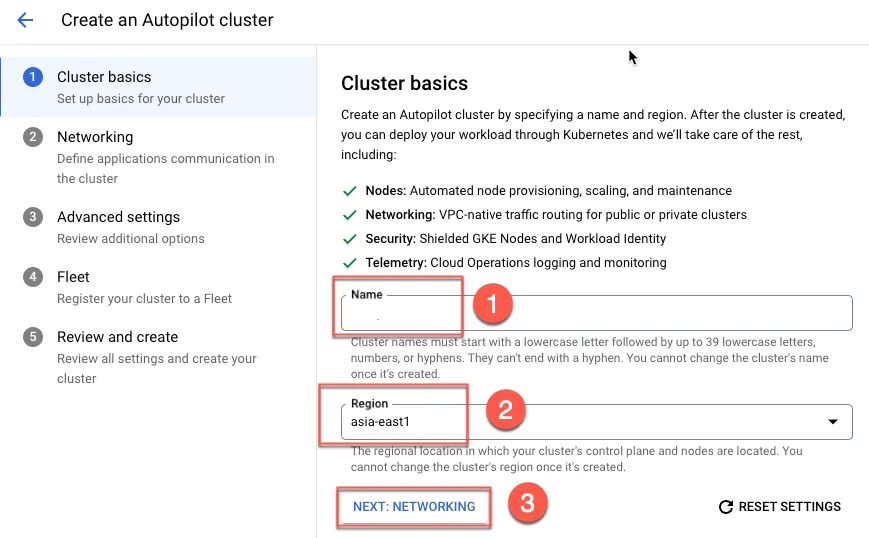
Create GKE
- Enter the name
- Select the region
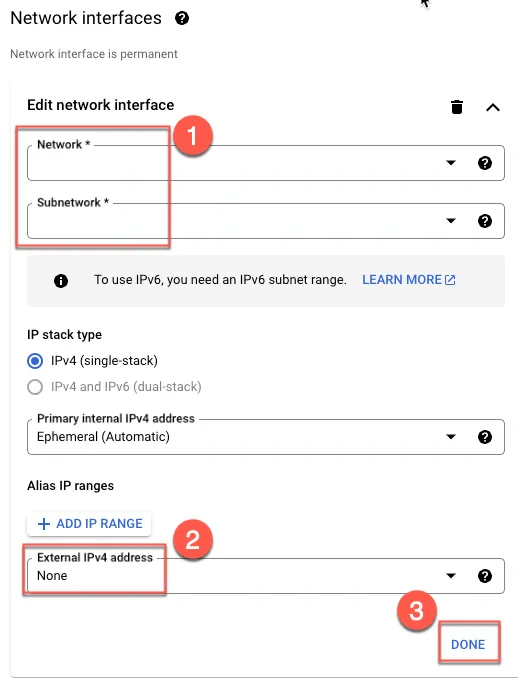
- Set up the network
- Select the network and subnet
- Choose private cluster
- Check to enable external connections
- Check to allow different regions to connect, and to lock specific external IPs to connect to the control plane
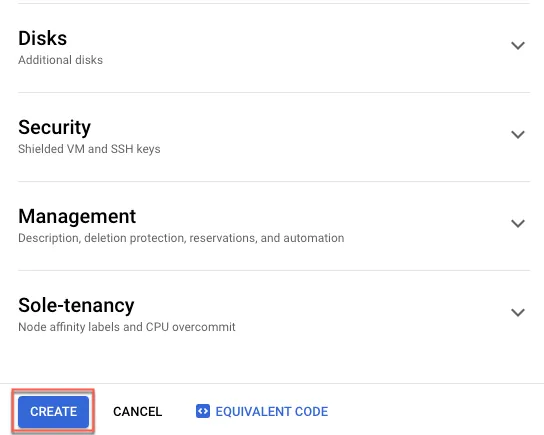
- Create
(Optional) Create Bastion VM
If you want the control plane to have no external access, you can use a VM in the same subnet as a bastion, or use a VPN in a production environment to connect from on-premise to the private cluster control plane.
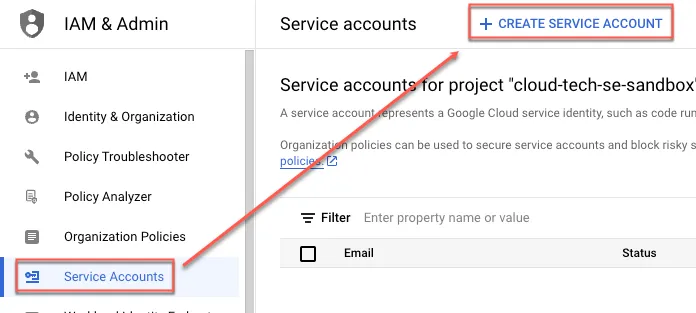
Create Service Account
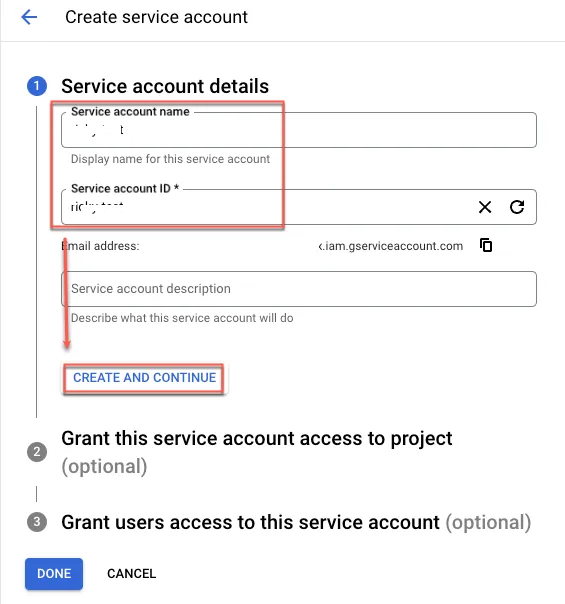
To allow the bastion VM to obtain and operate GKE, create a service account and provide permissions.
Enter the name, click Create and continue.
Grant the following permissions to complete:
- Kubernetes Engine Developer
- Logs Writer
- Monitoring Metric Writer
- Monitoring Viewer
- Stackdriver Resource Metadata Writer
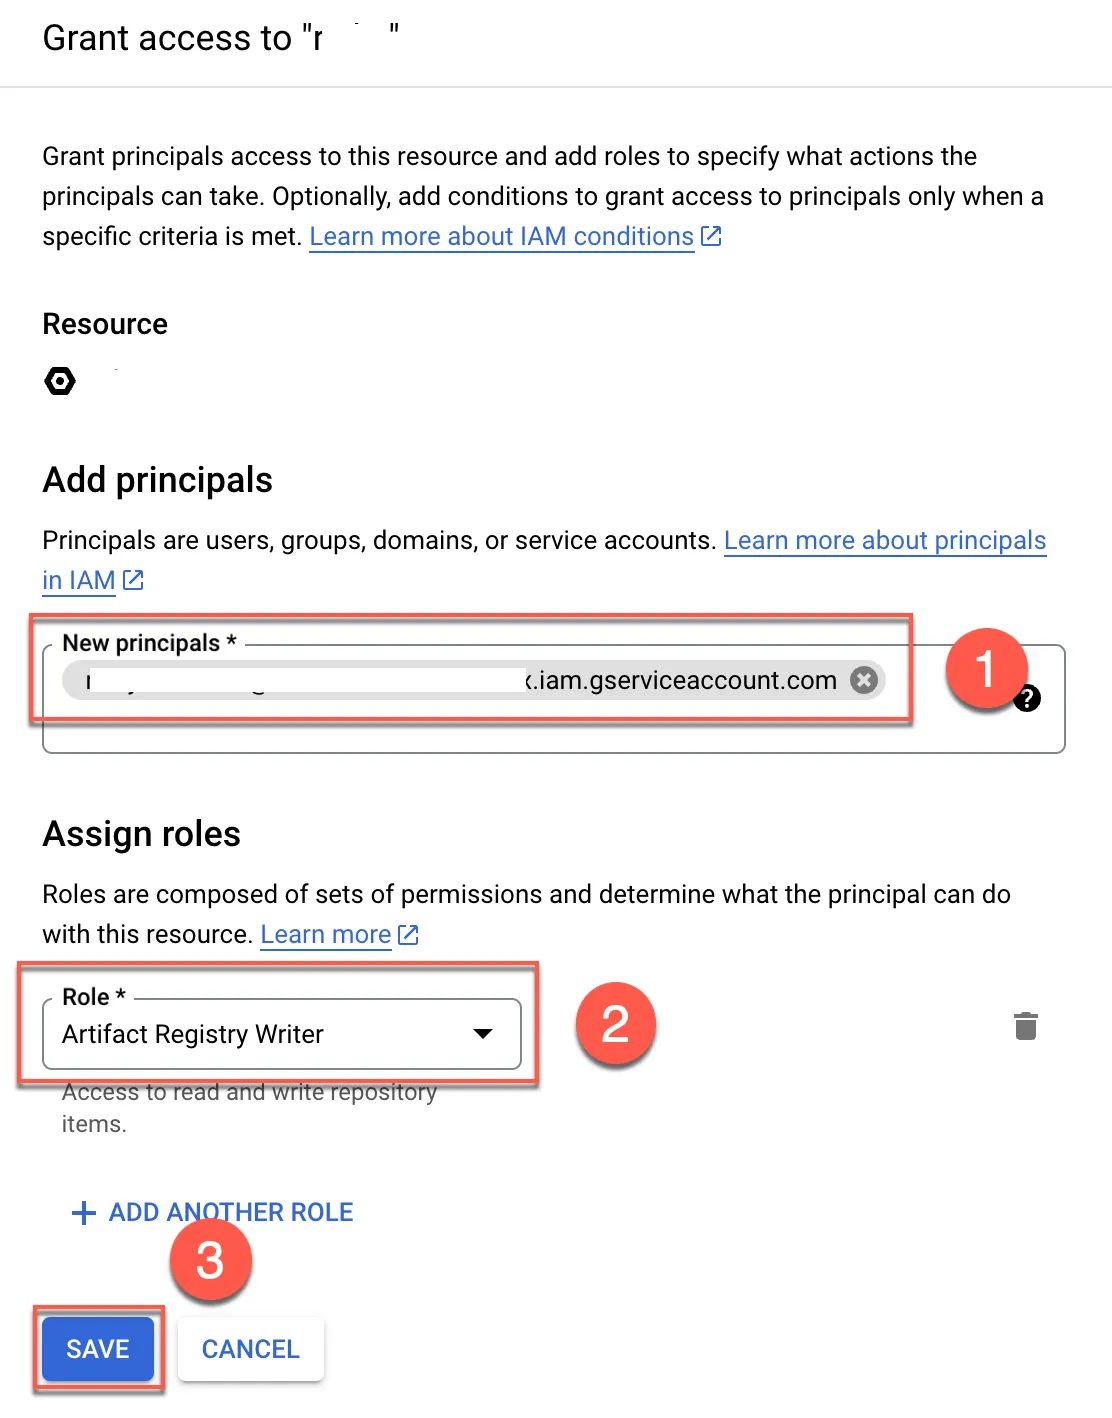
(Optional) Provide Artifact Registry Permissions to Bastion VM service account
- Add the previously created service account to Artifact Registry with the Artifact Registry Writer role.
- Check the previously created repo, click show info panel, and then click ADD PRINCIPAL
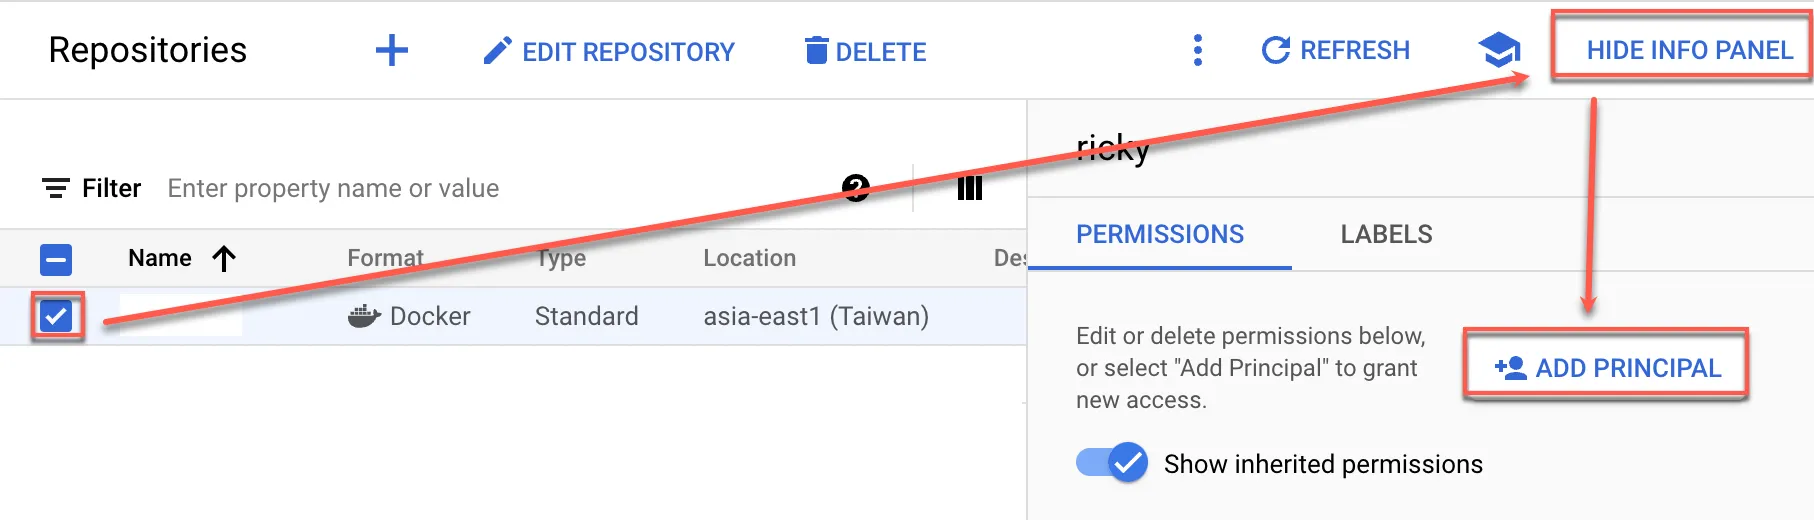
- Paste the previously created service account
- Add the Artifact Registry Writer permission
- Save
Create GCE VM
Create a VM within the same internal network as the GKE Cluster without an external IP.
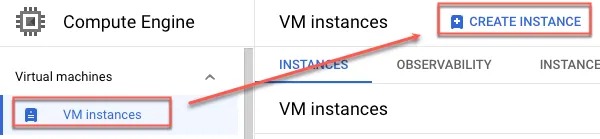
Enter the name and choose an appropriate VM size
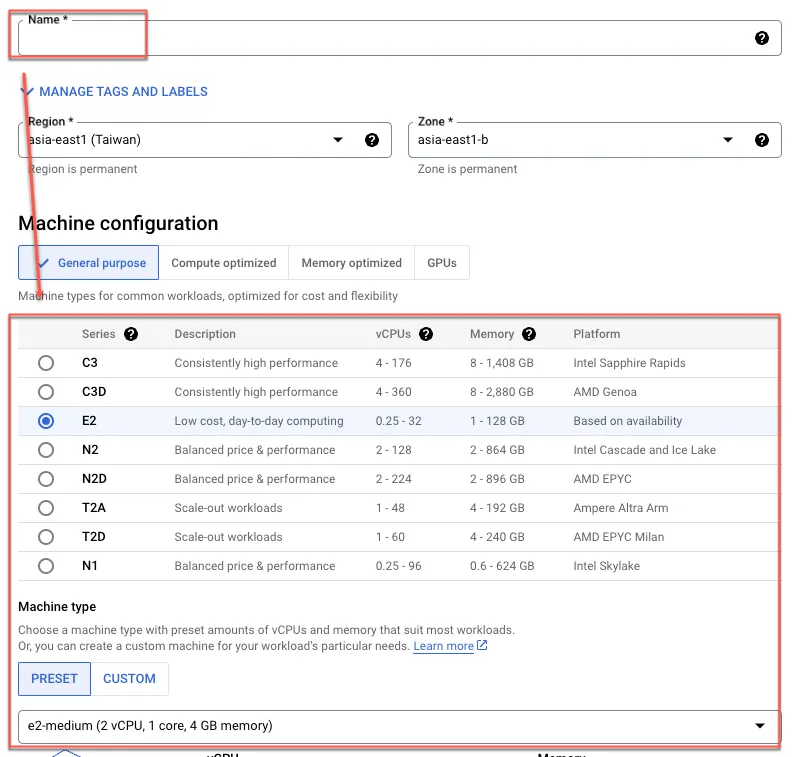
- Choose the operating system, for instance Ubuntu 22.04
- Select the previously created service account

Expand Advanced options and Networking
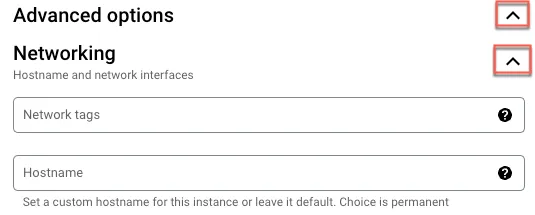
- Select the VPC and subnet created earlier
- Disable external IP
- Done
Create the VM
Test
Click SSH

Install gcloud
Refer to this document for installing gcloud commands.
1sudo su -2sudo apt-get update3sudo apt-get install apt-transport-https ca-certificates gnupg curl sudo4curl https://packages.cloud.google.com/apt/doc/apt-key.gpg | sudo gpg --dearmor -o /usr/share/keyrings/cloud.google.gpg5echo "deb [signed-by=/usr/share/keyrings/cloud.google.gpg] https://packages.cloud.google.com/apt cloud-sdk main" | sudo tee -a /etc/apt/sources.list.d/google-cloud-sdk.list6sudo apt-get update && sudo apt-get install google-cloud-cli7# Install kubectl and related packages8apt install kubectl google-cloud-sdk-gke-gcloud-auth-plugin -yConnect to the GKE cluster using the internal IP
1gcloud container clusters get-credentials CLUSTER_NAME --project=PROJECT_NAME --region=asia-east1 --internal-ip2# View kube config3cat ~/.kube/config4
5# Use kubectl to connect to the cluster; theoretically, there should be nothing, as no resources are created6kubectl get no -o wide
Install docker and push image to Artifact Registry
Follow this guide to install Docker.
1# Add Docker's official GPG key:2sudo apt-get update3sudo apt-get install ca-certificates curl gnupg4sudo install -m 0755 -d /etc/apt/keyrings5curl -fsSL https://download.docker.com/linux/ubuntu/gpg | sudo gpg --dearmor -o /etc/apt/keyrings/docker.gpg6sudo chmod a+r /etc/apt/keyrings/docker.gpg7
8# Add the repository to Apt sources:9echo \10  "deb [arch=$(dpkg --print-architecture) signed-by=/etc/apt/keyrings/docker.gpg] https://download.docker.com/linux/ubuntu \11  $(. /etc/os-release && echo "$VERSION_CODENAME") stable" | \12  sudo tee /etc/apt/sources.list.d/docker.list > /dev/null13sudo apt-get update14
15# Install Packages16sudo apt-get install docker-ce docker-ce-cli containerd.io docker-buildx-plugin docker-compose-plugin
Docker push image to Registry
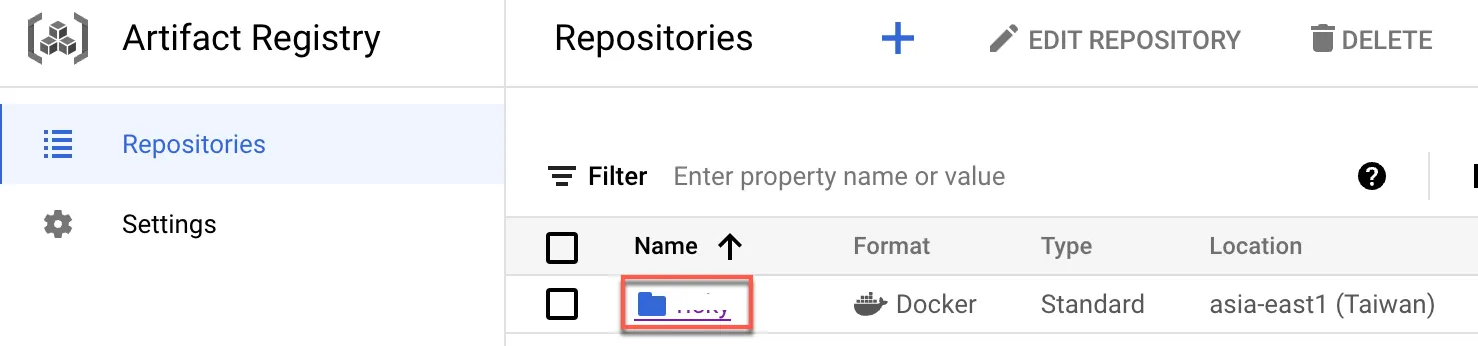
Click the repo that was created in Artifact Registry
Copy the path, then click SETUP INSTRUCTIONS

Copy configure docker command
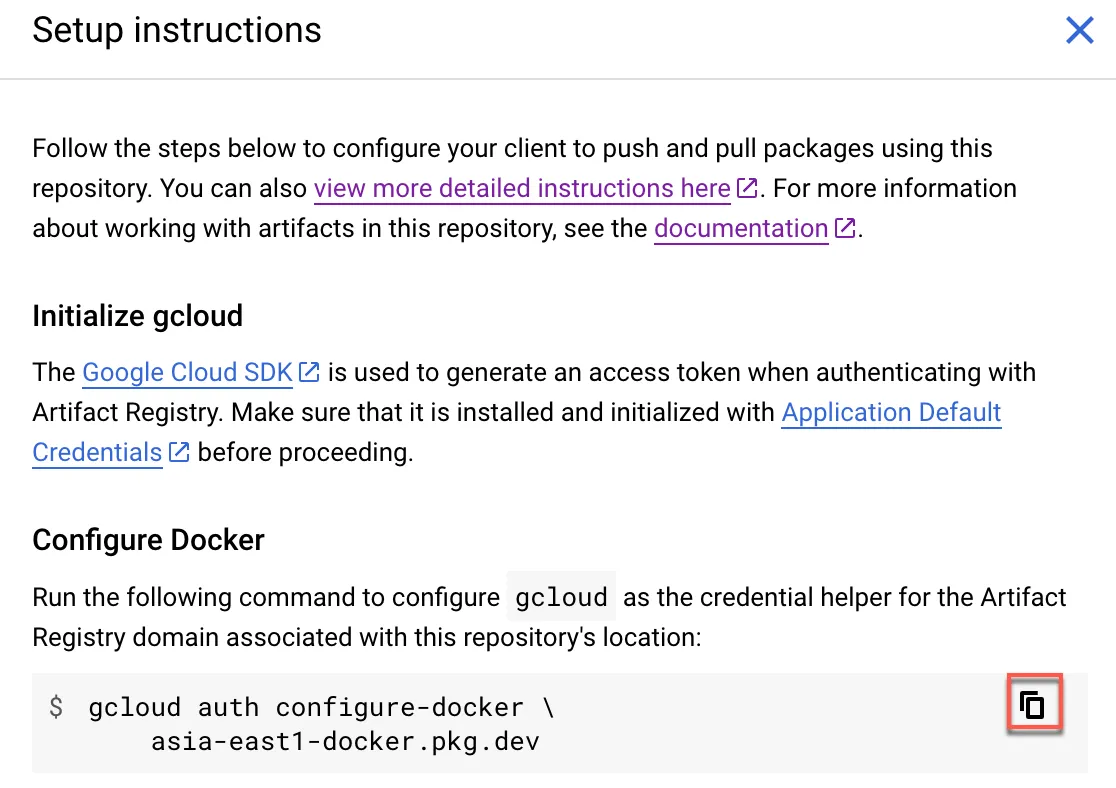
Paste the command in the console
1gcloud auth configure-docker asia-east1-docker.pkg.devExpected result; during the process, input Y to agree:
1Adding credentials for: asia-east1-docker.pkg.dev2After update, the following will be written to your Docker config file located at3[/root/.docker/config.json]:4{5 "credHelpers": {6   "asia-east1-docker.pkg.dev": "gcloud"7 }8}9
10Do you want to continue (Y/n)?  Y11
12Docker configuration file updated.
Pull Ubuntu image and push it to Artifact Registry
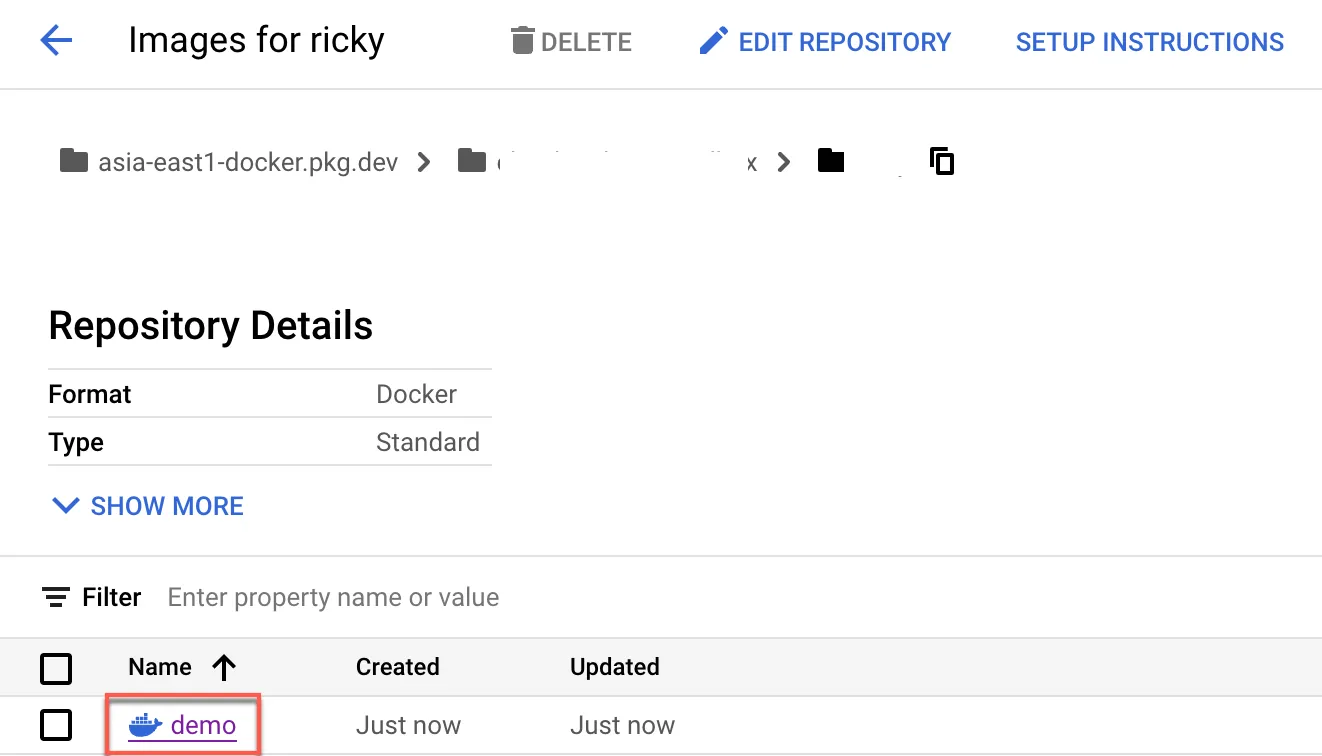
1docker pull ubuntu2
3# Tag with the copied path and name + tag4docker tag ubuntu:latest asia-east1-docker.pkg.dev/PROJECT_NAME/REPO_NAME/demo:latest5
6# Push to the repo7docker push asia-east1-docker.pkg.dev/PROJECT_NAME/REPO_NAME/demo:latest
Now, the image should be stored in Artifact Registry.
Deploy image to GKE
Use the following yaml for deployment and change the image path to the one used earlier for push.
1echo 'apiVersion: v12kind: Pod3metadata:4 name: ubuntu5spec:6 containers:7 - name: ubuntu8 image: asia-east1-docker.pkg.dev/PROJECT_NAME/REPO_NAME/demo:latest9 # Just spin & wait forever10 command: [ "/bin/bash", "-c", "--" ]11 args: [ "while true; do sleep 30000; done;" ]' > sleep.yamlDeploy to GKE autopilot, it can take several minutes to complete the deployment
1kubectl apply -f sleep.yaml2kubectl get poExpected result:
1NAME READY STATUS RESTARTS AGE2ubuntu 1/1 Running 0 4m21sCheck if the external IP is the NAT Gateway IP
1kubectl exec ubuntu -it -- apt update > /dev/null && apt install -y curl > /dev/null && curl https://api.ipify.orgAfter testing, remove the pod
1kubectl delete -f sleep.yamlCreate CloudBuild Private Pool VPC
The following steps are based on this and this document.
Create new VPC
Same method as creating “GKE VPC”, configure as follows:
- VPC Name:
build-network - Subnet Name:
nat-subnet - IP:
10.1.0.0/24 - Region:
asia-east1
Create PSA
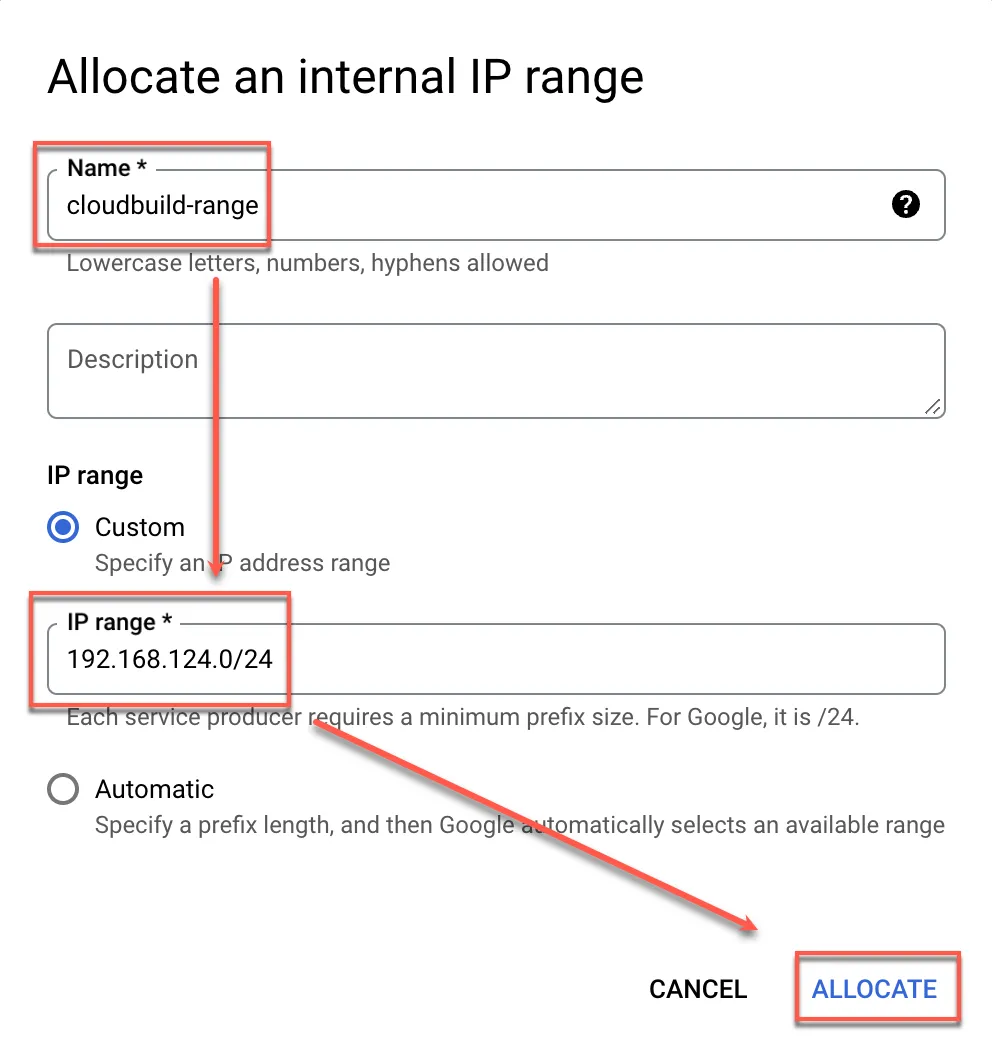
Open VPC to create IP RANGE
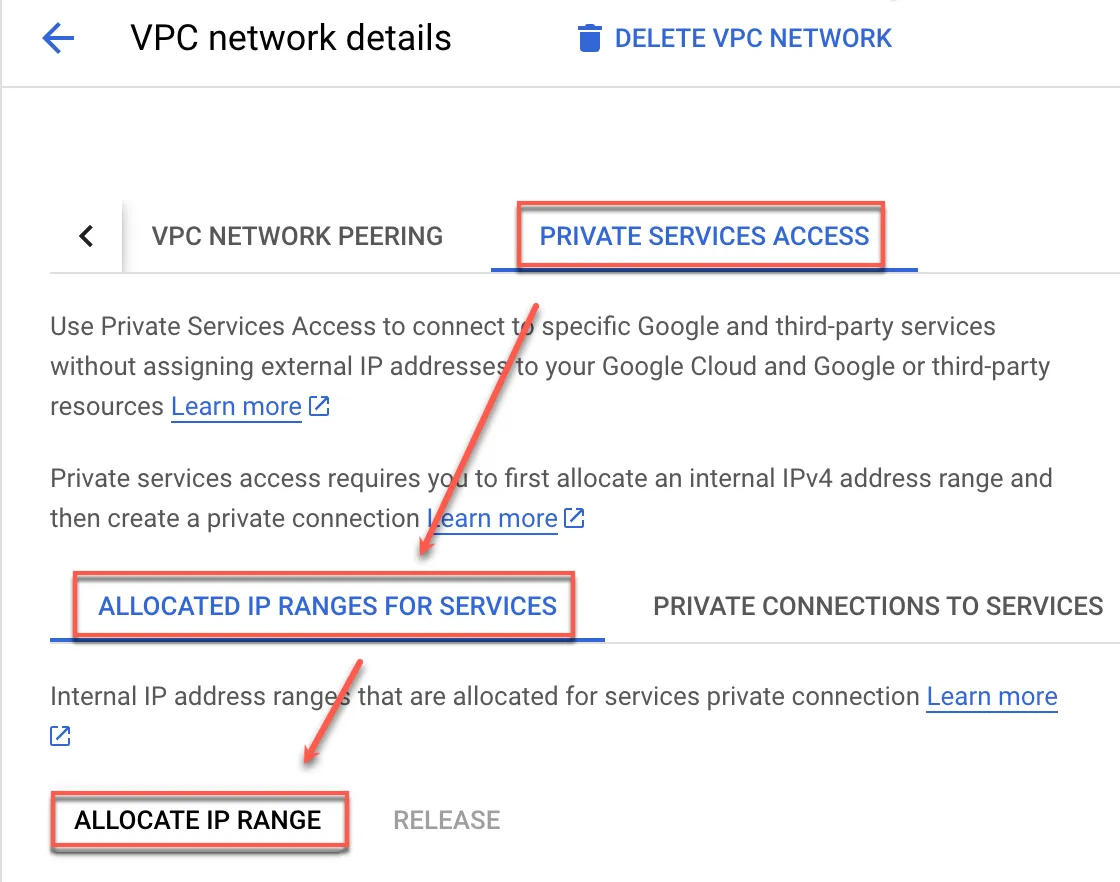
Allocate IP range
After creation, ensure the firewall allows this segment
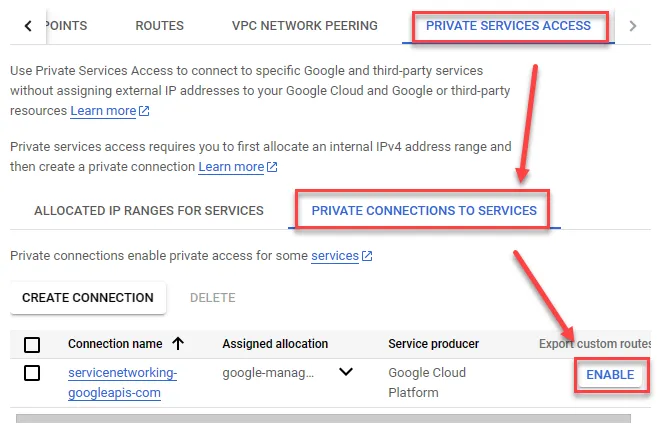
Create Private connections to services
Click Create connection
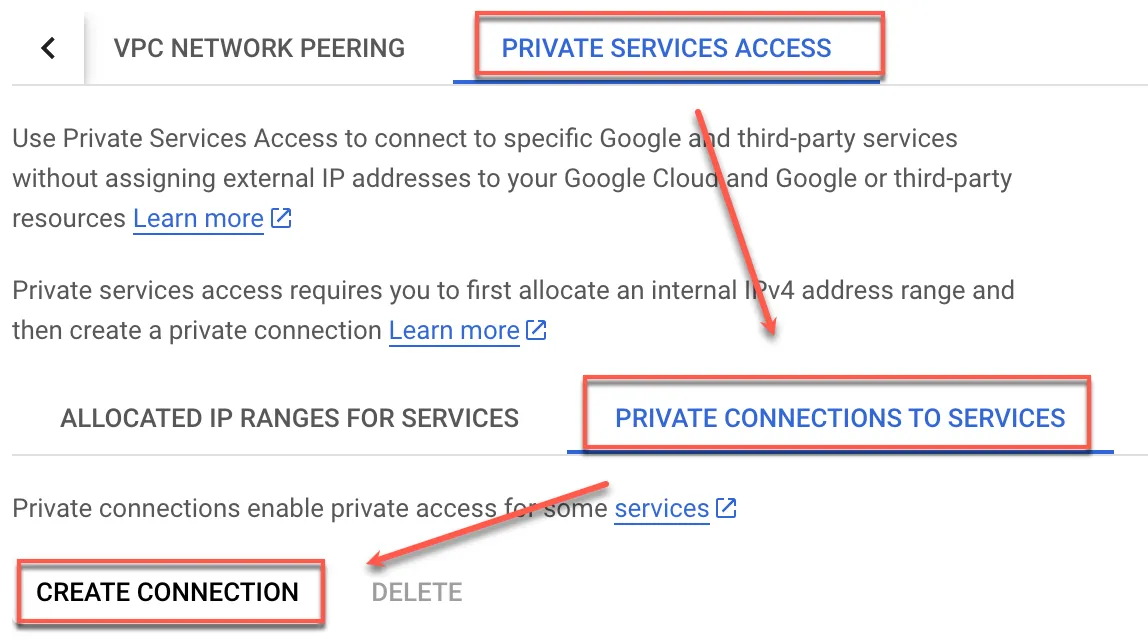
Select Google Cloud Platform and check the newly created subnet
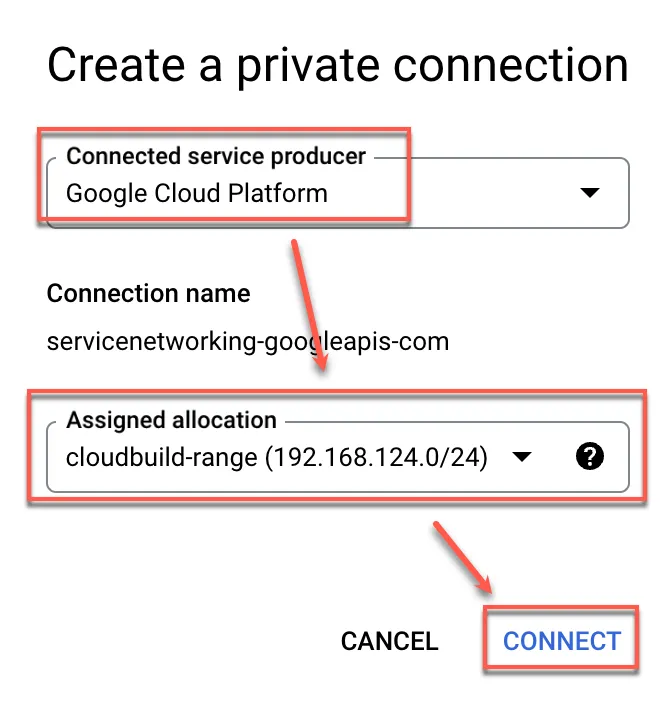
Open Export custom route
Firewall Settings
- Name:
allow-pool-to-nat - Direction of traffic:
Ingress - Action on match:
Allow - Targets:
Specified target tags - Target tags:
nat-gateway - Source IPv4 Ranges:
192.168.124.0/24 - Protocols and ports:
Allow all
Create CloudBuild
Set Cloud Build Network Environment
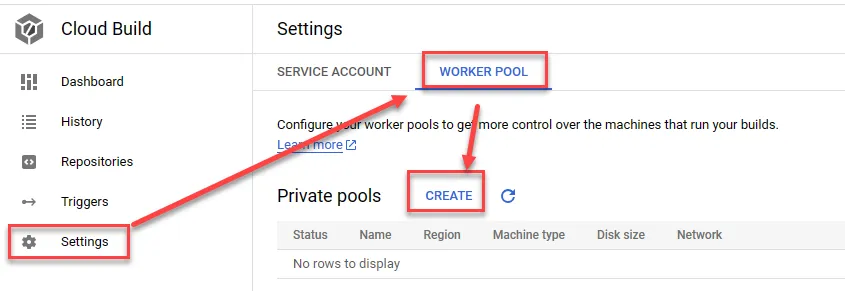
Click me to enable the necessary API and refer to this document to create Private Pool.
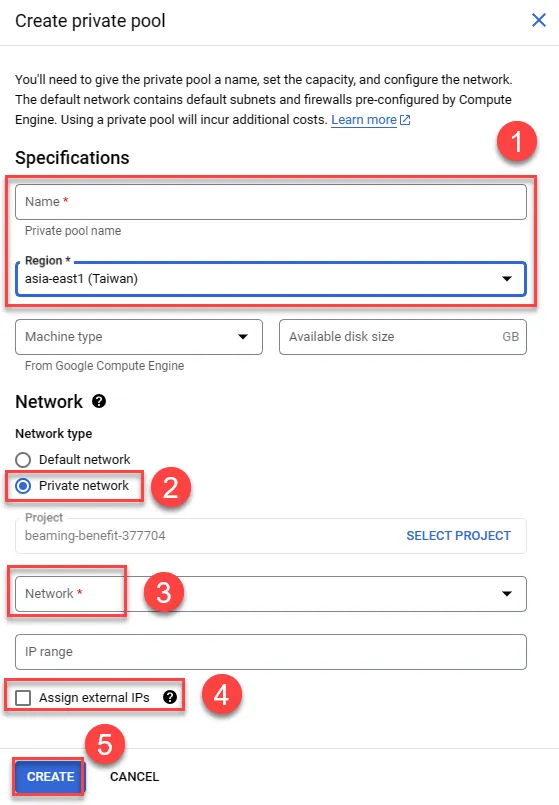
Create a worker pool.
- Enter name and select region
- Choose Private network
- Select the created VPC network (build-network)
- Do not assign an external IP to ensure connections through private VPC
- Create, using default settings of e2-medium and providing 100GB disk space
Create Bridging VM
Refer to this document to ensure CloudBuild uses a fixed IP when connecting to GKE.
Create VM, enter the name, choose the region and an appropriate size, e.g., e2-micro
- Expand advanced settings for the network setup
- Input network tags: direct-gateway-access, nat-gateway to be used later
- Enable IP forwarding
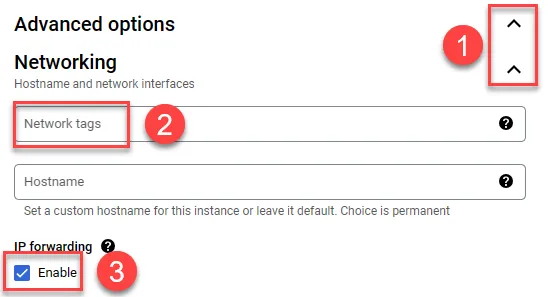
- Select the created VPC network (build-network) and its subnetwork
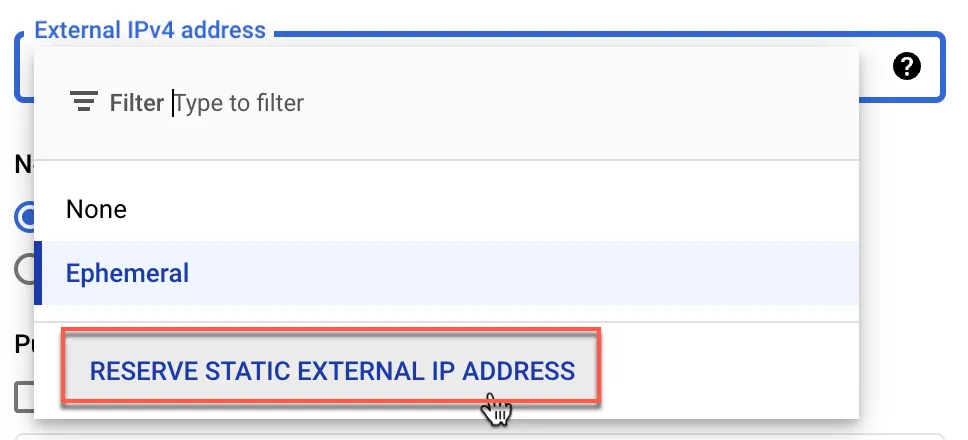
- Reserve static IP
- Done
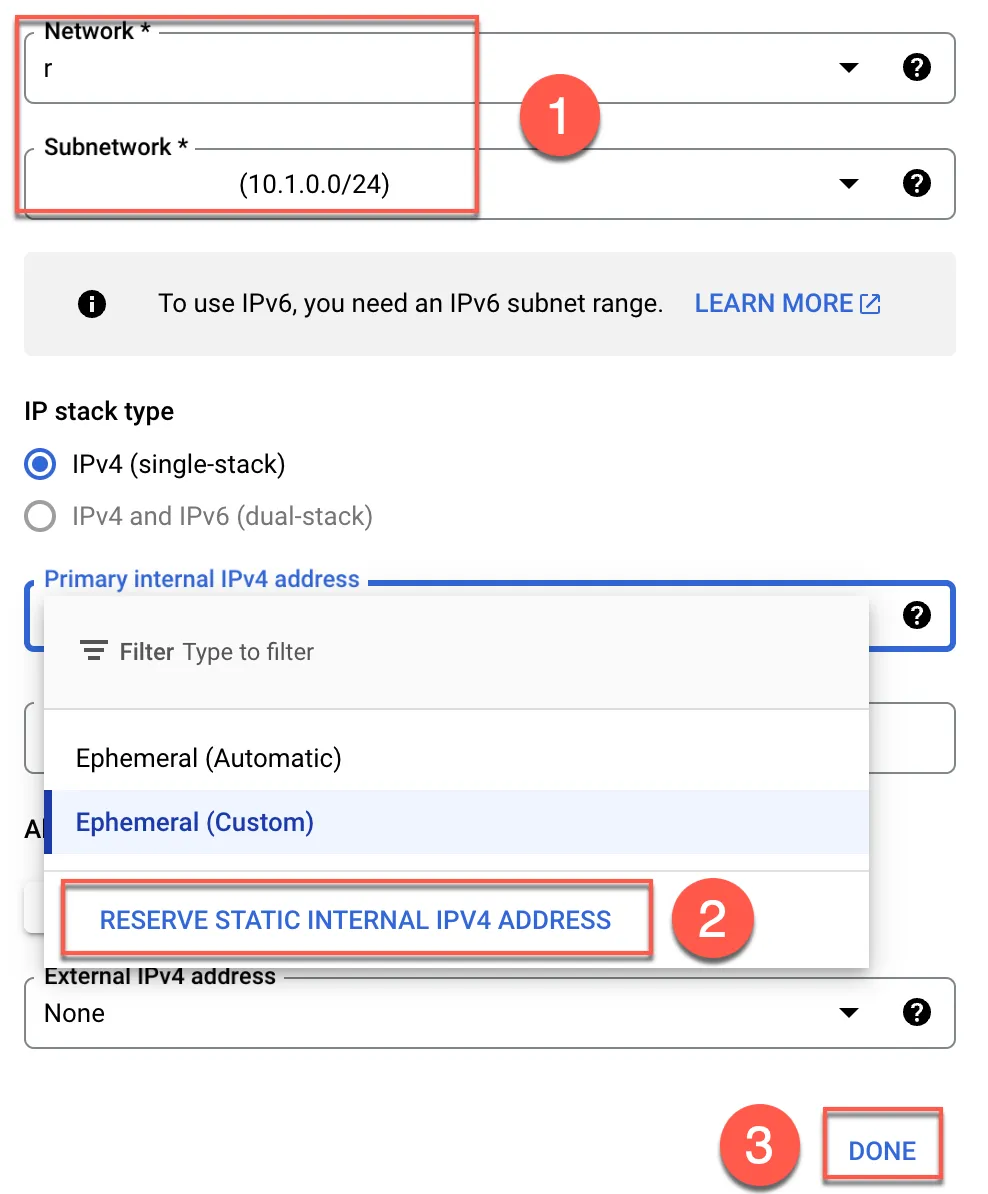
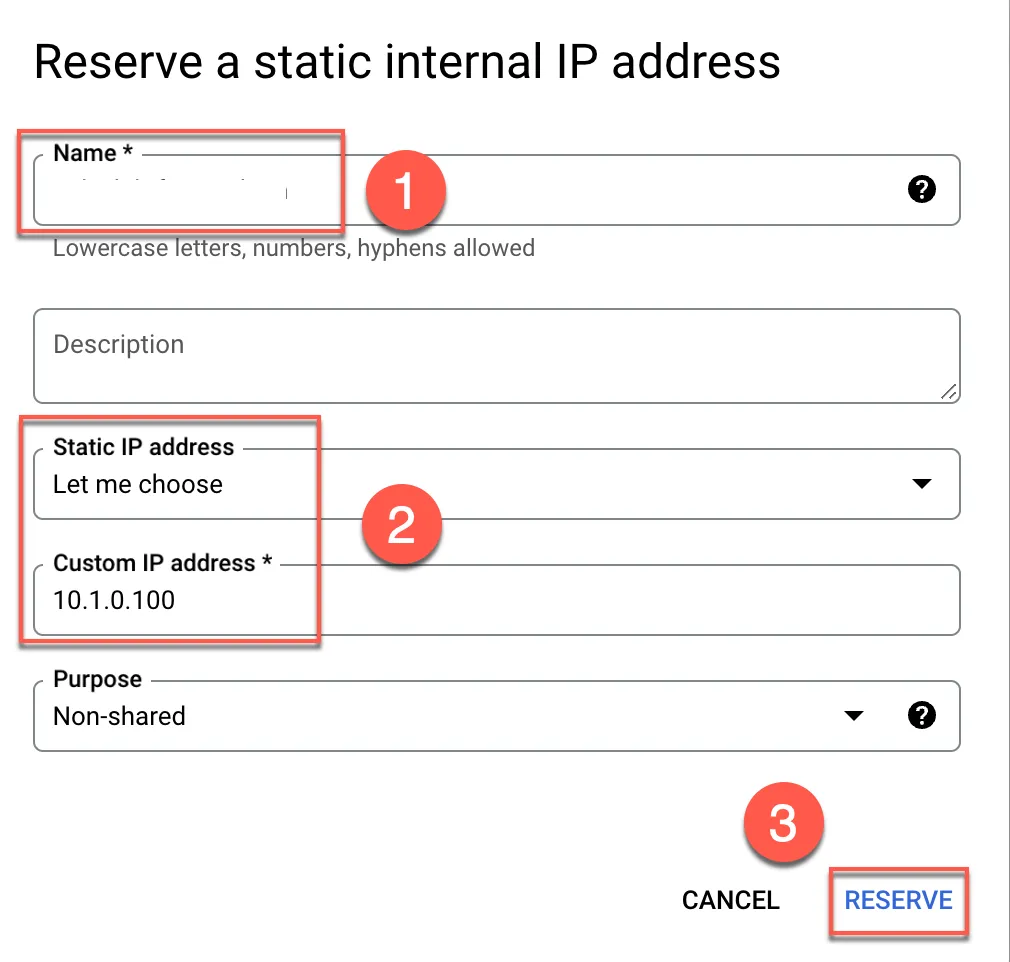
- Enter the name for the reserved IP
- Customize the IP or let it auto-allocate
- Reserve
Also, reserve a public IP
Paste the following startup script in the startup script field
1sysctl -w net.ipv4.ip_forward=12iptables -t nat -A POSTROUTING -o $(ip addr show scope global | head -1 | awk -F: '{print $2}') -j MASQUERADE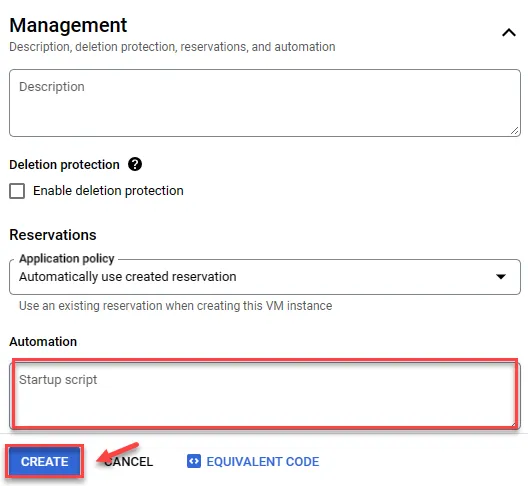
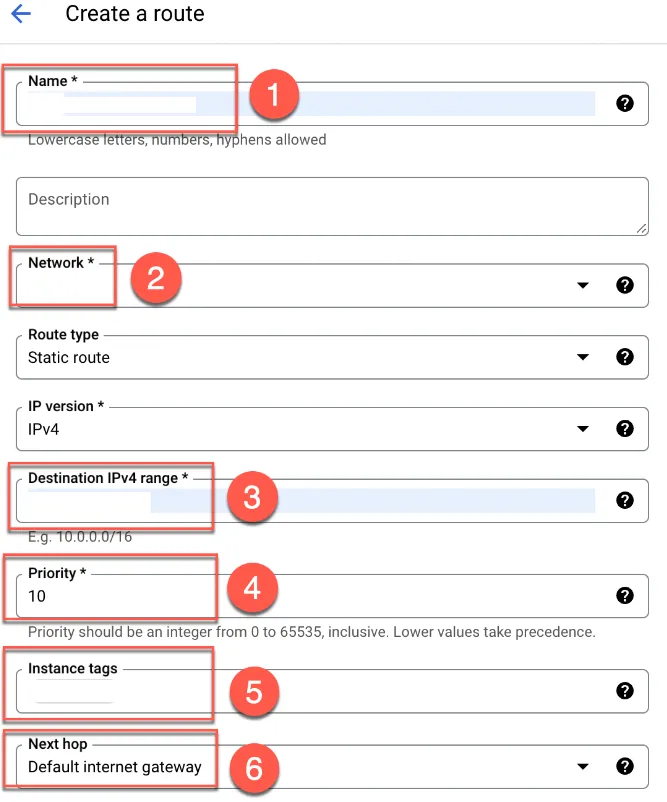
Create VPC Routes
To ensure all outgoing connections use fixed IP, create 4 routes. The main reason is to avoid the default 0.0.0.0/0. Thus, use 0.0.0.0/1 and 128.0.0.0/1 to prioritize.
- Redirect all traffic to the Bridging VM, priority
1000.0.0.0/1-> VM128.0.0.0/1-> VM
- Redirect traffic from the Bridging VM to the Default internet gateway (i.e., the VM’s public IP), priority
10(higher than the first two routes)- VM (
0.0.0.0/1) -> Default internet gateway - VM (
128.0.0.0/1) -> Default internet gateway
- VM (
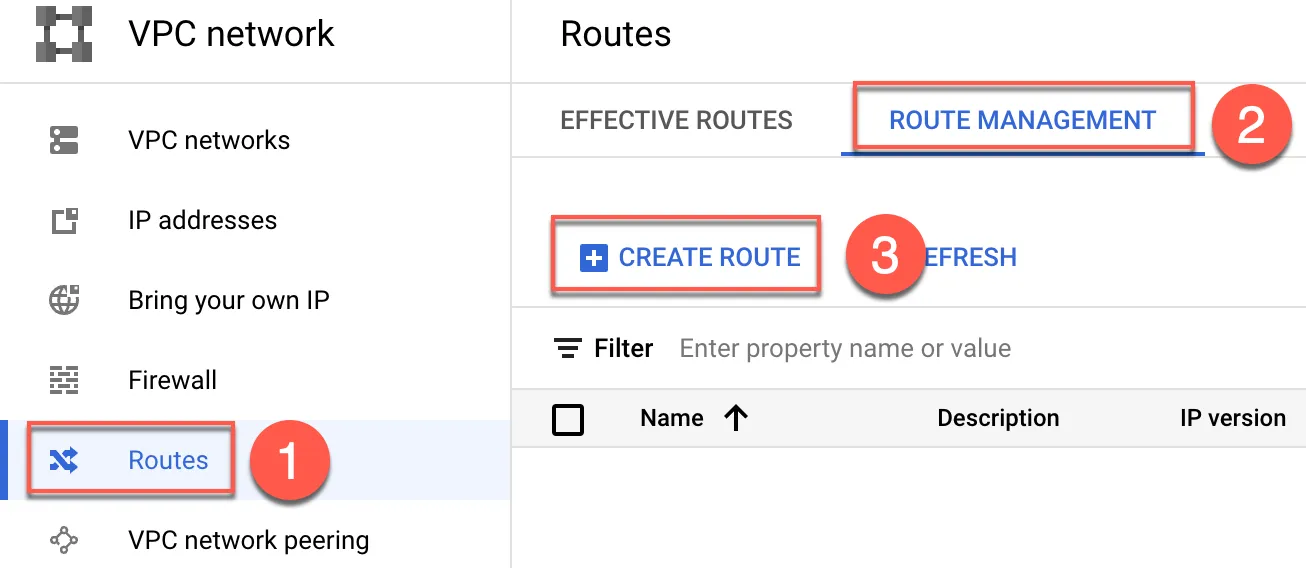
Open VPC Route and create
- Select Routes
- Click ROUTE MANAGEMENT
- Create ROUTE
The first two routes redirect all traffic to the VM as follows
- Name them
through-nat,through-nat2respectively - Select the VPC (
build-network) - Enter
0.0.0.0/1and128.0.0.0/1respectively - Set priority as
100 - Specify the next hop for all outgoing traffic and enter the previously created
VM internal static IP
Click Create at the bottom and create two routes.
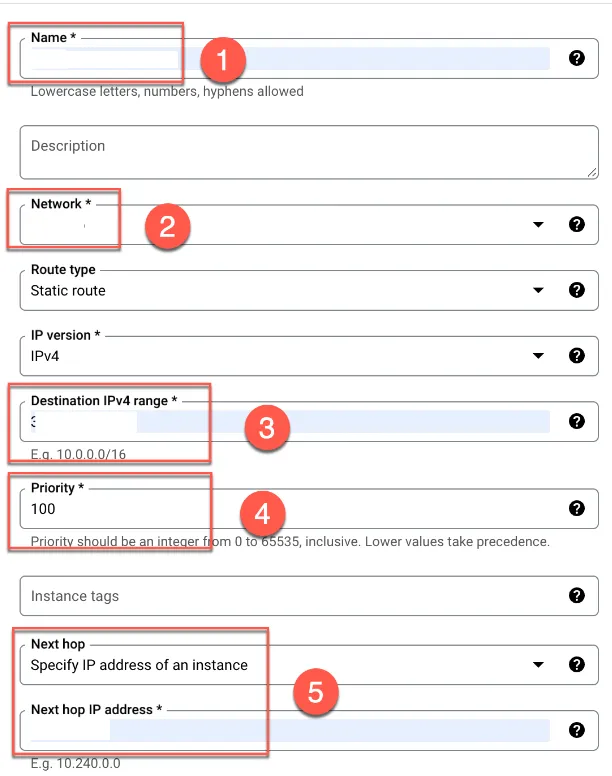
The next two routes allow traffic from the VM to the external IP. Configure as follows:
- Name them
direct-to-gateway1anddirect-to-gateway2 - Select the VPC (
build-network) - Enter
0.0.0.0/1and128.0.0.0/1respectively - Set priority as
10(lower than the first two routes) - Enter the tag:
direct-gateway-access - Next hop:
Default internet gateway
Click Create at the bottom and create two routes.
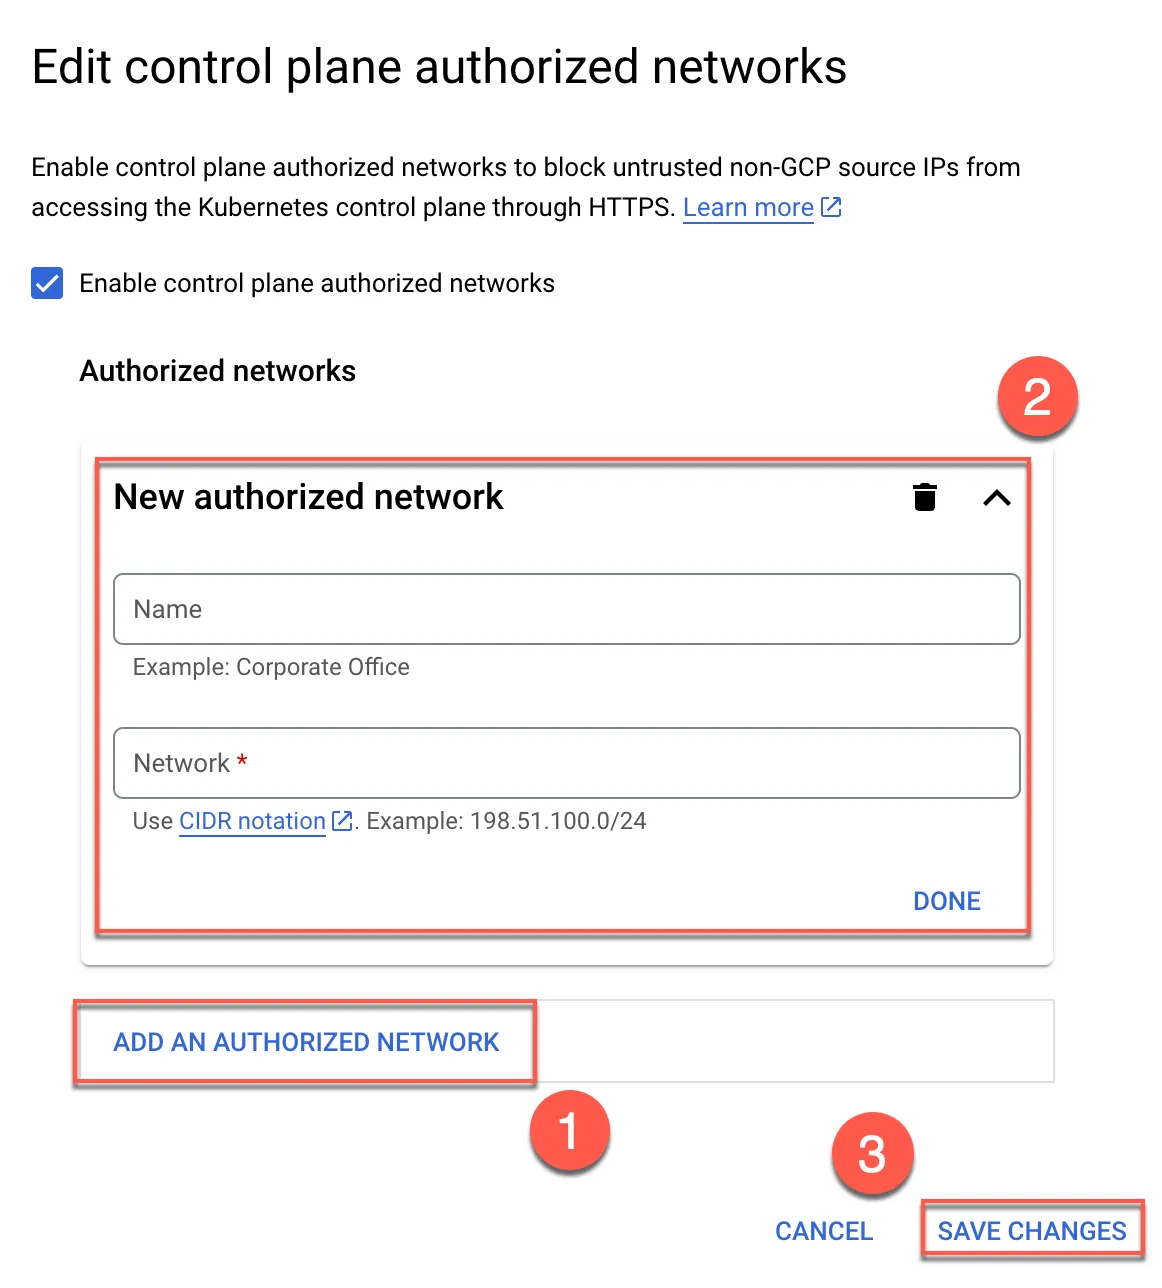
Set GKE Authorized Network
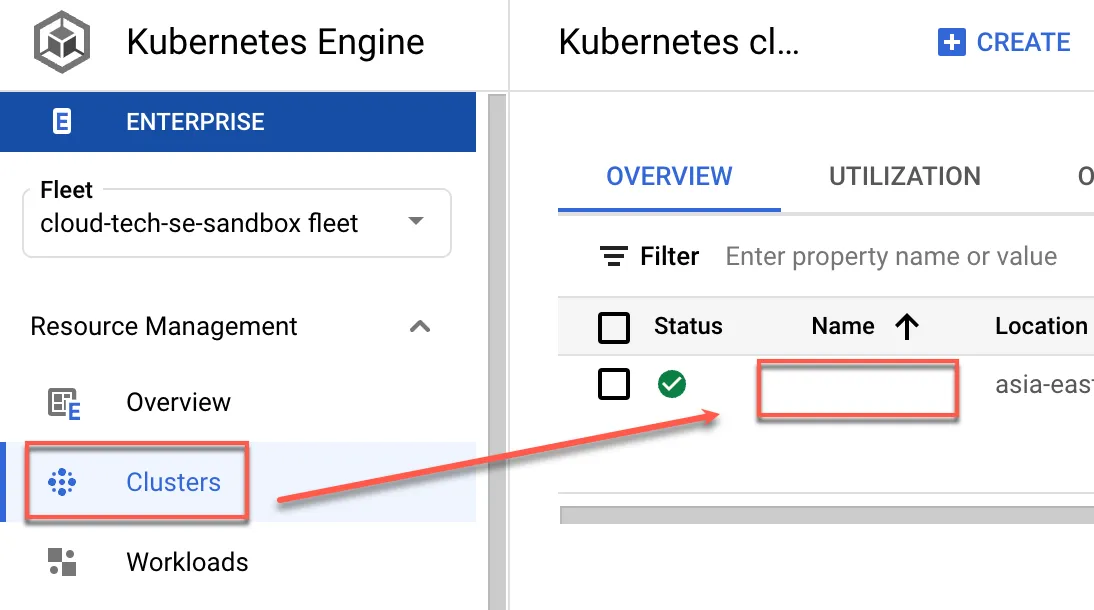
Configure to allow connection from the previously created Bridging VM. Click on the created GKE Cluster.
Click Control plane authorized networks and Edit

- Add a new entry
- Enter name and Bridging VM public static IP
- Save
Test External Connectivity
Open Cloud Shell and create a cloudbuild.yaml file. Paste the following content and modify the purple parameters.
This script will verify if the outgoing IP is the Bridging VM’s public static IP.
1steps:2- name: alpine3 args:4 - sh5 - -exc6 - |7 apk update8 apk add bind-tools9 dig @resolver1.opendns.com myip.opendns.com10options:11 pool:12 name: 'projects/YOUR_PROJECT_NAME/locations/asia-east1/workerPools/YOUR_POOL_NAME'Run the following command
1gcloud builds submit --no-sourceExpected result; the highlighted part is the VM’s external IP
1Created [https://cloudbuild.googleapis.com/v1/projects/YOUR_PROJECT_NAME/locations/asia-east1/builds/f25e0644-3d37-4a8a-89ac-xxxxxxx].2Logs are available at [ https://console.cloud.google.com/cloud-build/builds;region=asia-east1/f25e0644-3d37-4a8a-89ac-xxxxxxx?project=xxxxxxx ].3----------------------------------------------------------- REMOTE BUILD OUTPUT -----------------------------------------------------------4starting build "f25e0644-3d37-4a8a-89ac-xxxxxxx"5
6FETCHSOURCE7BUILD8Pulling image: alpine9Using default tag: latest10latest: Pulling from library/alpine11Digest: sha256:51b67269f354137895d43f3b3d810bfacd39454xxxxxxx12Status: Downloaded newer image for alpine:latest13docker.io/library/alpine:latest14+ apk update15fetch https://dl-cdn.alpinelinux.org/alpine/v3.19/main/x86_64/APKINDEX.tar.gz16fetch https://dl-cdn.alpinelinux.org/alpine/v3.19/community/x86_64/APKINDEX.tar.gz17v3.19.0-148-g1780794db9c [https://dl-cdn.alpinelinux.org/alpine/v3.19/main]18v3.19.0-149-gf57fb478059 [https://dl-cdn.alpinelinux.org/alpine/v3.19/community]19OK: 22981 distinct packages available20+ apk add bind-tools21(1/14) Installing fstrm (0.6.1-r4)22(2/14) Installing krb5-conf (1.0-r2)23(3/14) Installing libcom_err (1.47.0-r5)24(4/14) Installing keyutils-libs (1.6.3-r3)25(5/14) Installing libverto (0.3.2-r2)26(6/14) Installing krb5-libs (1.21.2-r0)27(7/14) Installing json-c (0.17-r0)28(8/14) Installing nghttp2-libs (1.58.0-r0)29(9/14) Installing protobuf-c (1.4.1-r7)30(10/14) Installing libuv (1.47.0-r0)31(11/14) Installing xz-libs (5.4.5-r0)32(12/14) Installing libxml2 (2.11.6-r0)33(13/14) Installing bind-libs (9.18.19-r1)34(14/14) Installing bind-tools (9.18.19-r1)35Executing busybox-1.36.1-r15.trigger36OK: 15 MiB in 29 packages37+ dig @resolver1.opendns.com myip.opendns.com38
39; <<>> DiG 9.18.19 <<>> @resolver1.opendns.com myip.opendns.com40; (1 server found)41;; global options: +cmd42;; Got answer:43;; ->>HEADER<<- opcode: QUERY, status: NOERROR, id: 5234744;; flags: qr rd ra; QUERY: 1, ANSWER: 1, AUTHORITY: 0, ADDITIONAL: 145
46;; OPT PSEUDOSECTION:47; EDNS: version: 0, flags:; udp: 409648;; QUESTION SECTION:49;myip.opendns.com.              IN      A50
51;; ANSWER SECTION:52myip.opendns.com.       0       IN      A       x.x.x.x53
54;; Query time: 28 msec55;; SERVER: 208.67.222.222#53(resolver1.opendns.com) (UDP)56;; WHEN: Fri Dec 29 01:31:47 UTC 202357;; MSG SIZE  rcvd: 6158
59PUSH60DONE61-------------------------------------------------------------------------------------------------------------------------------------------62ID: f25e0644-3d37-4a8a-89ac-xxxxxxx63CREATE_TIME: 2023-12-29T01:30:57+00:0064DURATION: 9S65SOURCE: -66IMAGES: -67STATUS: SUCCESS
Cloudbuild yaml file example
In the substitutions section, replace it with your environment variables. This example deploys a specific container image to GKE and integrates with CloudBuild triggered by Pub/Sub for GKE deployment.
1---2steps:3  - name: gcr.io/cloud-builders/gcloud4    entrypoint: gcloud5    args: ["container", "clusters", "get-credentials", "$_CLUSTER_NAME", "--region", "$_REGION_NAME", "--project", "$_PROJECT_ID"]6
7  - name: gcr.io/cloud-builders/gcloud8    entrypoint: sh9    args: ["-c", "cat $_DEPLOY.template |sed -e 's%{{IMAGE}}%$_REGISTRY_NAME/$_PROJECT_ID/$_REGISTRY_REPO_NAME/$_REPO_NAME:$_TAG_NAME%g' > $_DEPLOY"]10
11  - name: gcr.io/cloud-builders/gcloud12    entrypoint: kubectl13    args: ["apply", "-f", "$_DEPLOY", "-n", "$_NAMESPACE_NAME"]14
15options:16  env:17  - 'KUBECONFIG=/workspace/kubeconfig'18  logging: CLOUD_LOGGING_ONLY19  pool:20    name: 'projects/$_PROJECT_ID/locations/$_REGION_NAME/workerPools/$_WORKER_POOL_NAME'21
22substitutions:23  _PROJECT_ID: YOUR_PROJECT_ID24  _REGISTRY_NAME: YOUR_REGISTRY_LOCATION25  _REGISTRY_REPO_NAME: YOUR_REGISTRY_REPO_NAME26  _REPO_NAME: "YOUR_REPO_NAME"27  _TAG_NAME: "latest"28  _DEPLOY: kube-hello-change.yaml # YOUR K8S YAML29  _CLUSTER_NAME: YOUR_GKE_CLUSTER_NAME30  _REGION_NAME: asia-east131  _NAMESPACE_NAME: default32  _WORKER_POOL_NAME: YOUR_WORKER_POOL_NAME33
34timeout: 6000s
Example
1---2steps:3
4  - name: gcr.io/cloud-builders/gcloud5    entrypoint: gcloud6    args: ["container", "clusters", "get-credentials", "$_CLUSTER_NAME", "--region", "$_REGION_NAME", "--project", "$_PROJECT_ID"]7
8  - name: gcr.io/cloud-builders/gcloud9    entrypoint: sh10    args: ["-c", "cat deploy/$_DEPLOY.template |sed -e 's%{{IMAGE}}%$_REGISTRY_NAME/$_PROJECT_ID/$_REGISTRY_REPO_NAME/$_REPO_NAME:$_TAG_NAME%g' > $_DEPLOY"]11
12  - name: gcr.io/cloud-builders/gcloud13    entrypoint: kubectl14    args: ["apply", "-f", "$_DEPLOY", "-n", "$_NAMESPACE_NAME"]15
16options:17  logging: CLOUD_LOGGING_ONLY18  env:19  - 'KUBECONFIG=/workspace/kubeconfig'20  pool:21    name: 'projects/$_PROJECT_ID/locations/$_REGION_NAME/workerPools/$_WORKER_POOL_NAME'22substitutions:23  _PROJECT_ID: OOOOOOXXXXXXXX24  _REGISTRY_NAME: asia-east1-docker.pkg.dev25  _REGISTRY_REPO_NAME: docker-repo26  _REPO_NAME: "test-api"27  _TAG_NAME: "latest"28  _DIR_NAME: "./"29  _DEPLOY: kube-hello-change.yaml30  _CLUSTER_NAME: dev-cluster31  _REGION_NAME: asia-east132  _NAMESPACE_NAME: default33  _WORKER_POOL_NAME: test-build34
35timeout: 6000s1apiVersion: v12kind: Service3metadata:4 name: hello-test-service5 annotations:6 networking.gke.io/load-balancer-type: "Internal"7spec:8 type: LoadBalancer9 externalTrafficPolicy: Cluster10 selector:11 app: hello-test12 ports:13 - protocol: "TCP"14 port: 808015 targetPort: 999916
17---18apiVersion: apps/v119kind: Deployment20metadata:21 name: hello-test22spec:23 selector:24 matchLabels:25 app: hello-test26 replicas: 127 template:28 metadata:29 labels:30 app: hello-test31 spec:32 containers:33 - name: test-pod34 image: {{IMAGE}}35 imagePullPolicy: Always36 ports:37 - name: http-server38 containerPort: 999939 livenessProbe:40 httpGet:41 path: /actuator/health/liveness42 port: http-server43 initialDelaySeconds: 6044 periodSeconds: 545 resources:46 limits:47 cpu: 500m48 ephemeral-storage: 1Gi49 memory: 2Gi50 requests:51 cpu: 500m52 ephemeral-storage: 1Gi53 memory: 2Gi54 readinessProbe:55 httpGet:56 path: /actuator/health/readiness57 port: http-server58 initialDelaySeconds: 6059 periodSeconds: 5