Enhancing Cloud Run Security with Binary Authorization in GCP multi Project
Scenario
將各個角色分散至不同 project 擁有各自管理或使用權限。
可分為 4 個 project 角色如下:
KMS:存放金鑰匙,通常由資安單位管理attestor:放置由 KMS public key 所建立的 attestor,通常由資安單位管理deployer:建立使用 attestator policy 與部署 workloadattestation:進行簽章、存放 image
權限對照表
user為使用者帳號ooo-sa為系統或服務使用之 service account 帳號
| Project | 帳號 | 權限 |
|---|---|---|
| kms (CloudKMS key) | [email protected] | Cloud KMS CryptoKey Public Key Viewer |
| kms (CloudKMS key) | [email protected] | Cloud KMS CryptoKey Signer Cloud KMS CryptoKey Public Key Viewer |
| attestor (attestor) | [email protected] | Binary Authorization Attestor Image Verifier |
| attestor (attestor) | [email protected] | Binary Authorization Attestor Viewer |
| attestor (attestor) | [email protected] | Binary Authorization Attestor Viewer |
| attestor (IAM) | [email protected] | Container Analysis Notes Attacher Container Analysis Occurrences for Notes Viewer |
| attestation (Artifact) | [email protected] | Artifact Registry Reader |
Project API 對照表
| Project | API |
|---|---|
| kms | cloudkms.googleapis.com |
| attestor | containeranalysis.googleapis.com binaryauthorization.googleapis.com |
| attestation | containeranalysis.googleapis.com binaryauthorization.googleapis.com cloudkms.googleapis.com artifactregistry.googleapis.com |
| deployer | container.googleapis.com artifactregistry.googleapis.com binaryauthorization.googleapis.com |
步驟
設定 KMS Project
前置步驟與單一 Project 使用 Attestations 設定 KMS 相同 但 Key 須提供 Attestor Project 讀取權限才可進行 public 匯入 attestor,設定方式如下
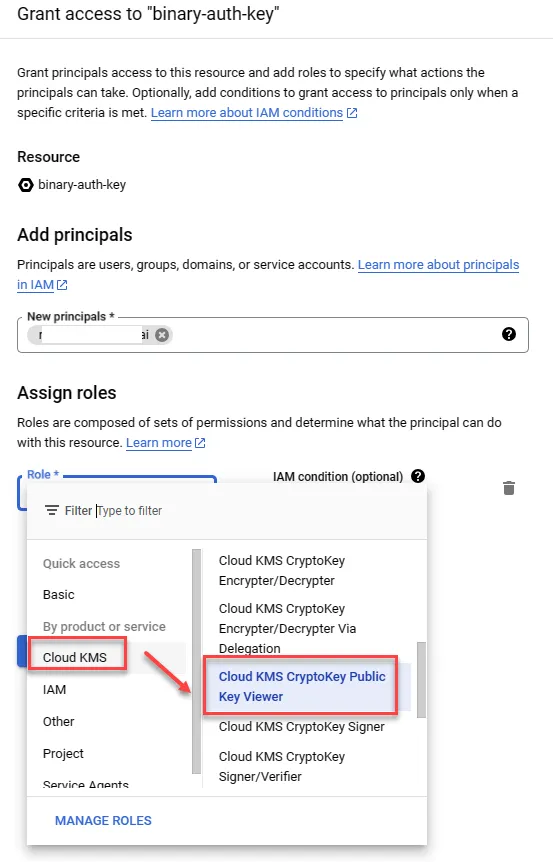
Key 權限設定
點選先前於 KMS 所建立之 key 後,點選 PERMISSIONS 並 GRANT ACCESS
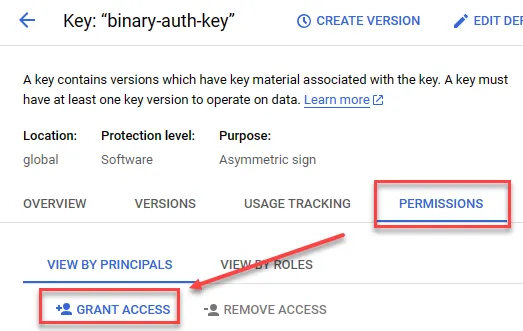
提供 Cloud KMS CryptoKey Public Key Viewer 權限給管理 attestor project 使用者帳號即可
設定 Attestor Project
與單一 Project 設定 Attestor 步驟相同,須留意 KMS Key 權限即可
設定 Attestor 使用權限
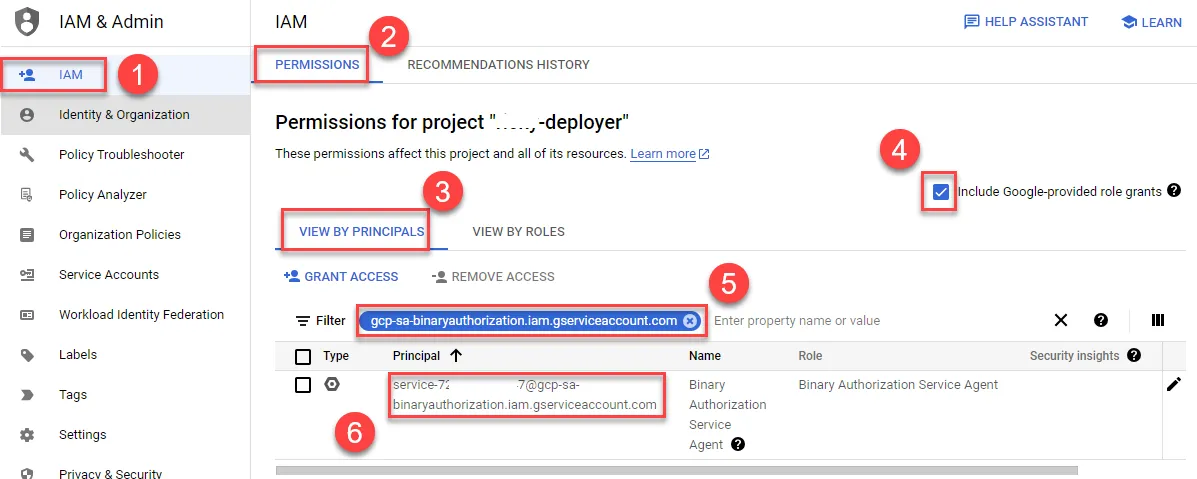
先到 deployer project 中取得 gcp-sa-binaryauthorization.iam.gserviceaccount.com 資訊
- 進入 IAM
- 點選 PERMISSIONS
- 勾選 Include Google-provided role grants
- 點選 VIEW BY PRINCIPALS
- 輸入 CloudRun Service Agent 過濾
- 複製此 service account 至 attestor project 使用
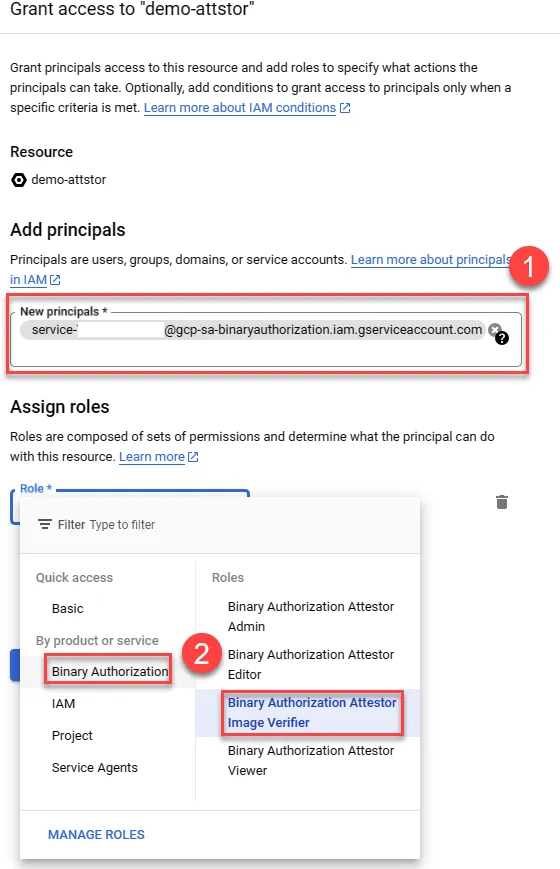
回到 attestor project 開啟設定權限
- 開啟 Binary Authorization
- 點選 ATTESTORS
- 勾選先前所建立之 Attestor
- 確認 PANEL 開啟
- 加入 PRINCIPAL
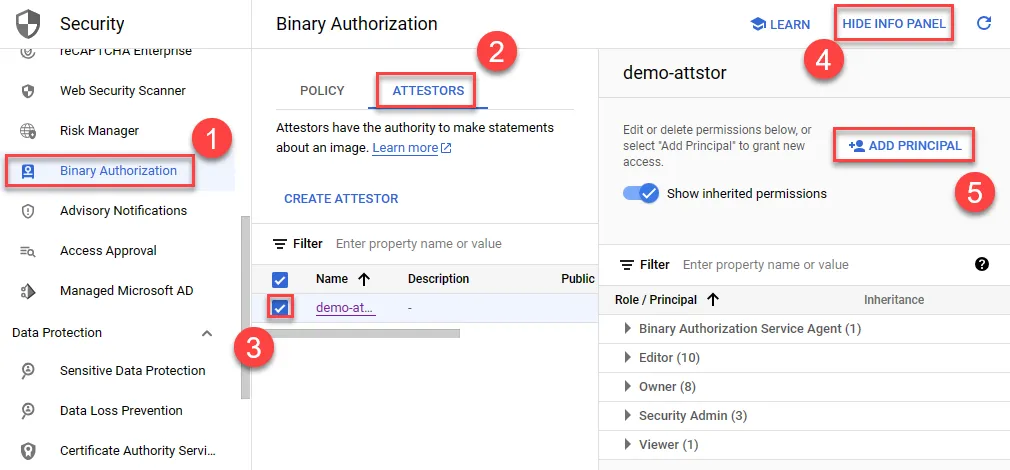
提供 deployer binary authorization service account 擁有 Binary Authorization Attestor Image Verifier 權限
- 貼上 deployer binary authorization service account
- 選擇 Binary Authorization Attestor Image Verifier 權限
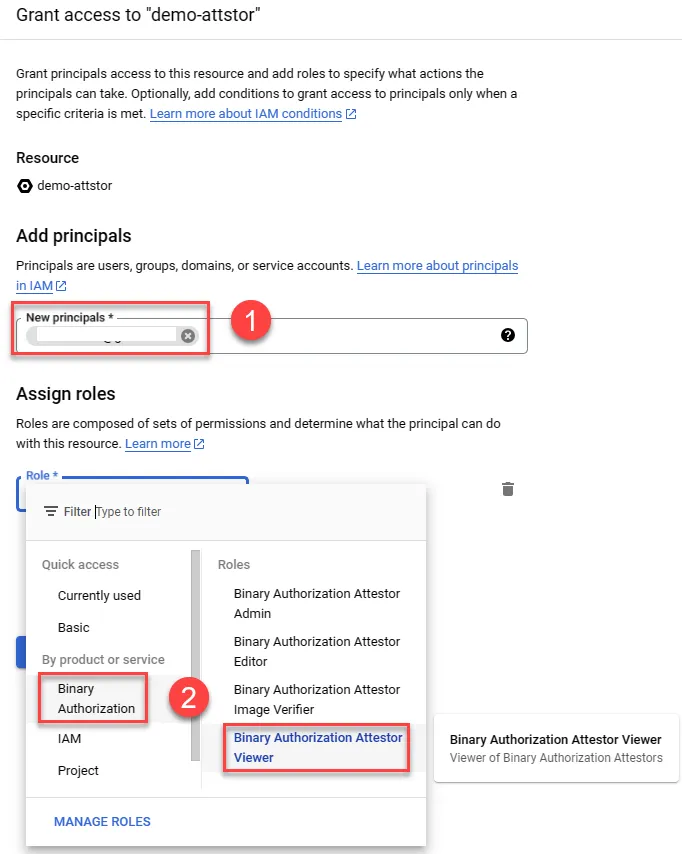
提供 deployer project 使用者 Binary Authorization Attestor Viewer 權限,才可加入此 attestor
- 輸入 deployer project 使用者帳號
- 提供 Binary Authorization Attestor Viewer 權限
設定 Attestation Project
開啟 Attestation API
可於 CloudShell 中使用以下指令開啟,或前述之 GUI 介面啟動
1gcloud services --project=${ATTESTATION_PROJECT_ID} \2 enable containeranalysis.googleapis.com \3 binaryauthorization.googleapis.com \4 cloudkms.googleapis.com(Optional) 建立測試 image
建立 Artifact registry 並上傳 nginx image
1export PROJECT_ID=${DEVSHELL_PROJECT_ID}2gcloud artifacts repositories create attestation-demo \3--repository-format=docker \4--location=asia-east15docker pull nginx6docker tag nginx:latest asia-east1-docker.pkg.dev/${PROJECT_ID}/attestation-demo/demo-nginx:latest7gcloud auth configure-docker asia-east1-docker.pkg.dev8docker push asia-east1-docker.pkg.dev/${PROJECT_ID}/attestation-demo/demo-nginx:latest授權 Deployer Project 可使用 Attestation Project 中 Artifact Registry container image
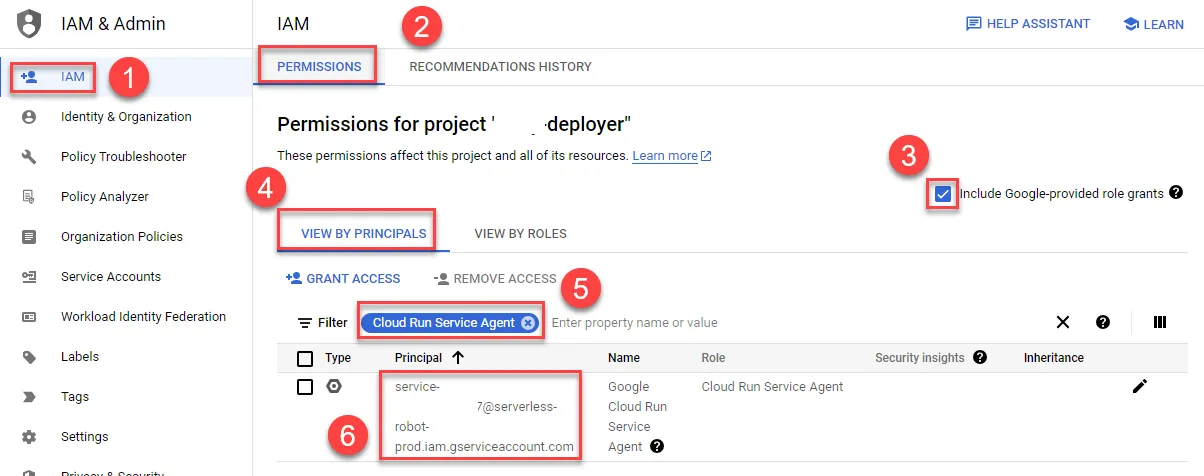
於 Deployer Project IAM 中複製 CloudRun Service Agent service account
- 進入 IAM
- 點選 PERMISSIONS
- 勾選 Include Google-provided role grants
- 點選 VIEW BY PRINCIPALS
- 輸入 CloudRun Service Agent 過濾
- 複製此 service account 至 Attestation project 使用
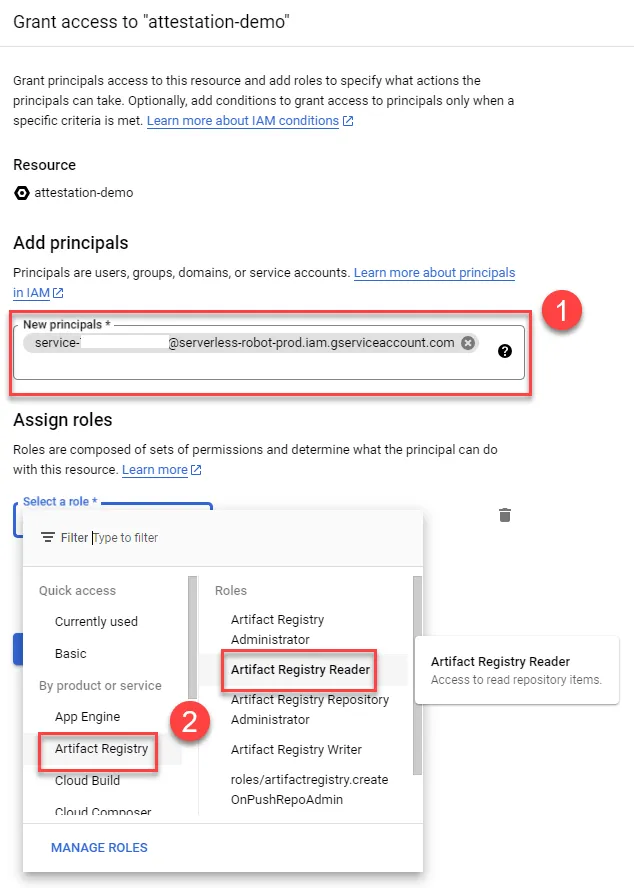
將 Deployer Project 中 CloudRun Service Agent service account 加入 attestation project 內的 Artifact Registry 提供 Artifact Registry Reader 權限
- 選擇 Repositories
- 勾選 repo
- 顯示面板
- 加入權限
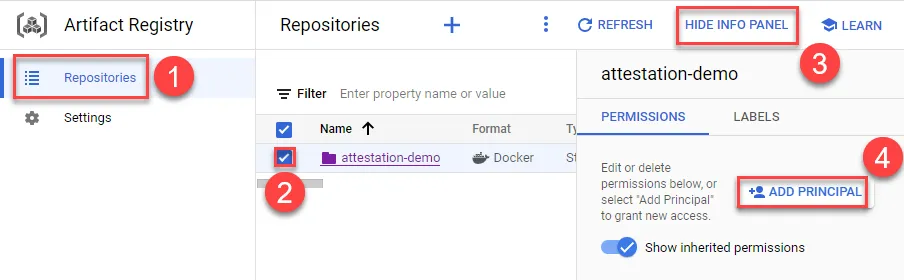
加入 CloudRun Service Agent service account 並提供 Artifact Registry Reader 權限
設定 Deployer Project
Policy 設定
使用 CloudShell 先開啟 API 指令如下,或以前述 UI 將 API 亦可
1gcloud --project=${DEPLOYER_PROJECT_ID} \2 services enable\3 container.googleapis.com\4 artifactregistry.googleapis.com\5 binaryauthorization.googleapis.com唯 project 須選 attestor 其餘與單一 Project 使用 Attestations 設定 Binary Authorization 相同
Policy 測試
由於目前尚未對任何 image 進行 attestation,故部署任何 CloudRun 都會出現警告,可參考在新 CloudRun service 上啟用 Binary Authorization 進行測試
進行 attestation
權限設定
- attestation project 使用者帳號於 attestor project 中設定以下權限
- 指定 attestor 擁有 Binary Authorization Attestor Viewer
- IAM 加入以下權限
- Container Analysis Notes Attacher
- Container Analysis Occurrences for Notes Viewer
- kms project 的 Cloud KMS key 加入 attestation project 使用者帳號以下權限
- Cloud KMS CryptoKey Signer
- Cloud KMS CryptoKey Public Key Viewer
設定完成後可參考單一 Project 使用 Attestation,於 atestation project 中進行作業即可
疑難排解
Attestor 權限不足
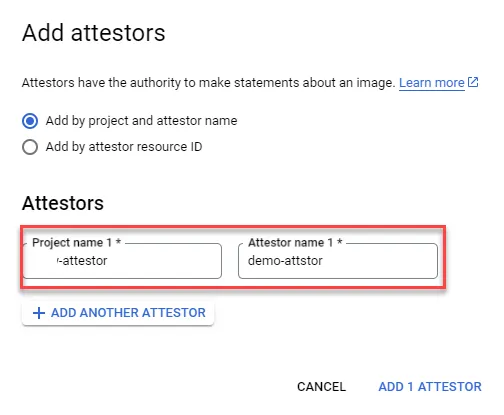
1ERROR: (gcloud.beta.container.binauthz.attestations.sign-and-create) PERMISSION_DENIED: permission binaryauthorization.attestors.get denied on resource projects/ATTESTOR_PROJECT_ID/attestors/demo-attstor解決方法
確認 attestation project 使用者帳號於 attestor project 權限設定,指定 attestor 擁有 Binary Authorization Attestor Viewer
Cloud KMS Key 權限不足
1ERROR: (gcloud.beta.container.binauthz.attestations.sign-and-create) PERMISSION_DENIED: Permission 'cloudkms.cryptoKeyVersions.viewPublicKey' denied on resource 'projects/KMS_PROJECT_ID/locations/global/keyRings/image-keys/cryptoKeys/binary-auth-key/cryptoKeyVersions/1' (or it may not exist).解決方法
確認 kms project 的 Cloud KMS key 有加入 attestation project 使用者帳號權限,並賦予以下權限
- Cloud KMS CryptoKey Signer
- Cloud KMS CryptoKey Public Key Viewer
Container Analysis Notes 權限不足
1ERROR: (gcloud.beta.container.binauthz.attestations.sign-and-create) User [user@ooo.com] does not have permission to access projects instance [ricky-attestations] (or it may not exist): permission "containeranalysis.notes.attachOccurrence" denied for project "ATTESTOR_PROJECT_ID", entity ID "demo-attstor-note"解決方法
確認 attestation project 使用者帳號於 attestor project IAM 中加入以下權限
- Container Analysis Notes Attacher
- Container Analysis Occurrences for Notes Viewer
CloudRun Org Policy 設定
可指定特定 Project / Folder / Org 強制啟用 CloudRun 中的 Authorization Policies
啟用
此範例為使用 folder 啟用,該 folder 下 project 都會啟用 Authorization Policies,xxxxxxxxxxxxx 為 folder ID
1gcloud resource-manager org-policies allow run.allowedBinaryAuthorizationPolicies default --folder=xxxxxxxxxxxxx預期成果
1constraint: constraints/run.allowedBinaryAuthorizationPolicies2etag: CM_3iKYGEOiJjTM=3listPolicy:4 allowedValues:5 - default6updateTime: '2023-07-27T09:41:35.107169Z'確認
列出 folder 狀態
1gcloud resource-manager org-policies allow run.allowedBinaryAuthorizationPolicies default --folder=xxxxxxxxxxxxx預期成果
1constraint: constraints/run.allowedBinaryAuthorizationPolicies2etag: CM_3iKYGEOiJjTM=3listPolicy:4 allowedValues:5 - default6updateTime: '2023-07-27T09:41:35.107169Z'刪除
刪除規則
1gcloud resource-manager org-policies describe run.allowedBinaryAuthorizationPolicies --folder=xxxxxxxxxxxxx預期成果
1constraint: constraints/run.allowedBinaryAuthorizationPolicies2etag: BwVUSr8Q7Ng=