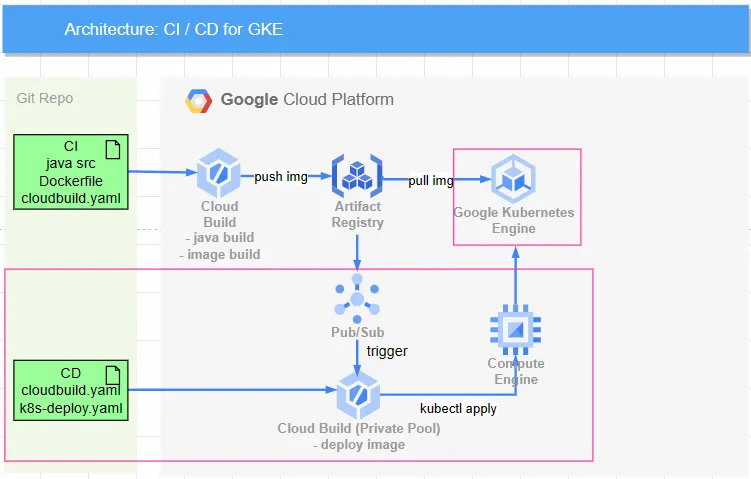
CloudBuild GKE Autopilot Private Cluster on New VPC
此方法為建立全新 VPC,單獨提供 Cloud Build Private Pool 專門使用,目的為提供 Cloud Build Private Pool 具備對外連線固定 ip,且不干擾既有 VPC
Scenario
- 確保所有網路資訊流不對外,但又想擁有 Autopilot GKE 便利,因此需要使用 Private Cluster
- 如欲以 private ip 連接至 CloudSQL 而不透過 CloudSQL Auth Proxy,則 Autopilot GKE 需使用 Private Cluster 才能達成
- 下圖紅框為本次實作範圍,GKE 使用 private cluster,下方的 CloudBuild 使用 private pool 獨立 VPC,上方無紅框 CloudBuild 則使用 public pool 做 CI 使用,細節可參考 CloudBuild triggered by Pub/Sub
流程與說明
- 建立 VPC 網路並開啟 Subnet PGA 與 NAT Gateway,而 GKE 內的 pod 對外網路,也會透過 NAT Gateway 連外
- 建立 GKE autopilot Private Cluster
- (Optional) 使用 GCE 作為跳板,service account 需具備 Kubernetes Engine Developer 權限,才能取得 GKE credential
- 建立 Artifact Registry,讓 GKE Private Cluster 能夠透過 PGA 進行直連
- 建立 CloudBuild 專用 VPC 網路 (上圖紅框處) 與所需 route
- 建立 Cloud Build 並使用 Private Pool 確保資料流在 private network 與固定 ip 中,因此需建立一台獨立 VM 作為 CloudBuild -> GKE 之跳板
- 流程會變成
CloudBuild 連接至 internal ip->VM (static internal ip & static public ip)->GKE(public ip) - CloudBuild 建立 private pool 時不可勾選對外 ip,確保流量在 VPC 內,但相對就無法連到外網,因此如有安裝套件相關作業,建議分開 private pool 執行
- 流程會變成
- 保留以下兩個網段不被任何服務所使用
- CloudBuild 保留
192.168.10.0/24 - Docker bridge 保留
172.17.0.0/16(GCP 務必避開使用此網段)
執行步驟
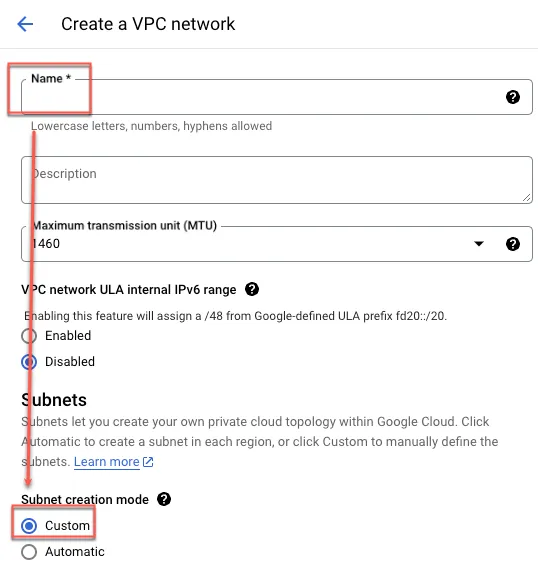
建立 GKE VPC
此 VPC 為提供 GKE Private cluster 對外,與真正要跑內部服務所使用,非 Cloud Build Private Pool 對外使用

輸入網路名稱,並於 Subnets 選擇 Custom
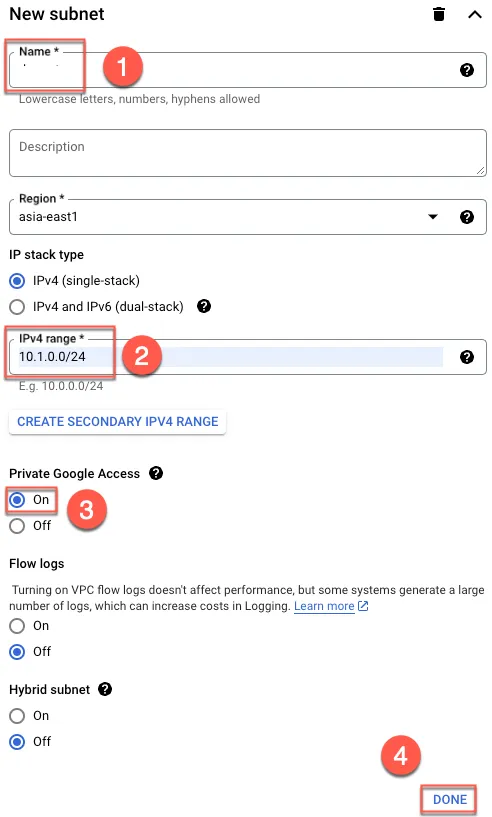
- 輸入名稱
- 輸入自訂網段
- 開啟 PGA
- 完成
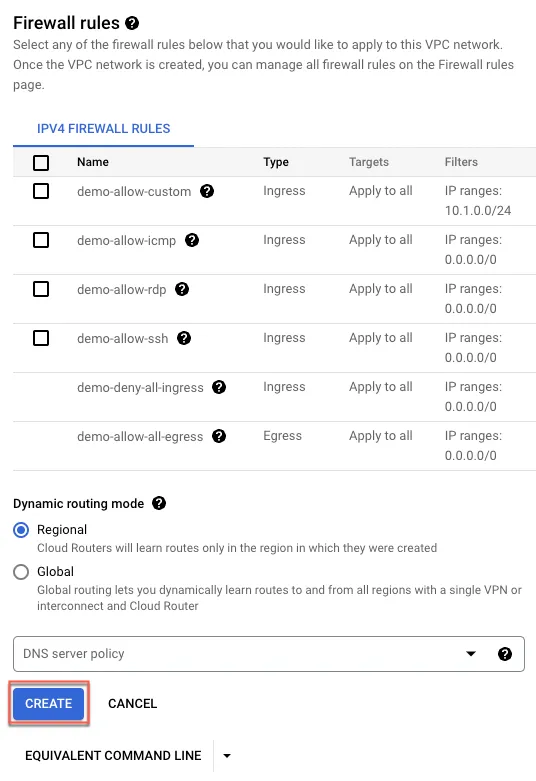
點選建立,以建立 VPC
設定 IAP 防火牆
確保 IAP 能通過 Firewall,需建立放行 35.235.240.0/20 防火牆規則
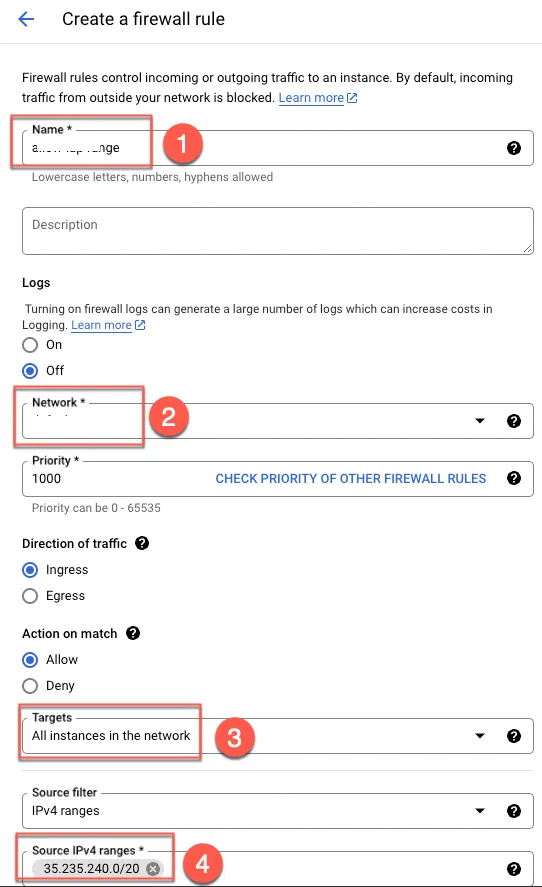
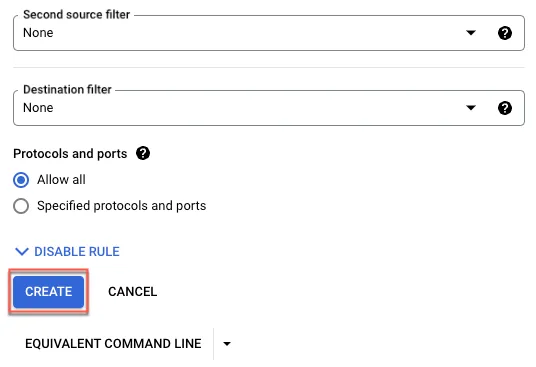
點選建立
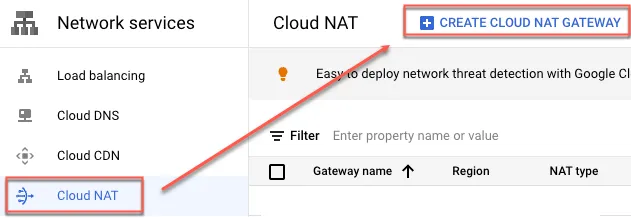
設定 NAT Gateway
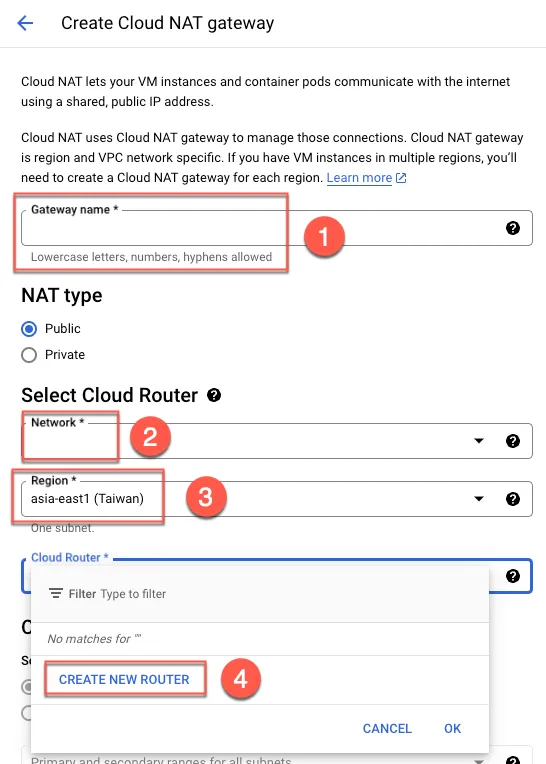
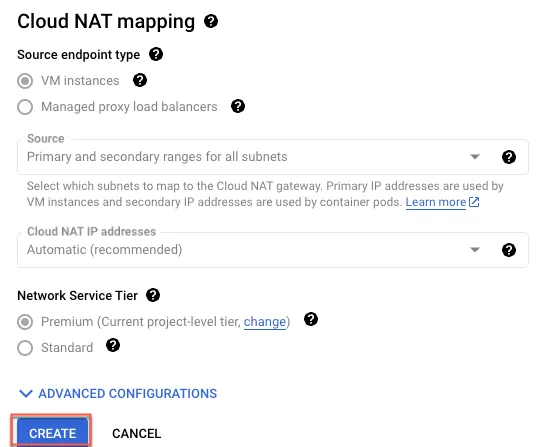
為使所有流量都能對外並透過特定 ip 流出,建立 NAT Gateway
- 輸入 Gateway 名稱
- 選擇 VPC
- 選擇區域
- 建立 router
輸入 router 名稱後點選建立

最後建立 Cloud NAT
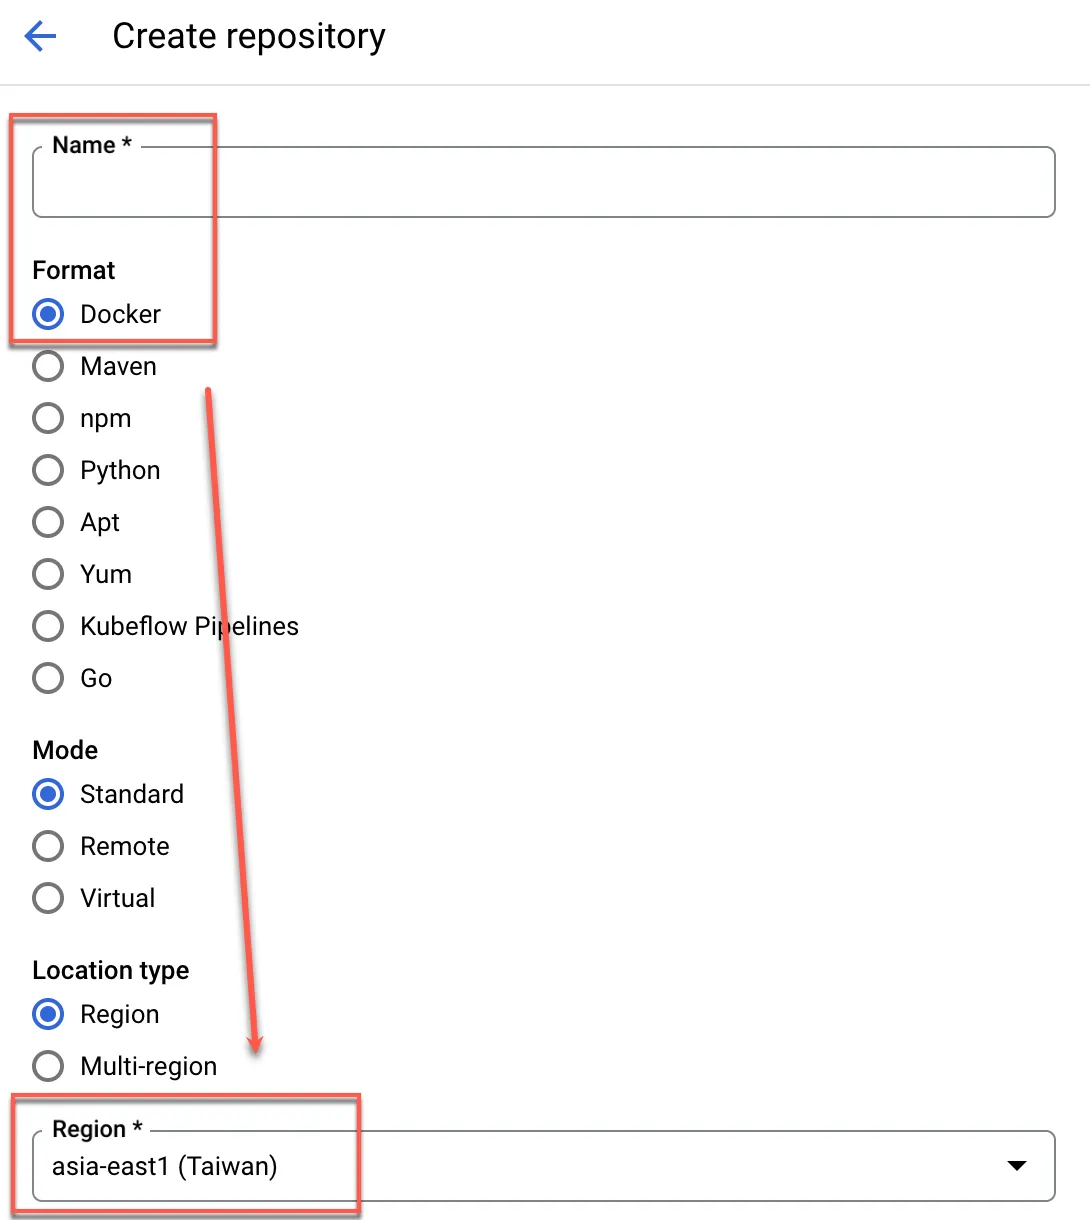
建立 Artifact Registry
點選 + 建立

輸入名稱,並選擇 Docker Format,接著選擇 Region 建立即可
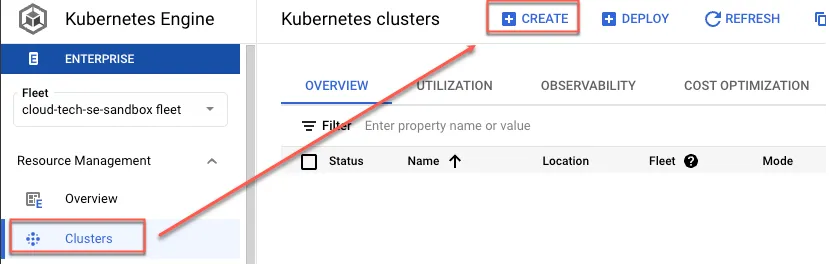
建立 GKE autopilot Private Cluster
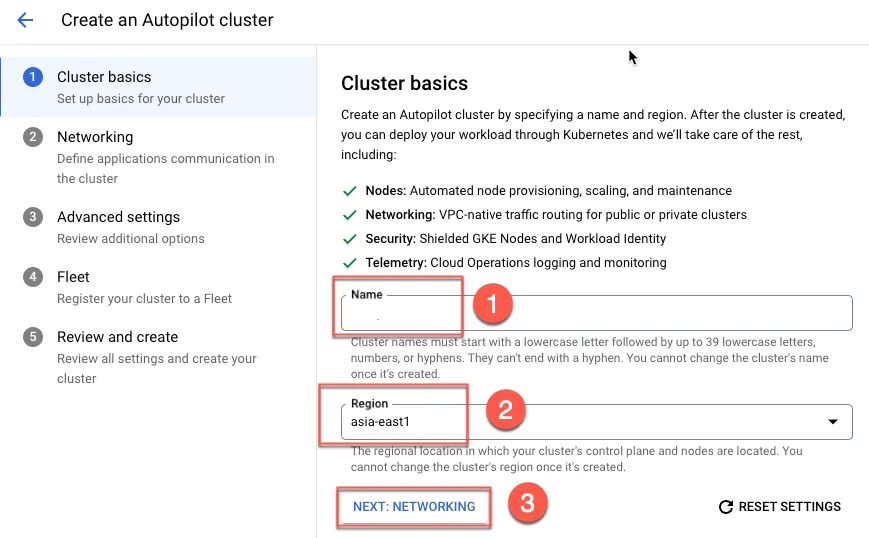
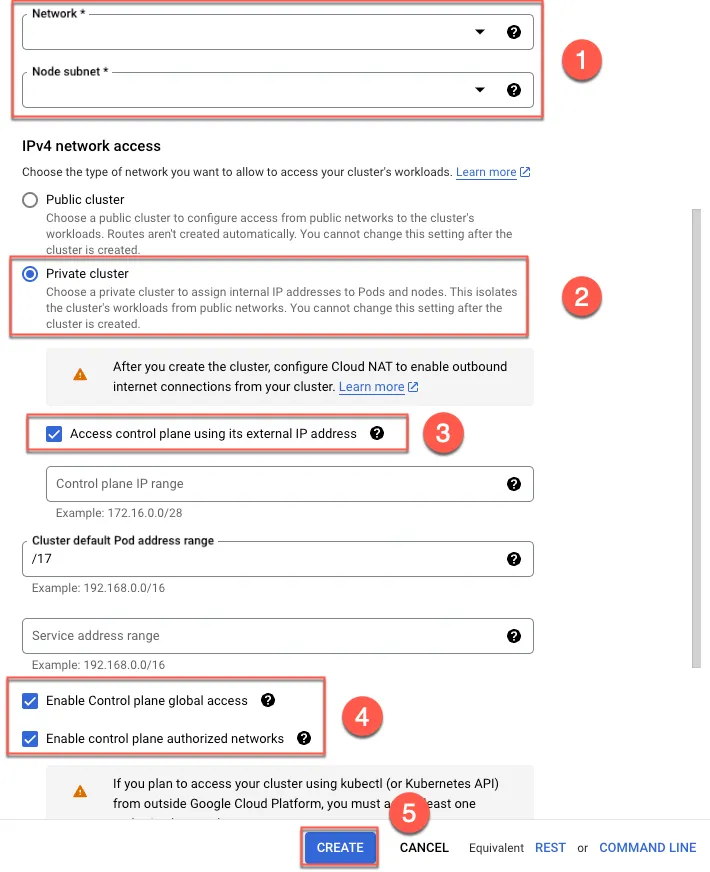
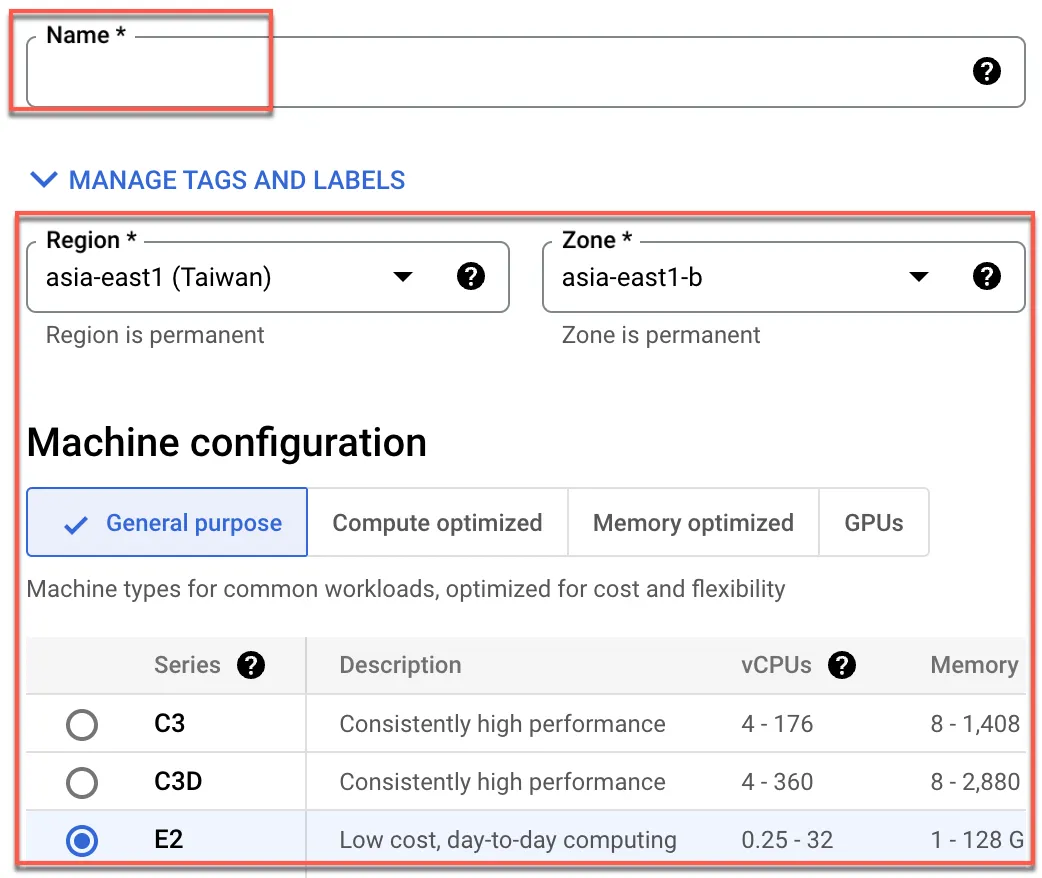
建立 GKE
- 輸入名稱
- 選擇區域
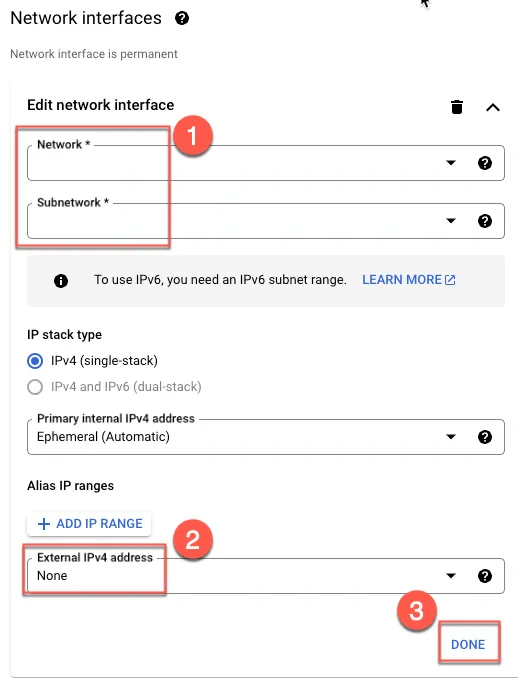
- 設定網路
- 選擇網路與 subnet
- 選擇 private cluster
- 勾選才能讓外網連入
- 勾選後才能讓不同 region 可連入,同時能鎖定特定外網 ip 連到 control plane
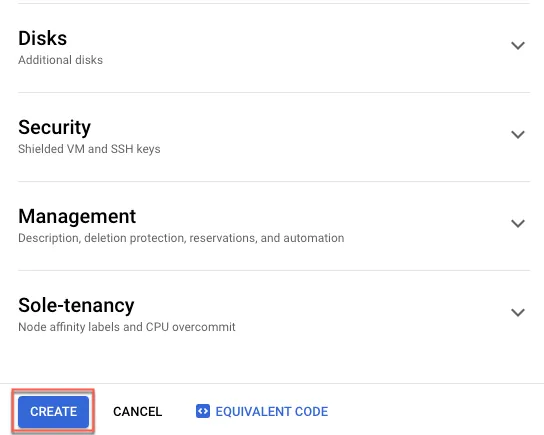
- 建立
(Optional) 建立跳板 VM
若完全不想讓 control plane 對外,則可使用同網段之 VM 作為跳板,或 production 環境中以 VPN 方式,從 on-premise 連接至 private cluster control plane
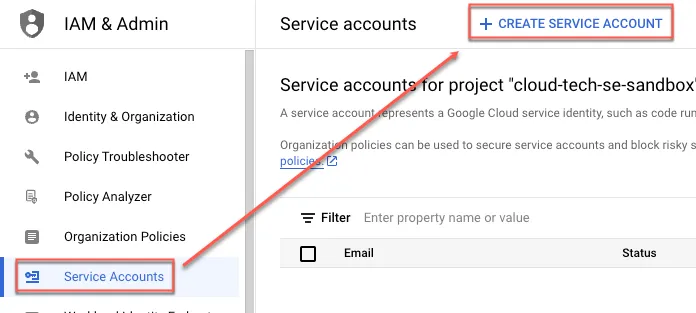
建立 Service Account
為能使跳板 VM 可順利取得並操作 GKE,建立 service account 並提供權限
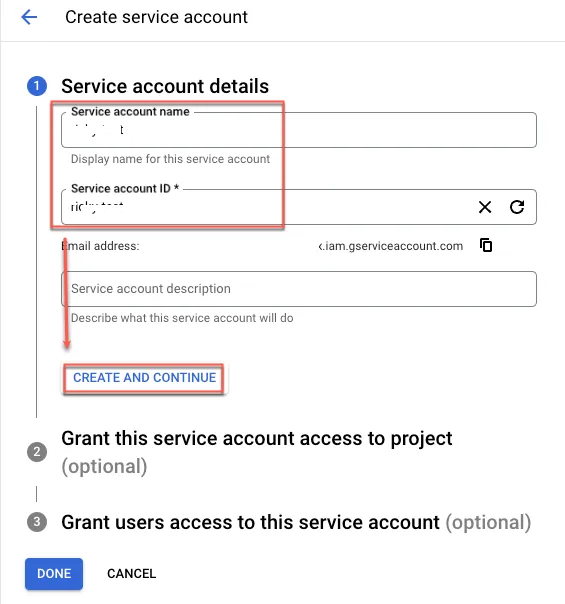
輸入名稱後點選建立並繼續
提供以下權限後即可完成
- Kubernetes Engine Developer
- Logs Writer
- Monitoring Metric Writer
- Monitoring Viewer
- Stackdriver Resource Metadata Writer
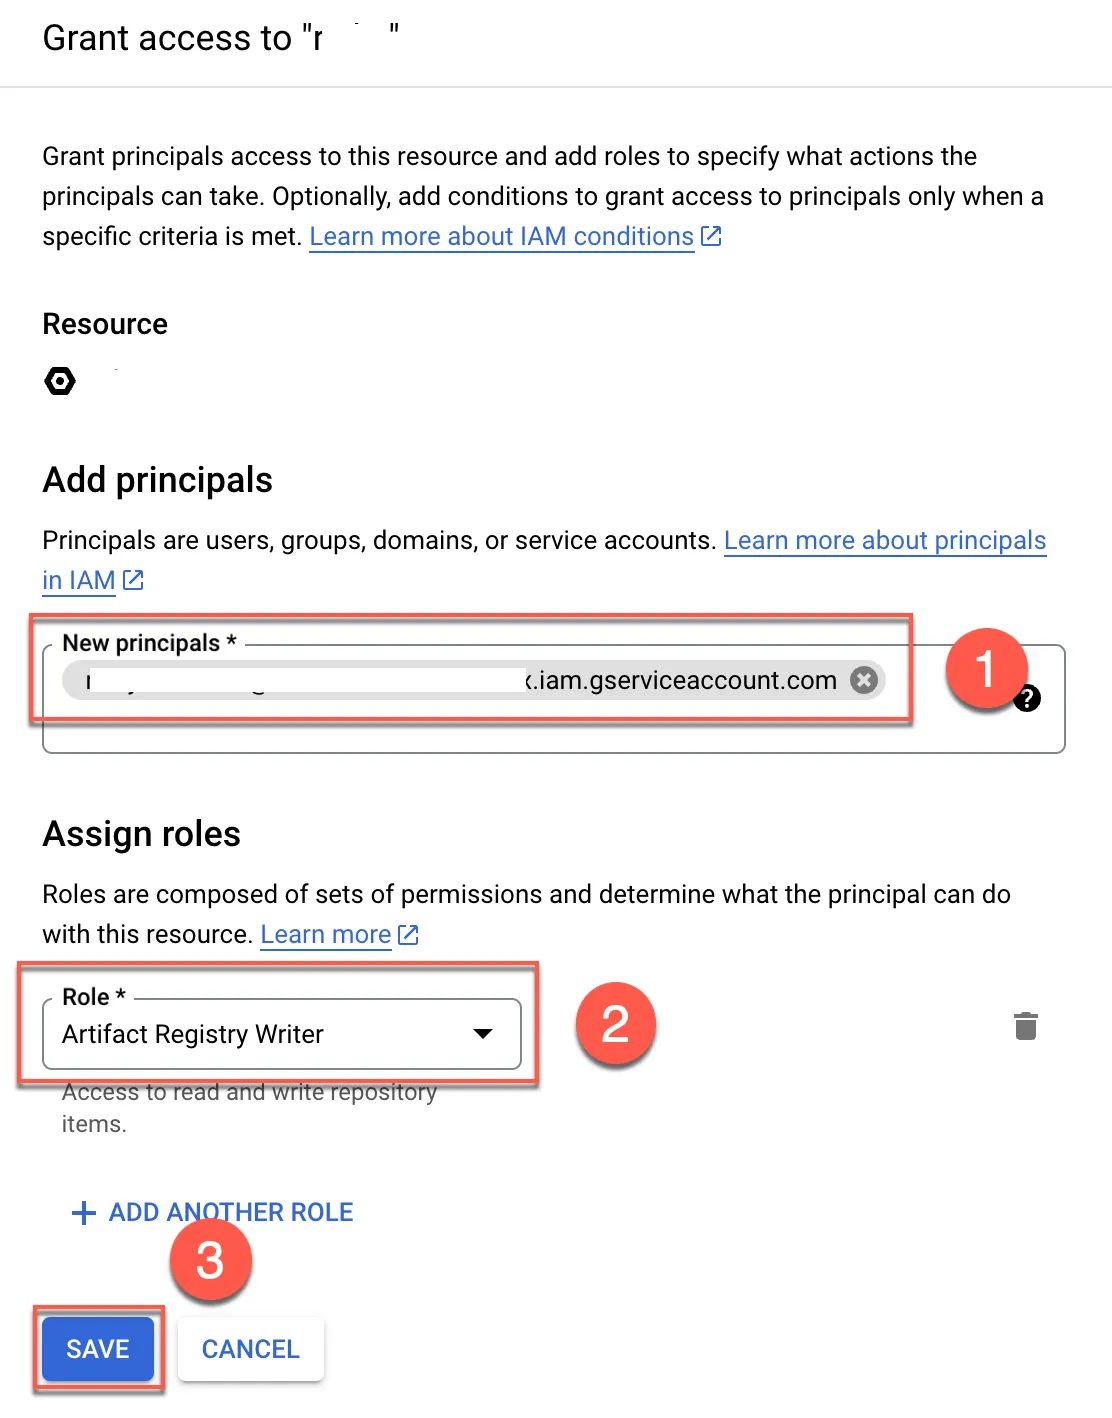
(Optional) 提供跳板機 service account 使用 Artifact Registry 權限
- 將前面所建立之 service account 加入至 Artifact Registry 內,並提供 Artifact Registry Writer 權限
- 勾選所建立之 repo,點選 show info panel 後,再點選 ADD PRINCIPAL
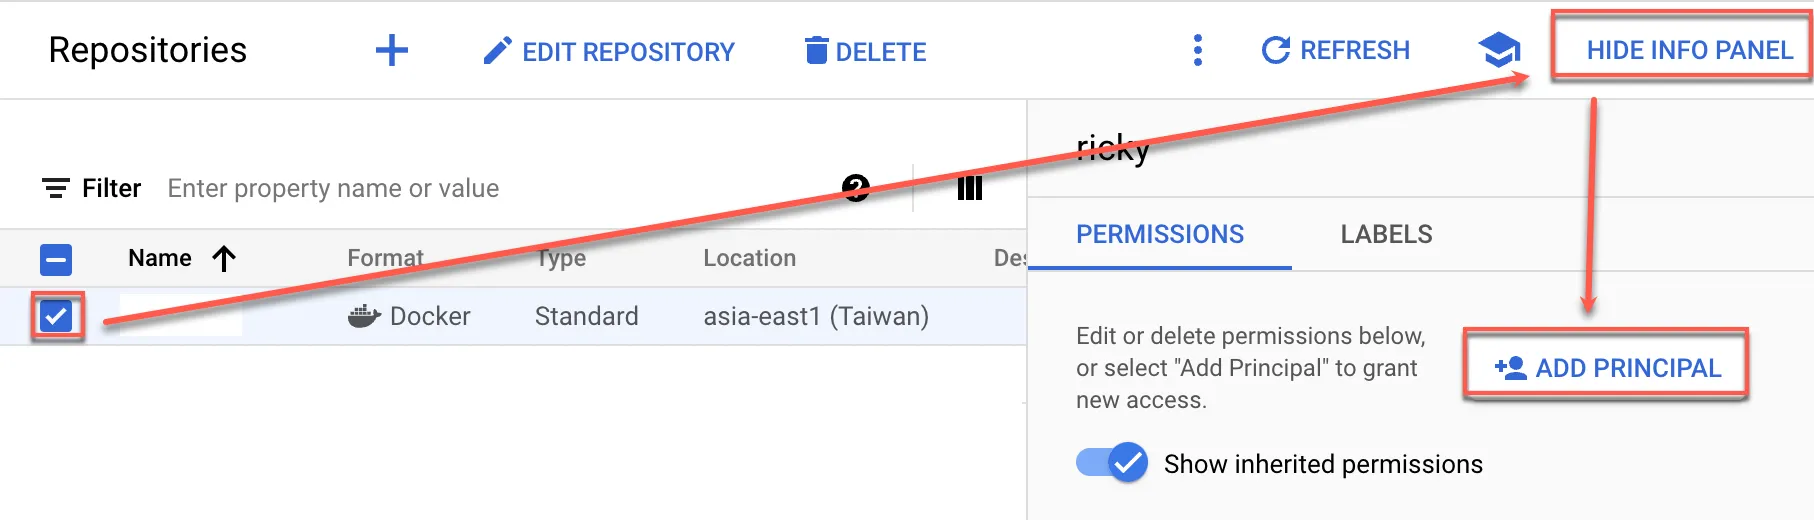
- 將前面所建立之 service account 貼上
- 加入 Artifact Registry Writer 權限
- 儲存
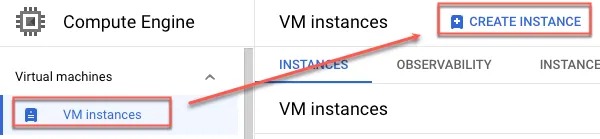
建立 GCE VM
所建制之 VM 與 GKE Cluster 同一 VPC 內網,且不建立對外 ip
輸入名稱與選擇合適 VM 大小
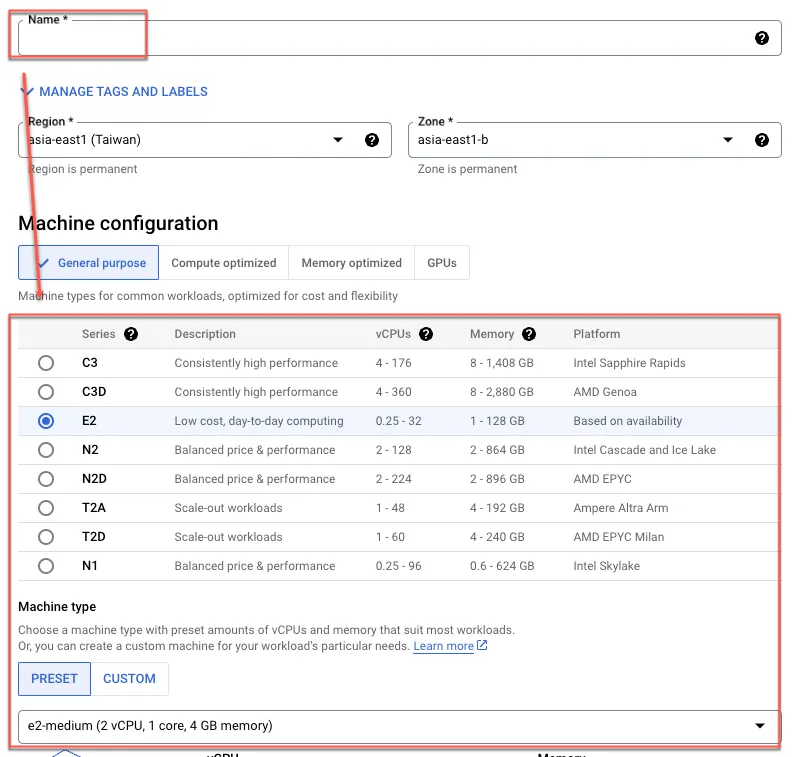
- 選擇作業系統,這邊以 Ubuntu 22.04 為例
- 選擇剛剛所建立之 service account

展開 Advanced options 與 Networking
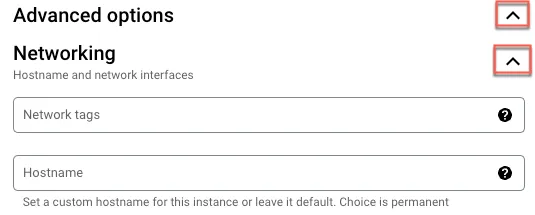
- 選擇前面所建立之 VPC 與 Subnet
- 關閉對外 ip
- 完成
建立 VM
測試
點選 SSH

安裝 gcloud
參考此篇文件進行 gcloud 指令安裝
1sudo su -2sudo apt-get update3sudo apt-get install apt-transport-https ca-certificates gnupg curl sudo4curl https://packages.cloud.google.com/apt/doc/apt-key.gpg | sudo gpg --dearmor -o /usr/share/keyrings/cloud.google.gpg5echo "deb [signed-by=/usr/share/keyrings/cloud.google.gpg] https://packages.cloud.google.com/apt cloud-sdk main" | sudo tee -a /etc/apt/sources.list.d/google-cloud-sdk.list6sudo apt-get update && sudo apt-get install google-cloud-cli7# 安裝 kubectl 與相關套件8apt install kubectl google-cloud-sdk-gke-gcloud-auth-plugin -y使用內網 ip 連到 GKE cluster
1gcloud container clusters get-credentials CLUSTER_NAME --project=PROJECT_NAME --region=asia-east1 --internal-ip2# 可查看 kube config3cat ~/.kube/config4
5# 使用 kubectl 連線至 cluster,理論上不會有東西,因為沒有建立任何資源6kubectl get no -o wide
安裝 docker 並 push image 至 Artifact Registry
1# Add Docker's official GPG key:2sudo apt-get update3sudo apt-get install ca-certificates curl gnupg4sudo install -m 0755 -d /etc/apt/keyrings5curl -fsSL https://download.docker.com/linux/ubuntu/gpg | sudo gpg --dearmor -o /etc/apt/keyrings/docker.gpg6sudo chmod a+r /etc/apt/keyrings/docker.gpg7
8# Add the repository to Apt sources:9echo \10  "deb [arch=$(dpkg --print-architecture) signed-by=/etc/apt/keyrings/docker.gpg] https://download.docker.com/linux/ubuntu \11  $(. /etc/os-release && echo "$VERSION_CODENAME") stable" | \12  sudo tee /etc/apt/sources.list.d/docker.list > /dev/null13sudo apt-get update14
15
16# Install Packages17sudo apt-get install docker-ce docker-ce-cli containerd.io docker-buildx-plugin docker-compose-plugin
Docker push image 至 Registry 中
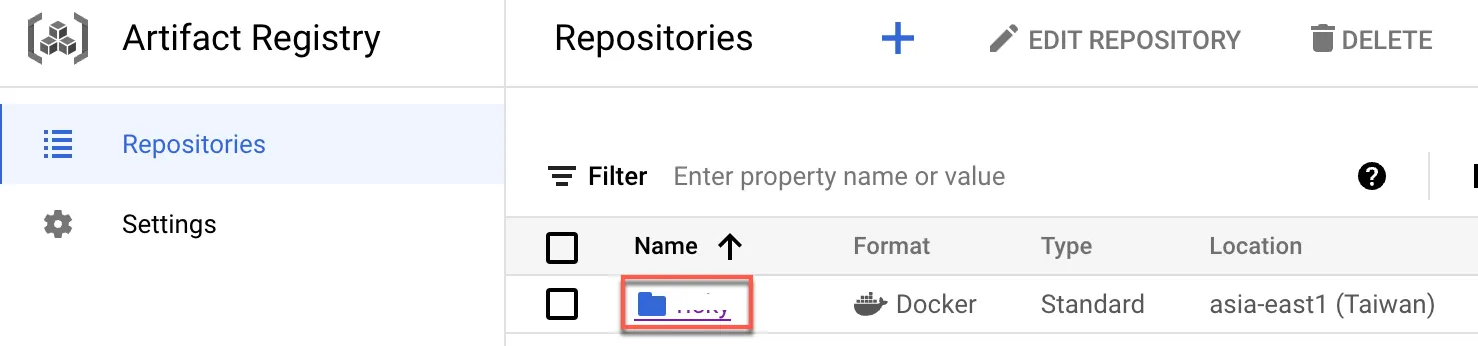
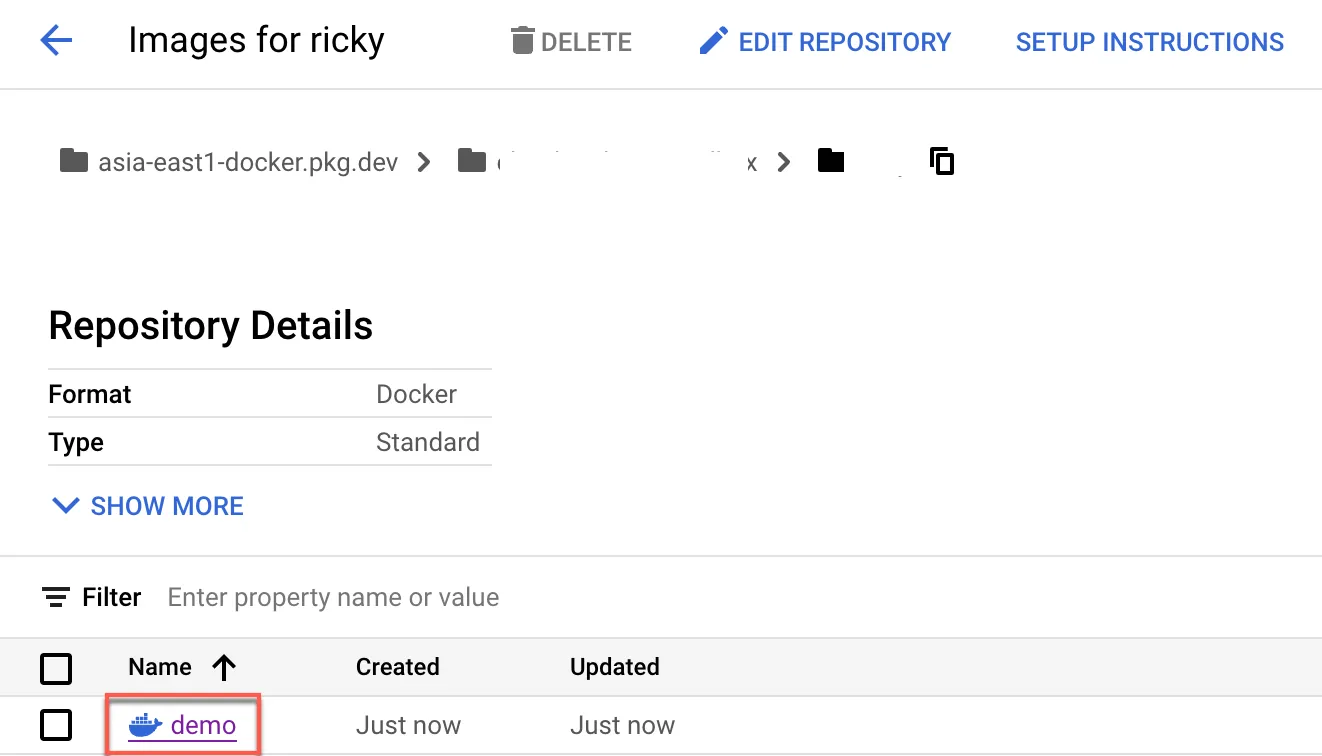
點選剛剛在 Artifact Registry 所建立之 repo
先將路徑複製起來,接著點選 SETUP INSTRUCTIONS

複製 configure docker 指令
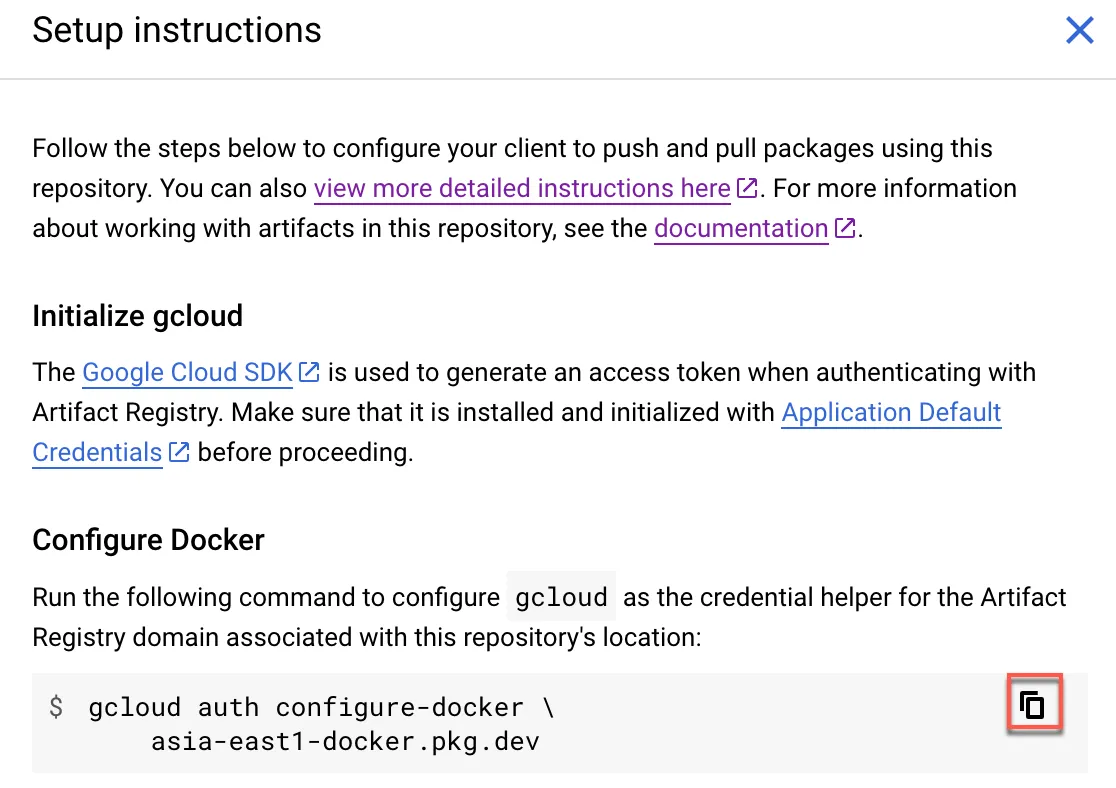
於 console 中貼上指令
1gcloud auth configure-docker asia-east1-docker.pkg.dev預期結果,過程需輸入 Y 同意繼續
1Adding credentials for: asia-east1-docker.pkg.dev2After update, the following will be written to your Docker config file located at3[/root/.docker/config.json]:4 {5  "credHelpers": {6    "asia-east1-docker.pkg.dev": "gcloud"7  }8}9
10Do you want to continue (Y/n)?  Y11
12Docker configuration file updated.
Pull Ubuntu Image 再上傳至 Artifact Registry 中
1docker pull ubuntu2
3# tag 後方接前面所複製的路徑與名稱 + tag4docker tag ubuntu:latest asia-east1-docker.pkg.dev/PROJECT_NAME/REPO_NAME/demo:latest5
6# push 至 repo 中7docker push asia-east1-docker.pkg.dev/PROJECT_NAME/REPO_NAME/demo:latest
此時便可發現 image 已存放至 Artifact Registry 內
部署 image 至 GKE 中
使用以下 yaml 進行部署,image 處修改為前面 push 所使用之路徑
1echo 'apiVersion: v12kind: Pod3metadata:4 name: ubuntu5spec:6 containers:7 - name: ubuntu8 image: asia-east1-docker.pkg.dev/PROJECT_NAME/REPO_NAME/demo:latest9 # Just spin & wait forever10 command: [ "/bin/bash", "-c", "--" ]11 args: [ "while true; do sleep 30000; done;" ]' > sleep.yaml部署至 GKE auto pilot 中,部署指令下達後,需等候數分鐘才會部署完成
1kubectl apply -f sleep.yaml2kubectl get po預期結果
1NAME READY STATUS RESTARTS AGE2ubuntu 1/1 Running 0 4m21s確認對外 ip 是否為 NAT Gateway ip
1kubectl exec ubuntu -it -- apt update > /dev/null && apt install -y curl > /dev/null && curl https://api.ipify.org測試完成後便可將 pod 移除
1kubectl delete -f sleep.yaml建立 CloudBuild Private Pool VPC
以下步驟為參考本篇說明實作
建立新 VPC
方式同前述「建立 GKE VPC」,分別設定如下:
- VPC 名稱:
build-network - 子網段名稱:
nat-subnet - IP:
10.1.0.0/24 - Region:
asia-east1
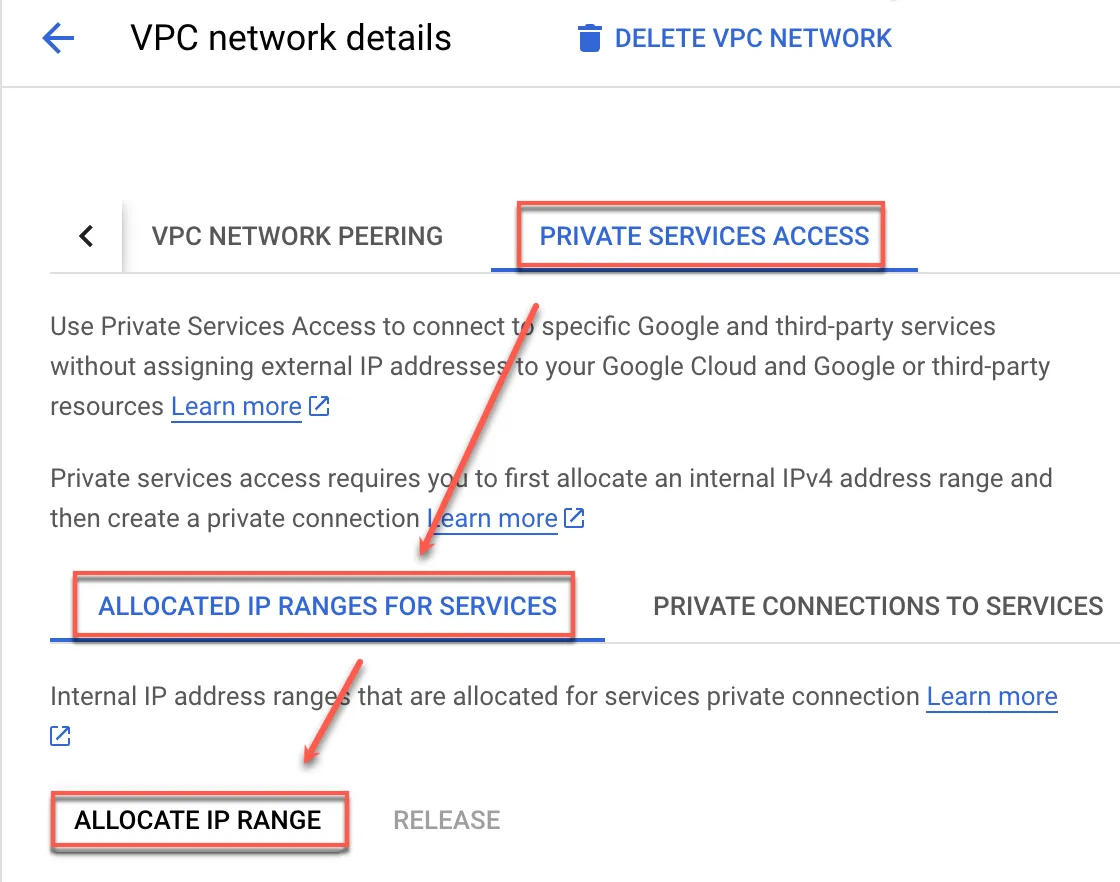
建立 PSA
開啟 VPC 建立 IP RANGE
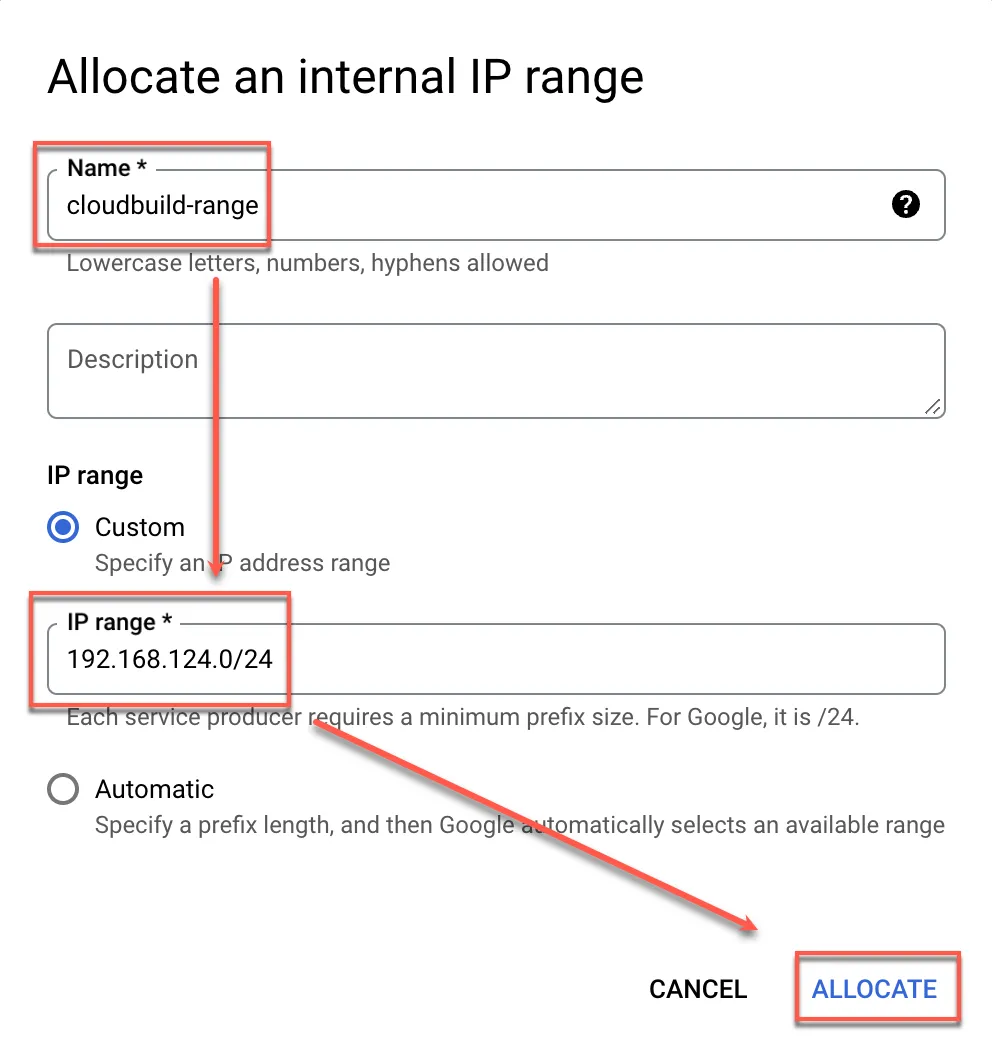
分配 ip range
建立完成後,請留意防火牆不要阻擋到此網段
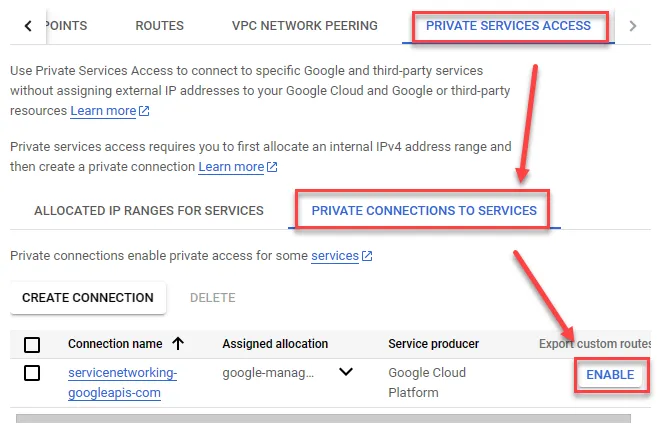
建立 Private connections to services
點選 Create connection
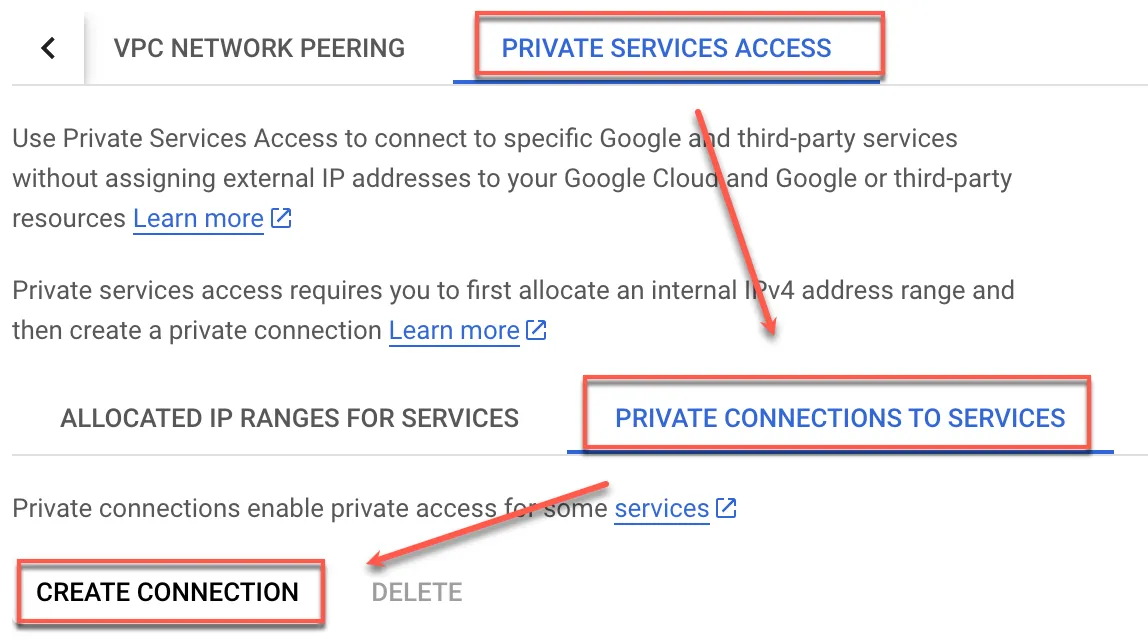
選擇 Google Cloud Platform 後,再勾選剛剛所建立的網段
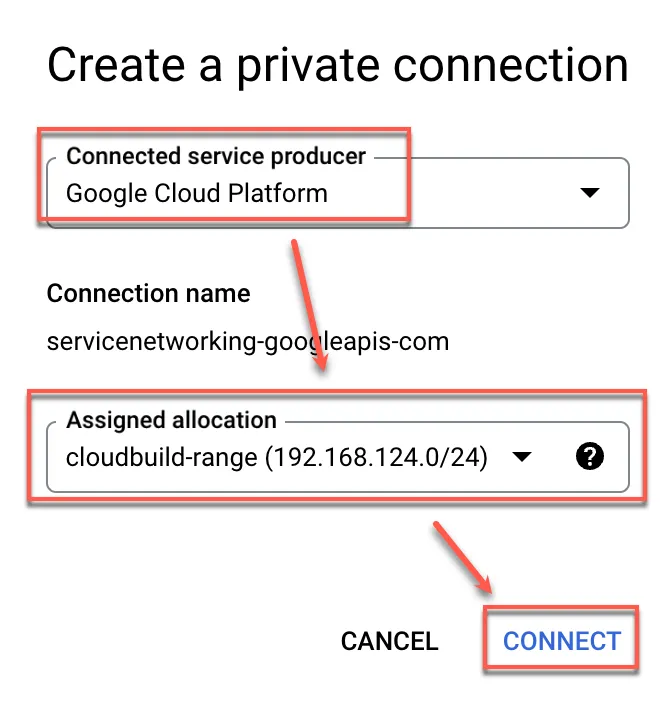
開啟 Export custom route
防火牆設定
- Name:
allow-pool-to-nat - Direction of traffic:
Ingress - Action on match:
Allow - Targets:
Specified target tags - Target tags:
nat-gateway - Source IPv4 Ranges:
192.168.124.0/24 - Protocols and ports:
Allow all
建立 CloudBuild
設定 Cloud Build 網路環境
點我開啟必要 API,本內容參考此文件進行實作
建立 Private Pool 參考此文件進行建立,建立前先點我開啟 API
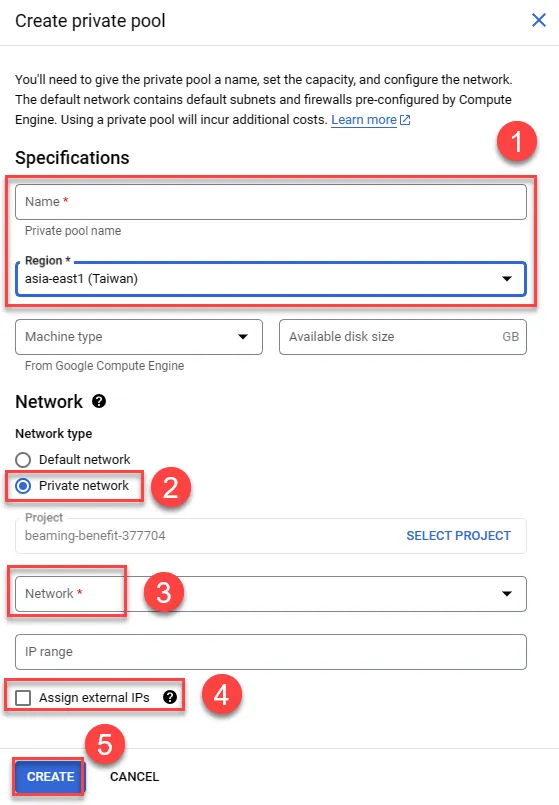
建立 worker pool
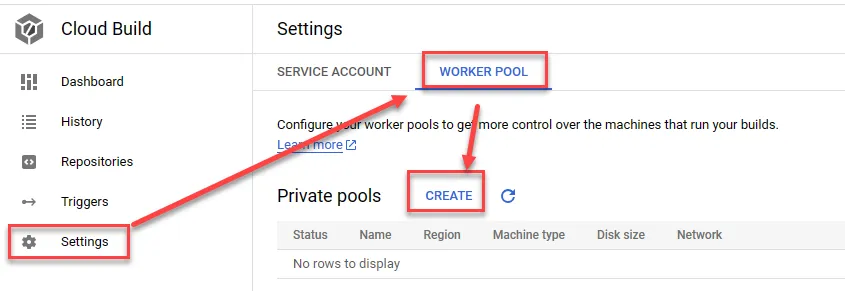
- 輸入名稱與選擇區域
- 選擇 Private network
- 選擇前面所建立之 VPC 網路 (build-network)
- 不可勾選分配外部 ip,確保連線都透過私有 VPC 出去
- 建立,預設使用 e2-medium 與提供 100GB 硬碟空間
建立橋接 VM
本內容參考此文件進行實作,目的為讓 CloudBuild 連線到 GKE 時使用固定 ip
建立 VM 輸入名稱,並選擇區域與合適大小,這邊選最小的 e2-micro
- 展開進階設定以設定網路
- 輸入網路 tag 分別為:direct-gateway-access, nat-gateway,後面建立 route 與防火牆會用到
- 開啟 IP forwarding
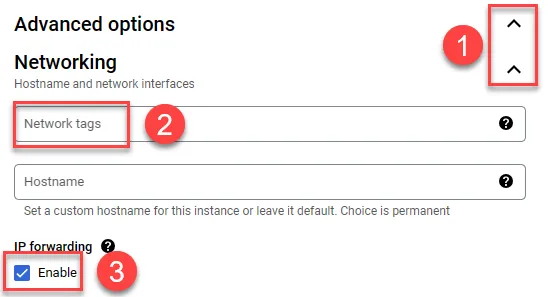
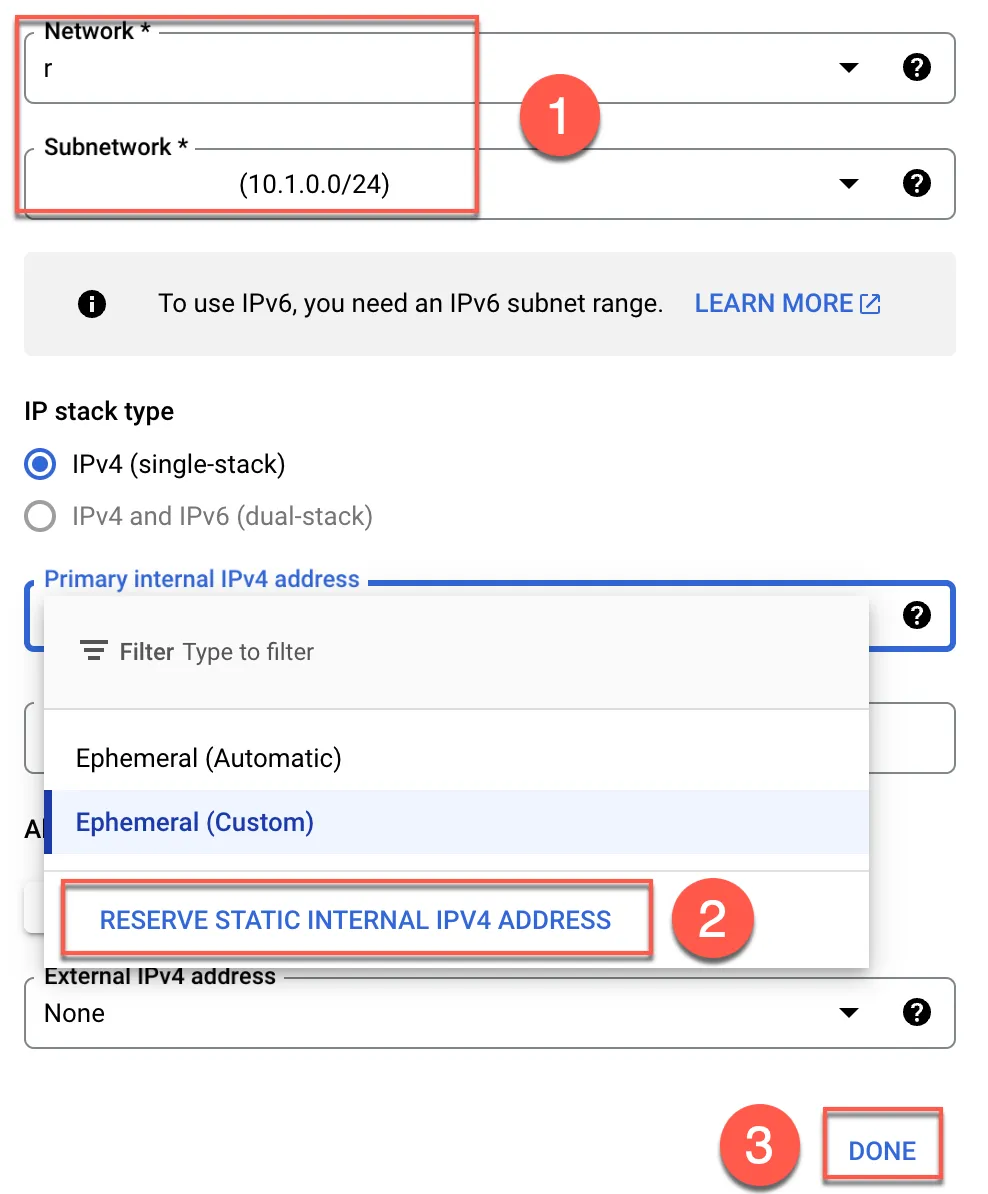
- 選擇所建立之 VPC 網路 (build-network) 與其 subnetwork
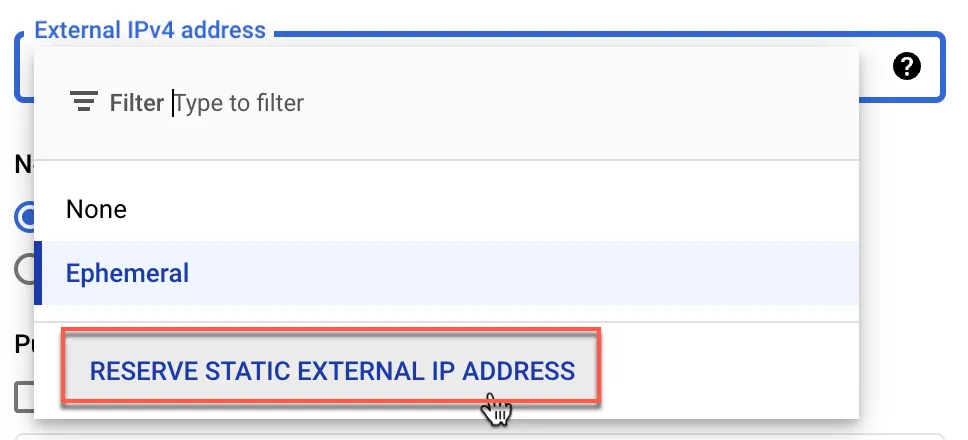
- 保留固定 ip
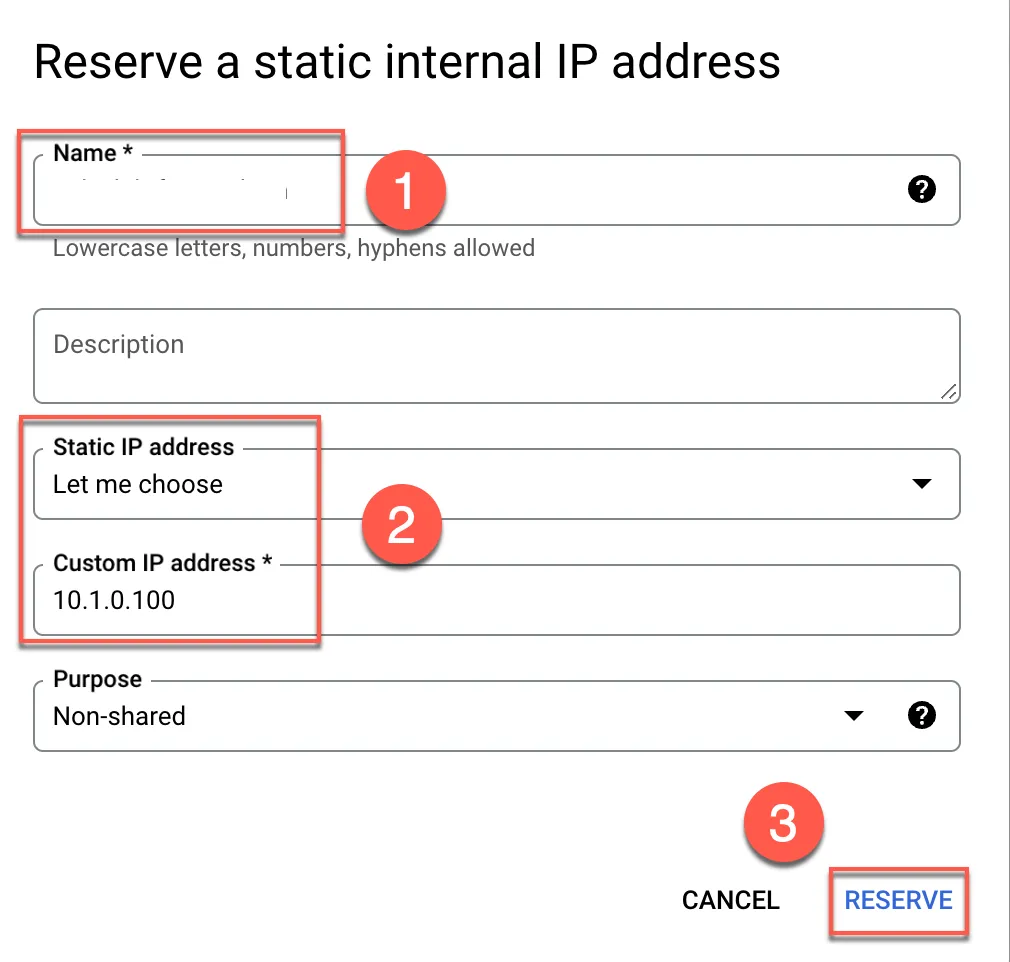
- 完成
- 輸入保留 ip 名稱
- 可自訂 ip 或自動分配
- 保留
一樣保留一組對外 ip
貼上以下啟動腳本於 startup script 中
1sysctl -w net.ipv4.ip_forward=12iptables -t nat -A POSTROUTING -o $(ip addr show scope global | head -1 | awk -F: '{print $2}') -j MASQUERADE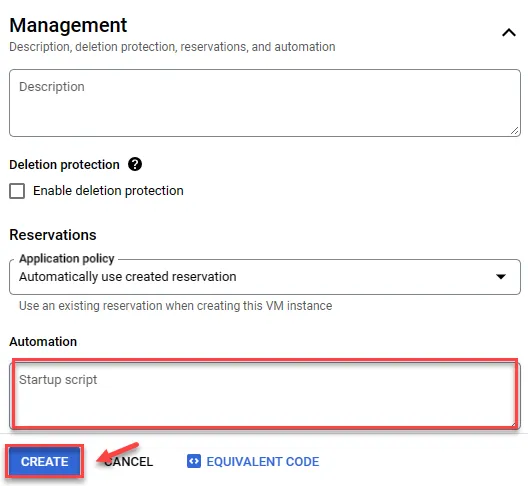
建立 VPC 路由
為能讓所有對外連線都使用固定 ip 因此需額外建立 4 條路由,設定原因參考,主要為了避開預設 0.0.0.0/0,因此使用 0.0.0.0/1 與 128.0.0.0/1 提昇優先度
- 將所有流量轉往橋接 VM,priority 為
1000.0.0.0/1-> VM128.0.0.0/1-> VM
- 將橋接 VM 流量轉往 Default internet gateway ( 即 VM 自己本身對外 ip ),priority 為
10(比前面兩條路由高即可)- VM (
0.0.0.0/1) -> Default internet gateway - VM (
128.0.0.0/1) -> Default internet gateway
- VM (
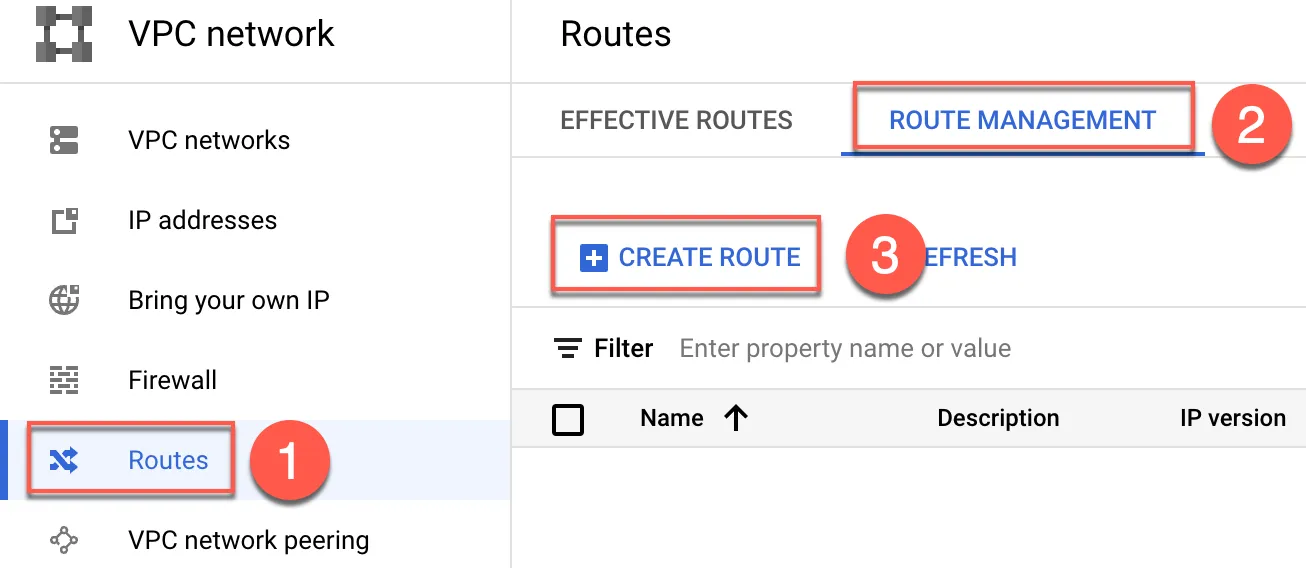
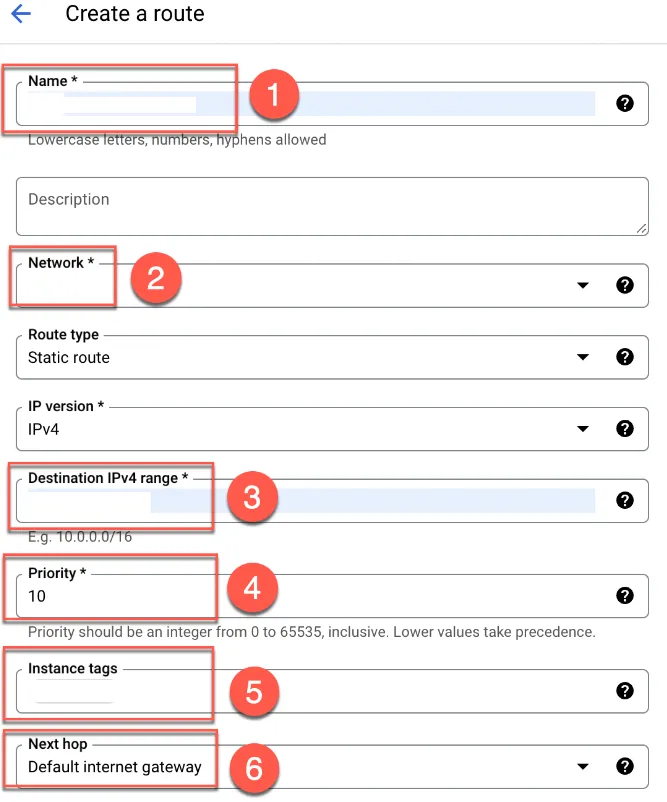
開啟 VPC Route 並建立
- 選擇 Routes
- 點選 ROUTE MANAGEMENT
- 建立 ROUTE
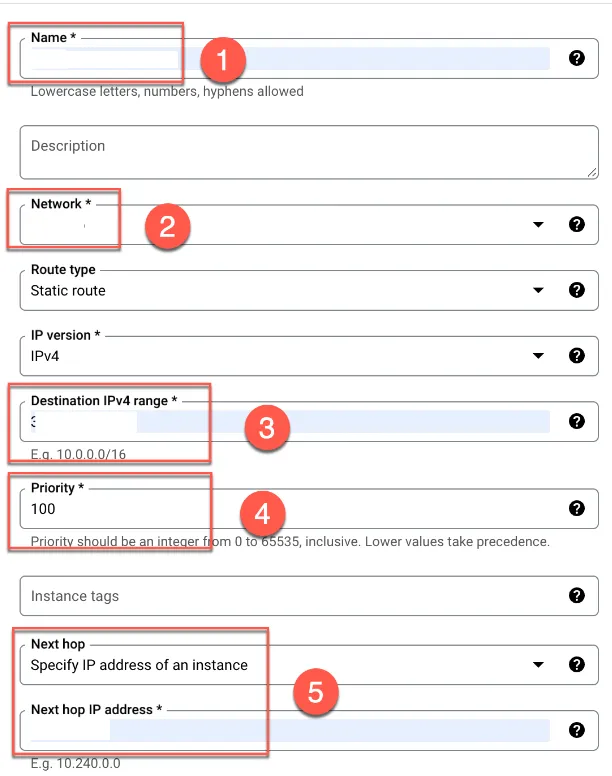
前兩條條路由,將所有流量轉導至 VM 分別如下
- 分別為
through-nat、through-nat2 - 選擇 VPC (
build-network) - 分別輸入
0.0.0.0/1、128.0.0.0/1 - 設定優先度,這邊設定
100 - 指定所有對外流量的 next hop 要怎走,輸入前面所建立之
VM internal static ip
最後往下點選建立,共須建立兩條 route
建立後 2 條路由,透過 VM ip 連線至外部
- 輸入名稱分別為:
direct-to-gateway1、direct-to-gateway2 - 選擇 VPC (
build-network) - 分別輸入
0.0.0.0/1、128.0.0.0/1 - 設定優先度,數值相較於第一條低即可,這邊設定
10 - 輸入前面 VM 所輸入之 tag:
direct-gateway-access - Next hop 為
Default internet gateway
最後往下點選建立,共須建立兩條 route
設定 GKE Authorized Network
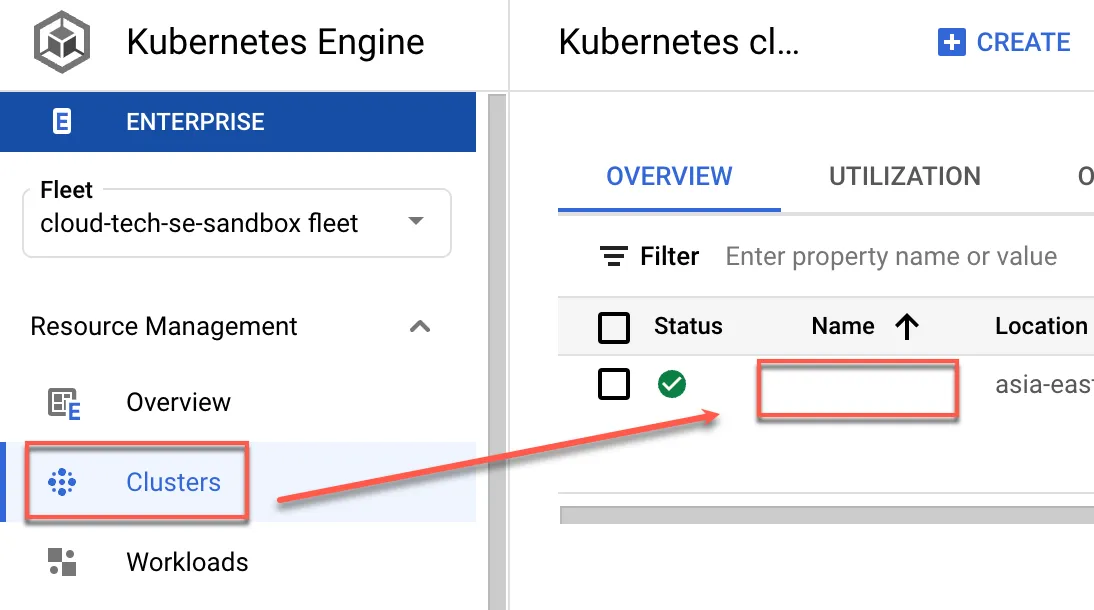
設定後使前面所建立之橋接 VM 可連線,點選所建立之 GKE Cluster
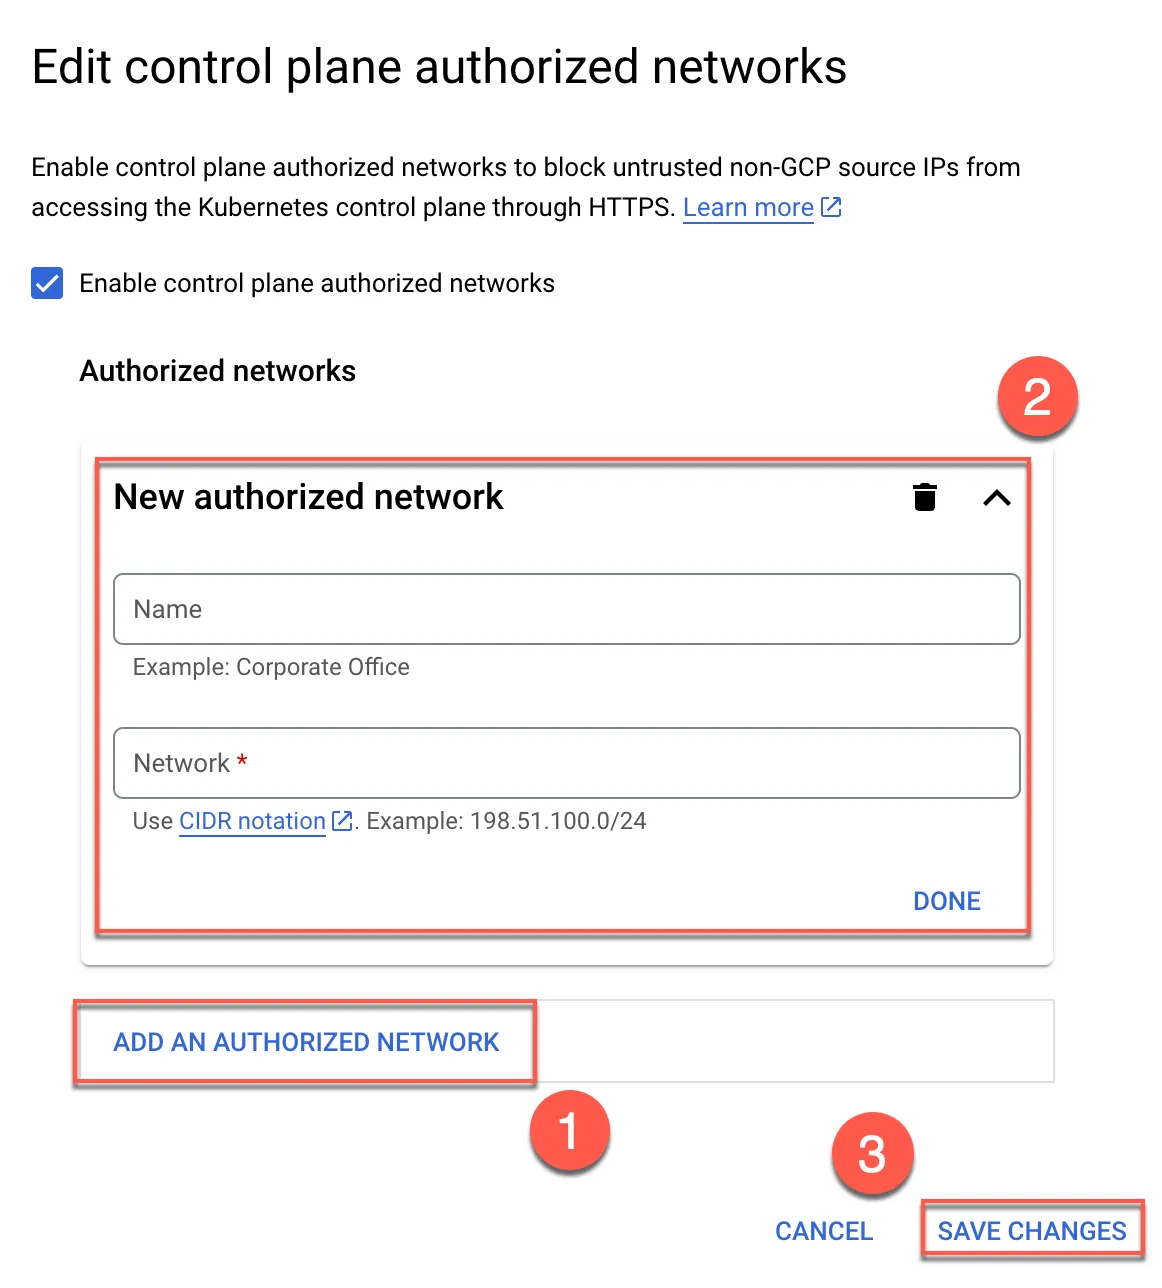
點選 Control plane authorized networks 編輯

- 新增
- 輸入名稱與橋接 VM public static ip
- 儲存
測試對外狀況
開啟 CloudShell 後建立 cloudbuild.yaml 檔案,將以下內容貼入檔案內,並修改紫色參數部份
此腳本可確認對外使用 ip 是否為 VM 之外部固定 ip
1steps:2- name: alpine3 args:4 - sh5 - -exc6 - |7 apk update8 apk add bind-tools9 dig @resolver1.opendns.com myip.opendns.com10options:11 pool:12 name: 'projects/YOUR_PROJECT_NAME/locations/asia-east1/workerPools/YOUR_POOL_NAME'輸入以下指令執行
1gcloud builds submit --no-source預期結果,highlight 部分為 VM 之對外 ip
1Created [https://cloudbuild.googleapis.com/v1/projects/YOUR_PROJECT_NAME/locations/asia-east1/builds/f25e0644-3d37-4a8a-89ac-xxxxxxx].2Logs are available at [ https://console.cloud.google.com/cloud-build/builds;region=asia-east1/f25e0644-3d37-4a8a-89ac-xxxxxxx?project=xxxxxxx ].3----------------------------------------------------------- REMOTE BUILD OUTPUT -----------------------------------------------------------4starting build "f25e0644-3d37-4a8a-89ac-xxxxxxx"5
6FETCHSOURCE7BUILD8Pulling image: alpine9Using default tag: latest10latest: Pulling from library/alpine11Digest: sha256:51b67269f354137895d43f3b3d810bfacd39454xxxxxxx12Status: Downloaded newer image for alpine:latest13docker.io/library/alpine:latest14+ apk update15fetch https://dl-cdn.alpinelinux.org/alpine/v3.19/main/x86_64/APKINDEX.tar.gz16fetch https://dl-cdn.alpinelinux.org/alpine/v3.19/community/x86_64/APKINDEX.tar.gz17v3.19.0-148-g1780794db9c [https://dl-cdn.alpinelinux.org/alpine/v3.19/main]18v3.19.0-149-gf57fb478059 [https://dl-cdn.alpinelinux.org/alpine/v3.19/community]19OK: 22981 distinct packages available20+ apk add bind-tools21(1/14) Installing fstrm (0.6.1-r4)22(2/14) Installing krb5-conf (1.0-r2)23(3/14) Installing libcom_err (1.47.0-r5)24(4/14) Installing keyutils-libs (1.6.3-r3)25(5/14) Installing libverto (0.3.2-r2)26(6/14) Installing krb5-libs (1.21.2-r0)27(7/14) Installing json-c (0.17-r0)28(8/14) Installing nghttp2-libs (1.58.0-r0)29(9/14) Installing protobuf-c (1.4.1-r7)30(10/14) Installing libuv (1.47.0-r0)31(11/14) Installing xz-libs (5.4.5-r0)32(12/14) Installing libxml2 (2.11.6-r0)33(13/14) Installing bind-libs (9.18.19-r1)34(14/14) Installing bind-tools (9.18.19-r1)35Executing busybox-1.36.1-r15.trigger36OK: 15 MiB in 29 packages37+ dig @resolver1.opendns.com myip.opendns.com38
39; <<>> DiG 9.18.19 <<>> @resolver1.opendns.com myip.opendns.com40; (1 server found)41;; global options: +cmd42;; Got answer:43;; ->>HEADER<<- opcode: QUERY, status: NOERROR, id: 5234744;; flags: qr rd ra; QUERY: 1, ANSWER: 1, AUTHORITY: 0, ADDITIONAL: 145
46;; OPT PSEUDOSECTION:47; EDNS: version: 0, flags:; udp: 409648;; QUESTION SECTION:49;myip.opendns.com.              IN      A50
51;; ANSWER SECTION:52myip.opendns.com.       0       IN      A       x.x.x.x53
54;; Query time: 28 msec55;; SERVER: 208.67.222.222#53(resolver1.opendns.com) (UDP)56;; WHEN: Fri Dec 29 01:31:47 UTC 202357;; MSG SIZE  rcvd: 6158
59PUSH60DONE61-------------------------------------------------------------------------------------------------------------------------------------------62ID: f25e0644-3d37-4a8a-89ac-xxxxxxx63CREATE_TIME: 2023-12-29T01:30:57+00:0064DURATION: 9S65SOURCE: -66IMAGES: -67STATUS: SUCCESS
cloudbuild yaml 檔案範例
substitutions 部分請改為自己的環境變數,此範例為將特定 container image 部署到 GKE 中,可搭配 CloudBuild triggered by Pub/Sub 觸發部署 GKE
1---2steps:3  - name: gcr.io/cloud-builders/gcloud4    entrypoint: gcloud5    args: ["container", "clusters", "get-credentials", "$_CLUSTER_NAME", "--region", "$_REGION_NAME", "--project", "$_PROJECT_ID"]6
7  - name: gcr.io/cloud-builders/gcloud8    entrypoint: sh9    args: ["-c", "cat $_DEPLOY.template |sed -e 's%{{IMAGE}}%$_REGISTRY_NAME/$_PROJECT_ID/$_REGISTRY_REPO_NAME/$_REPO_NAME:$_TAG_NAME%g' > $_DEPLOY"]10
11  - name: gcr.io/cloud-builders/gcloud12    entrypoint: kubectl13    args: ["apply", "-f", "$_DEPLOY", "-n", "$_NAMESPACE_NAME"]14
15options:16  env:17  - 'KUBECONFIG=/workspace/kubeconfig'18  logging: CLOUD_LOGGING_ONLY19  pool:20    name: 'projects/$_PROJECT_ID/locations/$_REGION_NAME/workerPools/$_WORKER_POOL_NAME'21
22substitutions:23  _PROJECT_ID: YOUR_PROJECT_ID24  _REGISTRY_NAME: YOUR_REGISTRY_LOCATION25  _REGISTRY_REPO_NAME: YOUR_REGISTRY_REPO_NAME26  _REPO_NAME: "YOUR_REPO_NAME"27  _TAG_NAME: "latest"28  _DEPLOY: kube-hello-change.yaml # YOUR K8S YAML29  _CLUSTER_NAME: YOUR_GKE_CLUSTER_NAME30  _REGION_NAME: asia-east131  _NAMESPACE_NAME: default32  _WORKER_POOL_NAME: YOUR_WORKER_POOL_NAME33
34timeout: 6000s
範例
1---2steps:3
4  - name: gcr.io/cloud-builders/gcloud5    entrypoint: gcloud6    args: ["container", "clusters", "get-credentials", "$_CLUSTER_NAME", "--region", "$_REGION_NAME", "--project", "$_PROJECT_ID"]7
8  - name: gcr.io/cloud-builders/gcloud9    entrypoint: sh10    args: ["-c", "cat deploy/$_DEPLOY.template |sed -e 's%{{IMAGE}}%$_REGISTRY_NAME/$_PROJECT_ID/$_REGISTRY_REPO_NAME/$_REPO_NAME:$_TAG_NAME%g' > $_DEPLOY"]11
12  - name: gcr.io/cloud-builders/gcloud13    entrypoint: kubectl14    args: ["apply", "-f", "$_DEPLOY", "-n", "$_NAMESPACE_NAME"]15
16options:17  logging: CLOUD_LOGGING_ONLY18  env:19  - 'KUBECONFIG=/workspace/kubeconfig'20  pool:21    name: 'projects/$_PROJECT_ID/locations/$_REGION_NAME/workerPools/$_WORKER_POOL_NAME'22substitutions:23  _PROJECT_ID: OOOOOOXXXXXXXX24  _REGISTRY_NAME: asia-east1-docker.pkg.dev25  _REGISTRY_REPO_NAME: docker-repo26  _REPO_NAME: "test-api"27  _TAG_NAME: "latest"28  _DIR_NAME: "./"29  _DEPLOY: kube-hello-change.yaml30  _CLUSTER_NAME: dev-cluster31  _REGION_NAME: asia-east132  _NAMESPACE_NAME: default33  _WORKER_POOL_NAME: test-build34
35timeout: 6000s1apiVersion: v12kind: Service3metadata:4 name: hello-test-service5 annotations:6 networking.gke.io/load-balancer-type: "Internal"7spec:8 type: LoadBalancer9 externalTrafficPolicy: Cluster10 selector:11 app: hello-test12 ports:13 - protocol: "TCP"14 port: 808015 targetPort: 999916
17---18apiVersion: apps/v119kind: Deployment20metadata:21 name: hello-test22spec:23 selector:24 matchLabels:25 app: hello-test26 replicas: 127 template:28 metadata:29 labels:30 app: hello-test31 spec:32 containers:33 - name: test-pod34 image: {{IMAGE}}35 imagePullPolicy: Always36 ports:37 - name: http-server38 containerPort: 999939 livenessProbe:40 httpGet:41 path: /actuator/health/liveness42 port: http-server43 initialDelaySeconds: 6044 periodSeconds: 545 resources:46 limits:47 cpu: 500m48 ephemeral-storage: 1Gi49 memory: 2Gi50 requests:51 cpu: 500m52 ephemeral-storage: 1Gi53 memory: 2Gi54 readinessProbe:55 httpGet:56 path: /actuator/health/readiness57 port: http-server58 initialDelaySeconds: 6059 periodSeconds: 5